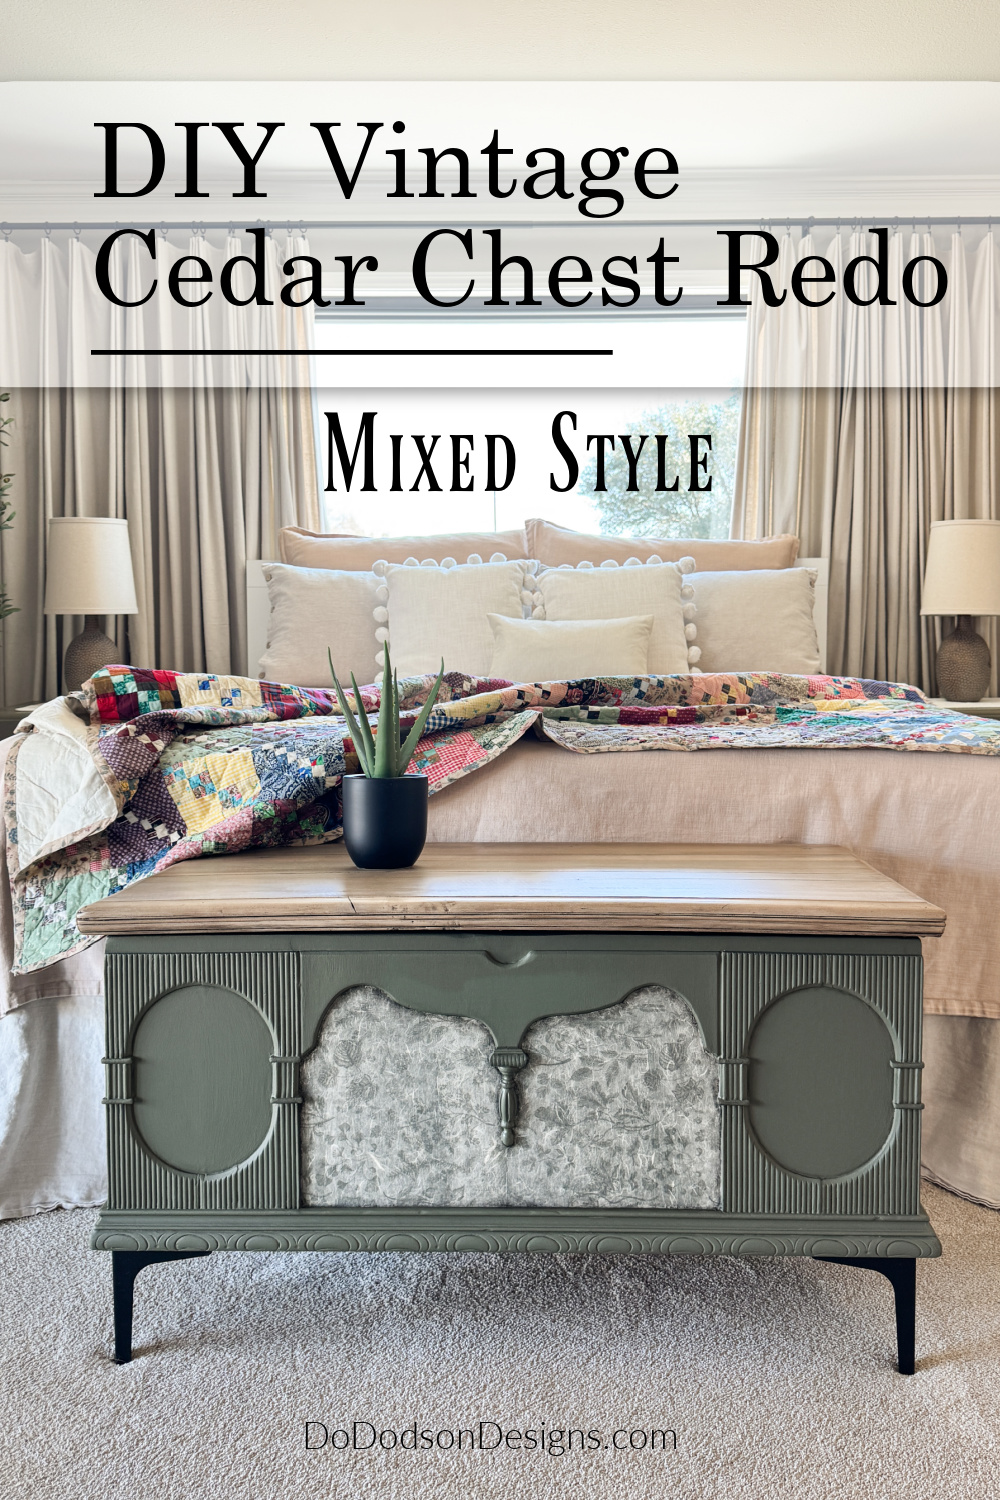
Cedar chests just have this special something, don’t they? Whether they’ve been hiding at the foot of a bed or chilling in storage for years, they’re full of history and often show a little wear and tear. Today, I’m sharing a Vintage Cedar Chest Redo that mixes old-timey charm with a fresh, modern vibe and a touch of farmhouse. My style is all over the place, and I’m here for it!
This makeover proves that you don’t have to erase the past to give a piece new life. You just need to highlight it differently.
- The article showcases a vintage cedar chest redo that blends old-time charm with a modern farmhouse style.
- It emphasizes that updating a piece doesn’t erase its history; rather, it enhances it.
- A list of supplies includes Dixie Belle paints and tools used for the makeover.
- The project features a warm green paint, a stained wood top, and vintage rice decoupage paper for added detail.
- The author encourages readers to embrace mixing styles and to consider revamping their own vintage furniture.
Thanks to Dixie Belle Paint Co. for sponsoring this post. While I was compensated to write this post, all opinions are my own.
* As an Amazon Associate, I earn from qualifying purchases and through other companies as well. You will not be charged extra when you purchase through these affiliate links, but any income I make helps me create more amazing DIY projects to share with you! To see my full disclaimer, click here!
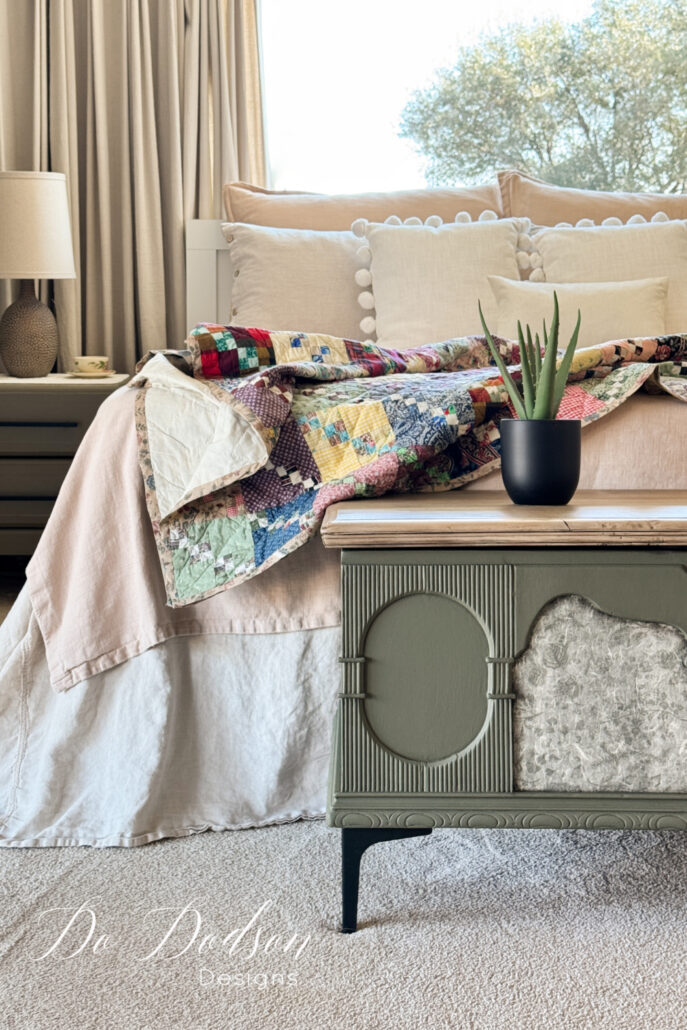
Vintage Cedar Chest Redo – Round Two!
Like many furniture painters, it’s not unusual to redo or update a piece we love.
The original cedar chest I purchased was in rough “BAD” shape, to say the least. Against my better judgment, I paid $40 for it and loaded it up. I cried 😢about it later. The first redo was nice, but, like many creatives, we embrace change.
I didn’t want to get rid of its vintage charm; I just wanted to make its vintage side pop while keeping it fresh and trendy. A little more modern.
CLICK HERE if you’d like to see the hot mess it was before and the finish I’m covering up with paint today! It was just a bit too cold for me. Maybe because of this Arctic blast we’re having right now. Anyhoo…

SUPPLY LIST:
- Catus Green SILK All-In-One Mineral Paint
- Synthetic Paint Brush
- Walnut No Pain Gel Stain (oil-based)
- Dainty Botanical A2 Rice Decoupage Paper
- Exacto Knife
- Clear Coat – Satin
- Black Best Dang Wax
One Color Paint Finish
So, this vintage cedar chest redo starts with a warm, green paint job. Green is such a classic, fresh color. The side tables beside our bed are painted green, too, but a darker shade. CLICK HERE to see the ah-mazing makeover I did on them. They belonged to my hubby (80s style) before we married, and he insisted we keep them. They are the inspiration for this cedar chest redo.
Using the SILK All-In-One Mineral Paint in the color Cactus (rich green), I painted over the original finish of the vintage cedar chest. This paint is perfect for those quick one-color paint jobs. And yes, you can paint over an existing finish as long as you know what was used previously and do proper prep/cleaning, and scuff-sanding.
Since I painted this chest with SILK a couple of years back, I knew it’d be cool to just paint over it.
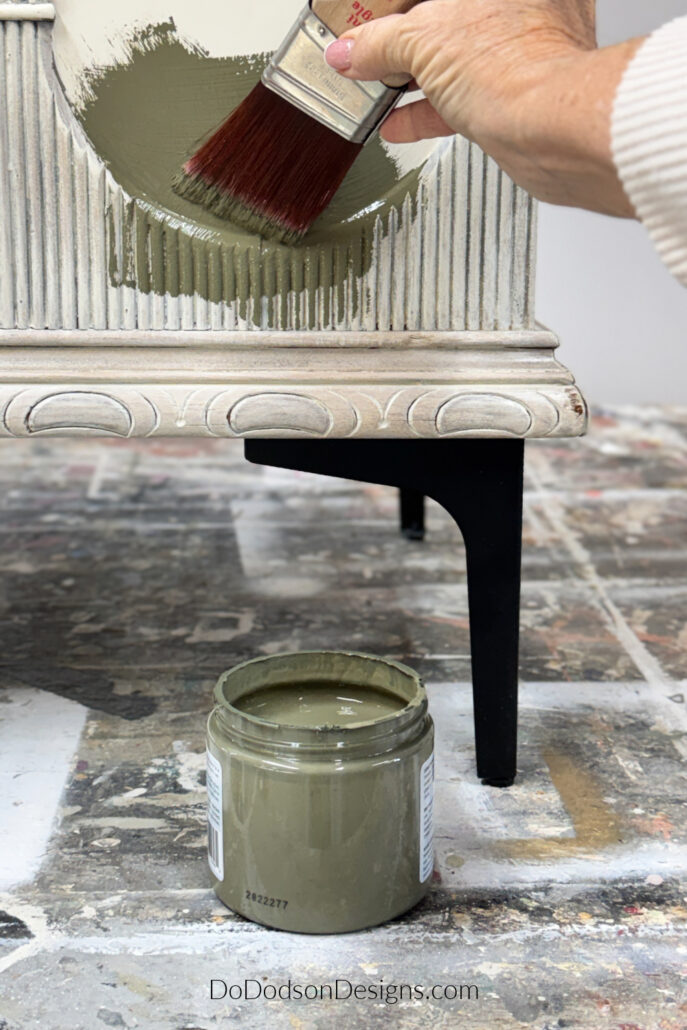
SILK Mineral paint has a built-in self-leveling feature and covers with just two coats. It has a built-in primer and topcoat, making it a good paint for beginners. It’s seriously one of my favorite paints in the Dixie Belle Paint line.
And this color Cactus is to die for! 💚
The green instantly gives this chest depth and warmth, making it the perfect base color for this DIY project.

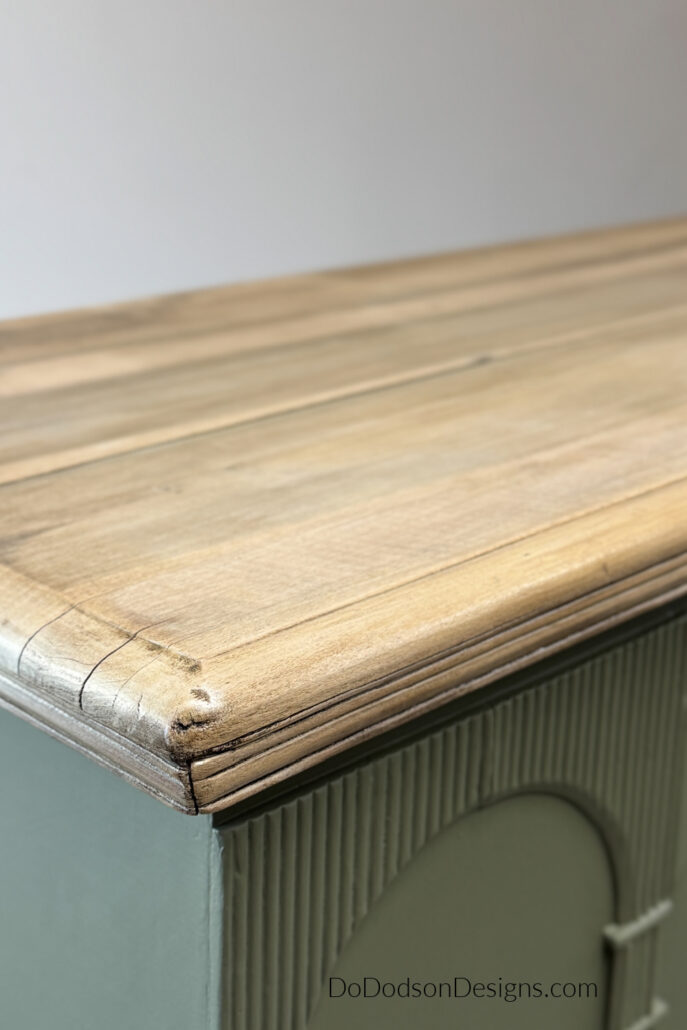
Light Wood Top: Letting the Wood Shine
Okay, the wood top on this cedar chest is awesome, so I didn’t want to paint it! Those cracks and imperfections actually give it a super vintage, timeless look, you know?
I went with a dark walnut gel stain, knowing it wouldn’t penetrate the wood because it already had a finish from the first go-round, but now I want to warm it up just a bit.
Did you know you can stain over an existing stained finish with No Pain Gel Stain? Sure can! As long as the finish is in good shape, just wipe it on.
With a soft cotton cloth, I applied a light coat of the walnut gel stain to the wood, then wiped away any excess with a clean, soft cloth.
It gave the cedar chest top a slightly darker look while also warming up the wood. I love how it made the grain in the wood stand out.

The contrast between the painted body and the warm wood top adds balance and keeps the chest from feeling too heavy or dark, I think.
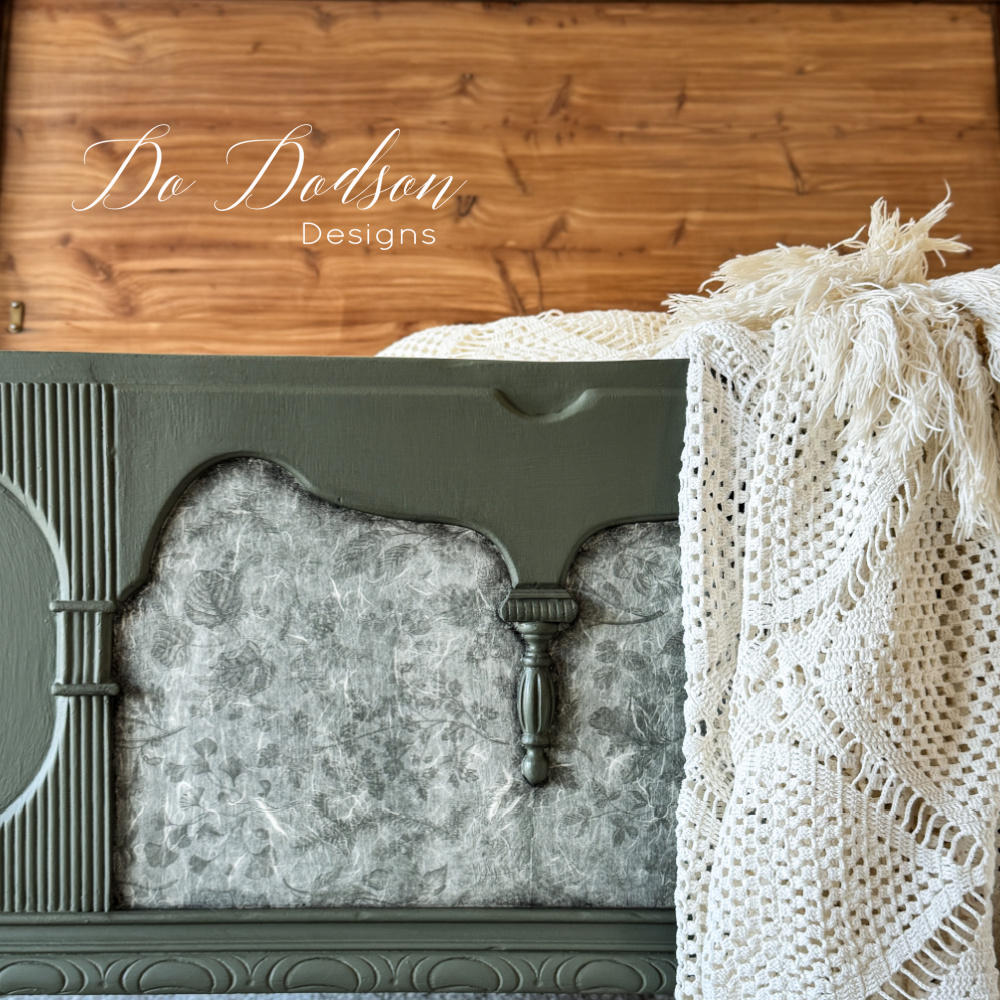
Vintage Rice Decoupage Paper
The front of the chest is where all the detail is! I used vintage-style decoupage paper to make it a real focal point that looks like it’s been around the block… like it’s traveled through time.
The pattern is so soft, it adds a nice pop without being too much. It’s subtle, elegant, and full of charm, making the chest feel super unique. This detail really brings together the vintage and modern vibes!

I applied the rice decoupage paper using Dixie Belle’s satin-finish topcoat as the decoupage adhesive. It acts like a glue when used in this fashion and is recommended with this paper.
But before applying, I laid the paper over the area I was applying it to and traced a line with my fingernails. This area has many curves and sharp edges. I used the scissors to cut the curved and straight areas first. I also used an exacto knife in some hard-to-get-to areas.

Carefully apply a good coat of topcoat to the area where the paper will go.
If you want to use an exacto knife, you must cut it immediately after the paper is placed on top of the glue. Slide the paper into place and cut. This can get tricky because the paper is porous, the glue can weaken it, and cutting it could cause it to tear. But if it tears, depending on the pattern, you can always glue it back together. This applies only to placing the paper on irregular surfaces, such as the front of this cedar chest.
Now, if you’re applying the paper to your project and it has straight lines, cut the paper first and then apply it to your project. I didn’t have much choice here.
After the paper is in place, apply another layer of the topcoat (glue) over the paper. Because the paper is very thin and porous, you will get bubbles and wrinkles, and that’s just the nature of the beast. I used my fingertips to gently work them from the center of the design to the edges.

Like decoupage projects? Check out my friend Denise at Salvaged Inspirations. She’s a pro at putting paper on furniture!
After the paper is completely dry, you can add details to the edges to soften them if you choose.
Furniture wax is great for adding shading to those inset areas, hiding any imperfections, and adding depth. Just dab it on with a small wax brush, blending it around the edges (darker in the corners) and into the paper so it fades away like a shadow. Best Dang Wax comes in several colors, so you can totally pick one that matches your project!

For more cedar chest inspiration, check out the links below from past projects. I think you’ll enjoy these too!
Old Soul, Mixed Style
This vintage cedar chest redo is the perfect example of mixing eras:
- Vintage charm from the original piece and decoupage paper
- Modern style from clean lines, black legs, and a fresh color palette
- Warm character from the natural wood top
While the inside of the cedar chest no longer has its sweet cedar aroma, it still looks beautiful.
My grandmother’s crocheted or knitted ( I don’t know, but I LOVE it) bedspread is among many cherished handmade quilts and other items stored inside. 🤍
It’s a totally usable, pretty piece that can sit at the end of a bed, in the living room, or even in the entryway, and it still looks vintage! I like it here… for now.
What is my style, you ask? It’s whatever I like. I truly love them all, and the new trend of mixing styles is nothing new to me. I call it being authentic to myself. Our home is full of thrift store, estate sale, and garage sale finds!

If you’ve got an old cedar chest hanging around and not in use, consider this your cue! A little paint, some cool detailing, and a fresh look can make it your own. 💚
I just want to crawl back into my bed now, under Grandma’s quilt, and read a good book.

Updating my furniture more than once may seem a bit fickle to some, but to me, it’s about using what I have and making it new again. I embrace the change.
If you liked this project, drop your thoughts in the comments! I’d love to hear them. And don’t forget to PIN and share it with your DIY buddies. I always appreciate creative friends sharing inspiration with me. Spread that DIY love, baby!
Until the next project… xo, Do
Awesome restyle, Do! 😍 It’s absolutely gorgeous, and thanks for the reminder on the Cactus green paint color. I haven’t used that color in a few years – I forgot how lovely it is! And your grandmother crocheted that blanket? Ohmygoodness, it’s stunning! Thanks for the shout-out. 😘 Pinned XOXO
Hey friend! Isn’t it a dreamy shade of green? I feel in love with it. Now I’m looking for something else to paint with it. 🤭 I hope you have a wonderful week with a lot sunshine. I know it’s been cold there because it’s cold here. 🥶 Brutal. xo
I think it’s very lovely – the color and the design go beautifully together!
Hi Marion,
Always good to hear from you. Thank you and thanks for reading. Have a good week. 😊
I love the top and woodwork colour. Normally I love decoupage too and here it is fine but somehow doesn’t marry completely. It would be interesting to see several different ideas for the central panel – I wonder what else you could create.
Hi Audrey! I’m with you on the marriage. Nothing is permanent, so I’ll sit with it a bit and see what moves me. I’m thinking a wood base to match the wood top. 🤷🏼♀️ I’ll let you know. Have a great week and thanks for your support.
Very nice and love the color!
Hi Nancy! God to hear from you. It’s a pretty shade of green and one I’ll be using again. Enjoy your week. 😊
Oh I love this. You know my fave color is green! I used cactus a lot on pieces. Love the refresh of this chest.
Thanks! The first redo was okay for a time but I knew I wanted more green in our bedroom and this was a simple way to add it without a commitment on the walls. 💚 Cactus is a beautiful shade of green. 😘
You never cease to amaze me Do… really… your creations are so unique and hi end looking! Your color choices are spot on! This piece is simply gorgeous in every way! A statement piece for any room. It also gives so many ideas to people that have a similar item which is always a bonus!!! Thank you for sharing!
Thank you, Andrea.
These types of makeovers are my favorite because it forces me to use whatever piece I have and make it blend with my style. I think it works but creativity is up to interpretation. I appreciate your taking the time to read my post on this unusual cedar chest redo. Have a beautiful week, friend. xo 😘