
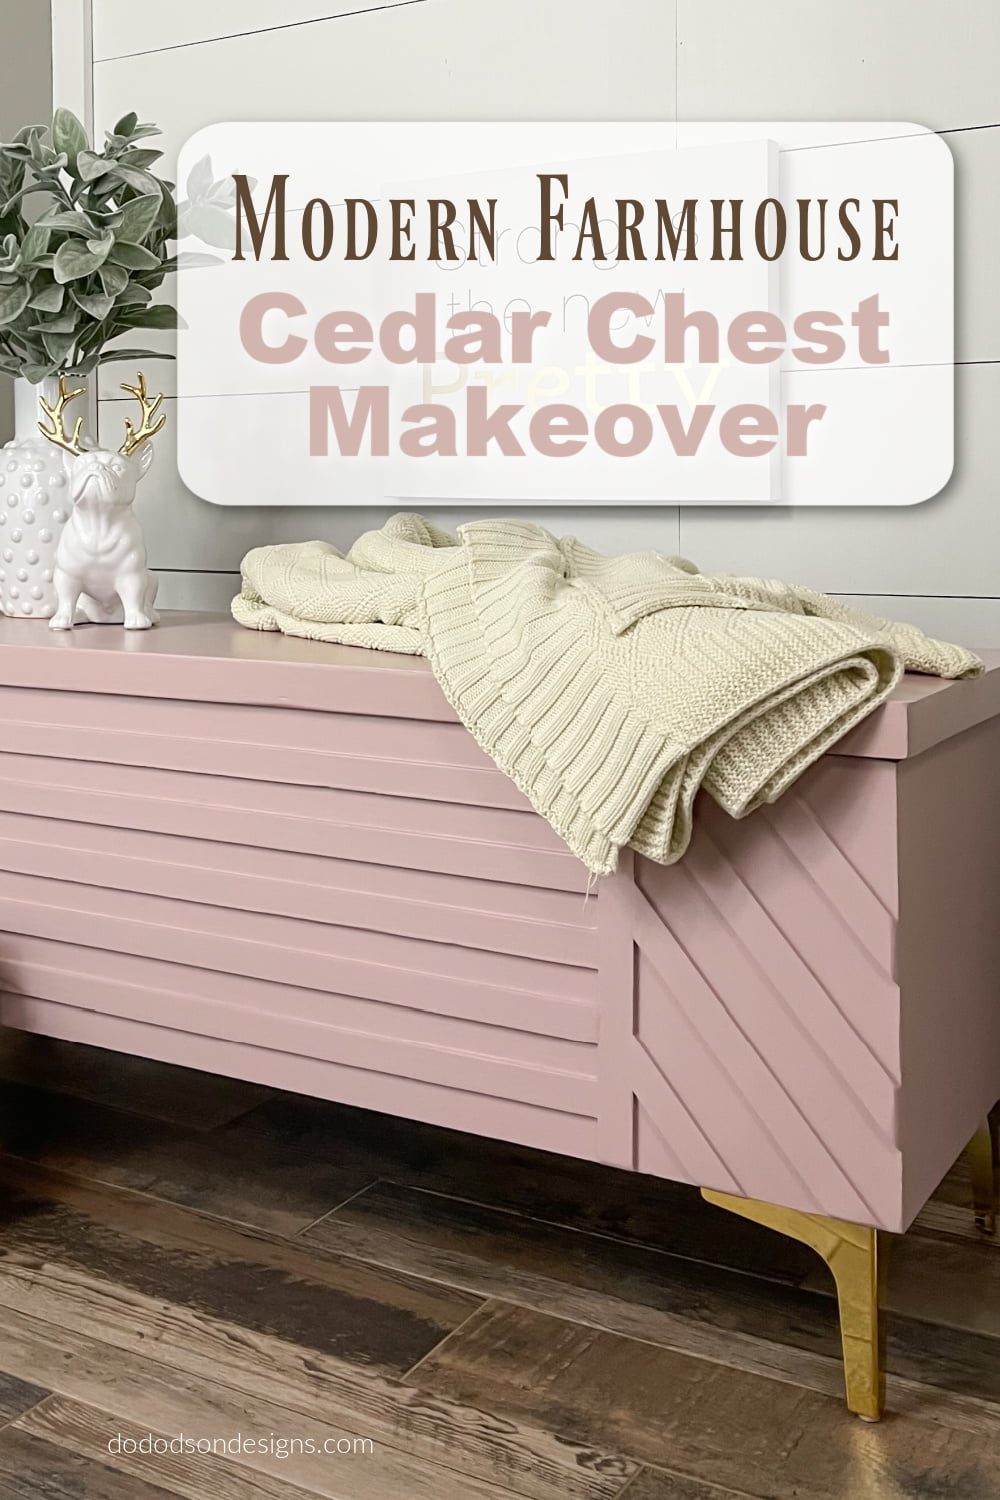
Hey creative friend! If the price is right, you know I’m gonna grab it no matter the condition! I knew this DIY cedar chest makeover would be a challenge, but it turns out it was easier than I expected. Let’s get creative and DO this!
* As an Amazon Associate, I earn from qualifying purchases and through other companies as well. You are not charged extra to use any of the links, but any income I make helps me create more amazing DIY projects to share with you! To see my full disclaimer, click here!
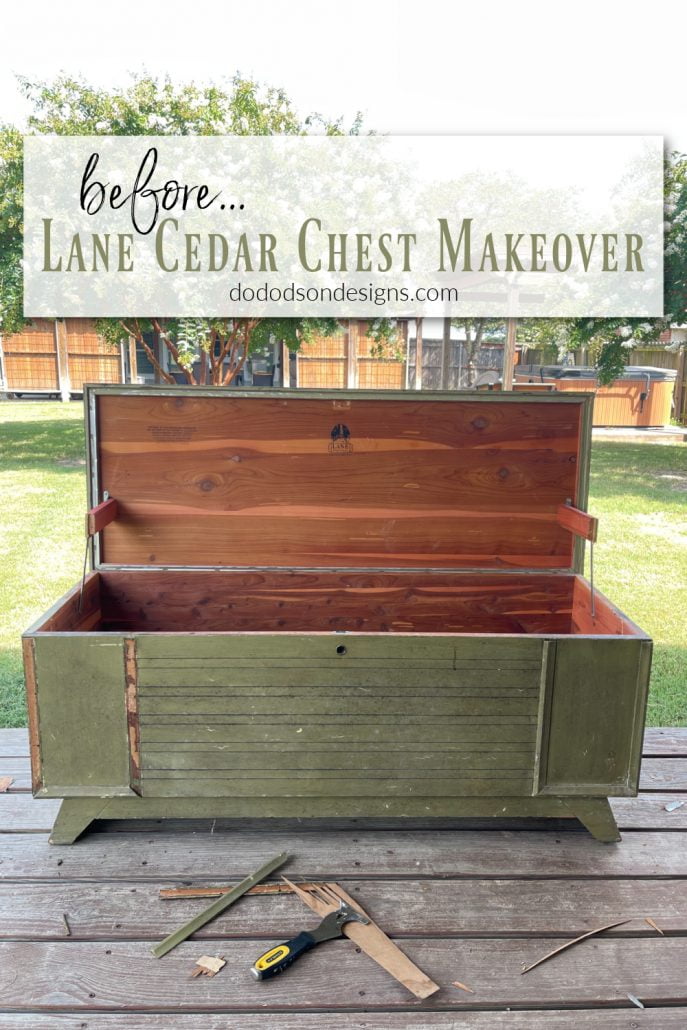
Before – Lane Cedar Chest Makeover
It was a hot mess but no different from any other piece that finds its way into the back of my Jeep. I have a thing for old and neglected furniture (if you don’t know by now ), and this one fits the bill… that’s for sure. And did I mention it was a Lane Cedar Chest? If you come across these, they are worth the investment. I paid $40 for this one.
It had been painted prior… some time ago, from what I could gather. Old trim and some of the veneer were in bad shape, too, and I wasn’t crazy about the whole leg situation.
So, with a hammer, paint scraper, and a little elbow grease, I managed to strip this vintage cedar chest down and was left with an empty cedar box. That’s a blank canvas for me to be creative.

SUPPLY LIST:
- an old cedar chest
- Surfprep Sanding System (Use my discount CODE DOIT10 to save10% when purchasing)
- wood trim 1×1/8 inch pine strips
- wood glue
- shellac (to seal the wood trim from bleeding wood tannins)
- Silk All-In-One Paint CONCH (a gorgeous pale pink)
- Extra Coat
- paintbrush
- gold furniture legs (these are 6 inch)
Adding A Creative DIY Modern Design
Aright! Here we go! Here’s how I updated the old chest.
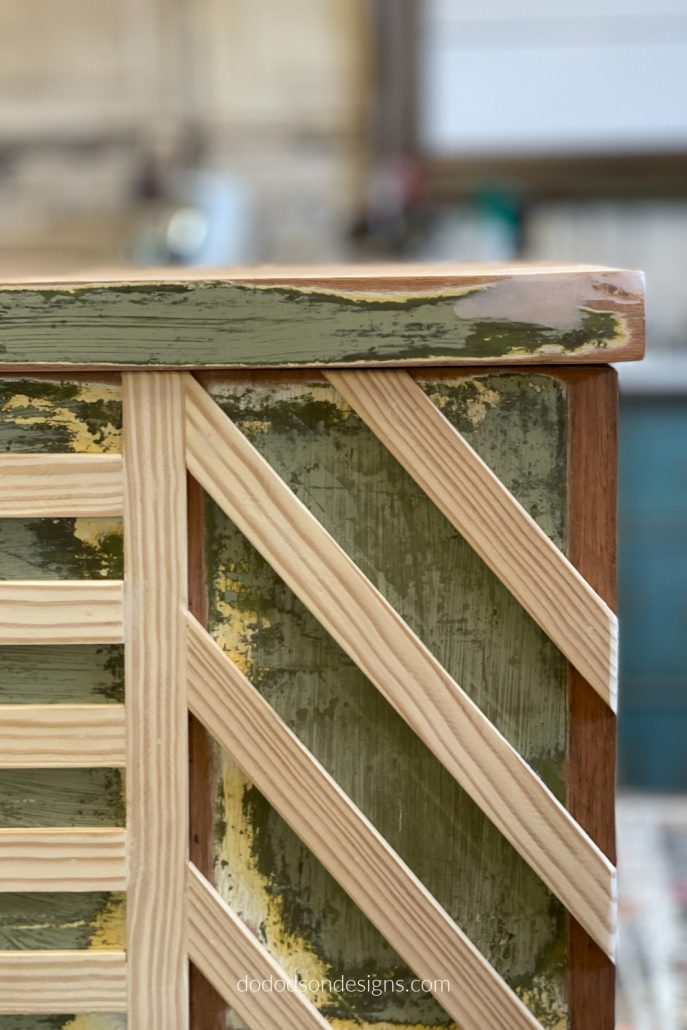
I used 1 1/8 inch wood trim to create a modern design all across the front of the cedar chest. I followed the lines that were already across the front.
Cutting each piece to fit the pattern I had in my head. No, I don’t sit down and draw these designs out ahead of time. I’m not that smart or organized. I go with the flow. I’m sorry if you’re disappointed. LOL
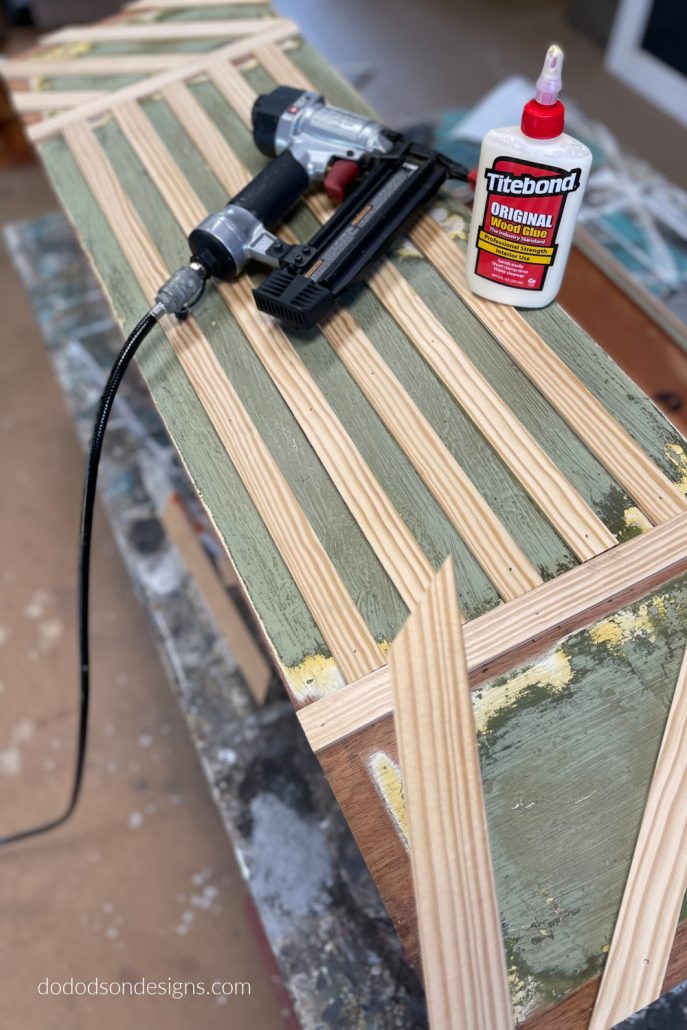
Each piece was attached with wood glue and secured with a pin nailer.
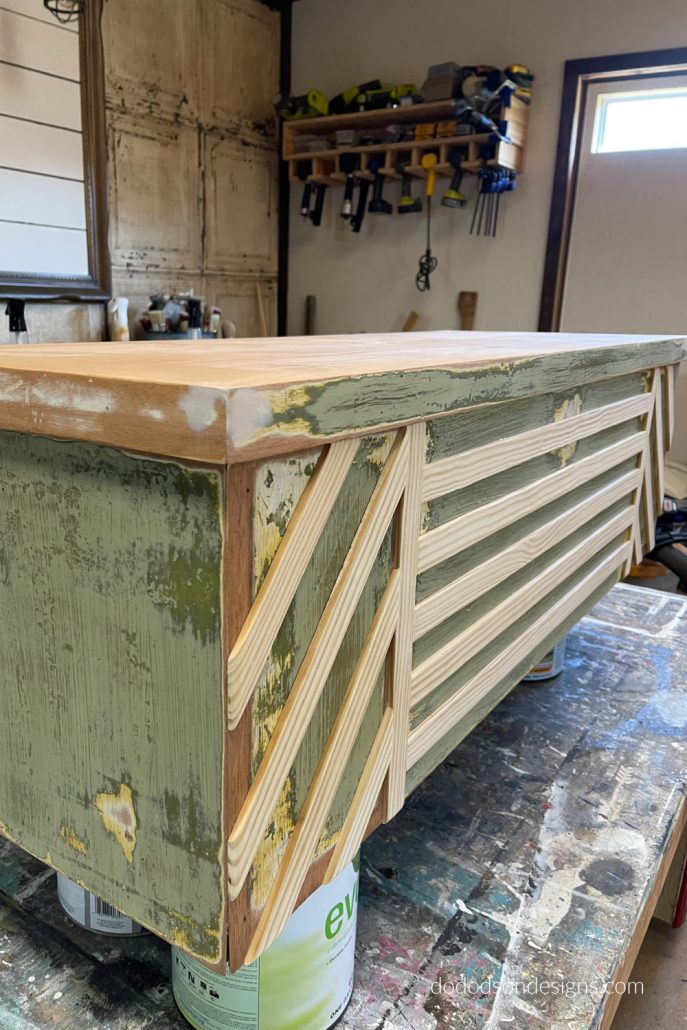
I seriously had no plan, and after I had completed the look I wanted, I noticed the sharp wood edges of the trim. Hindsight is always 20/20, and I should have cut the ends at an angle before attaching them.
To get around that issue, I used my Surfprep 3X4 Electric Ray Sander to round the edges to where they flowed seamlessly with the cedar chest.
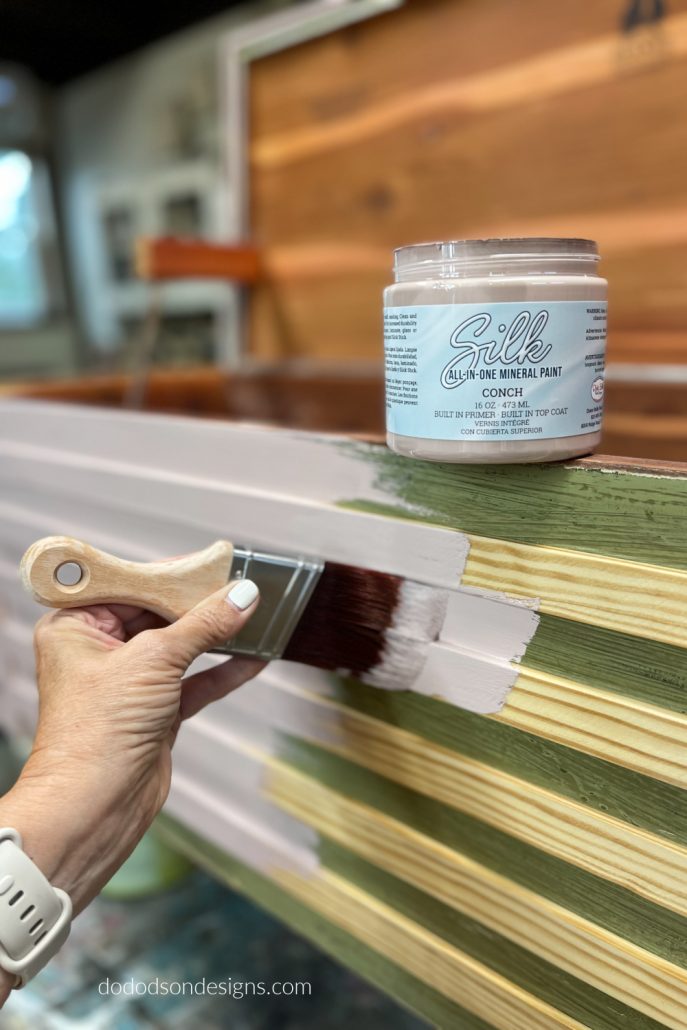
Sealing The New Wood Trim – Blocking Wood Tannins
Before the next step… painting, of course, I used a stain blocker to prevent the wood tannins from bleeding through my paint. DO NOT miss this step because it will bleed through. Use 2 coats of Shellac to seal the trim before painting.
Cedar Chest Makeover With Paint
Finally, my favorite part! I choose a lovely shade of pink CONCH from the Silk All-In-One Mineral Paint line by Dixie Belle Paint Company for the paint.
After Silk All-In-One Mineral Paint On The Cedar Chest Makeover
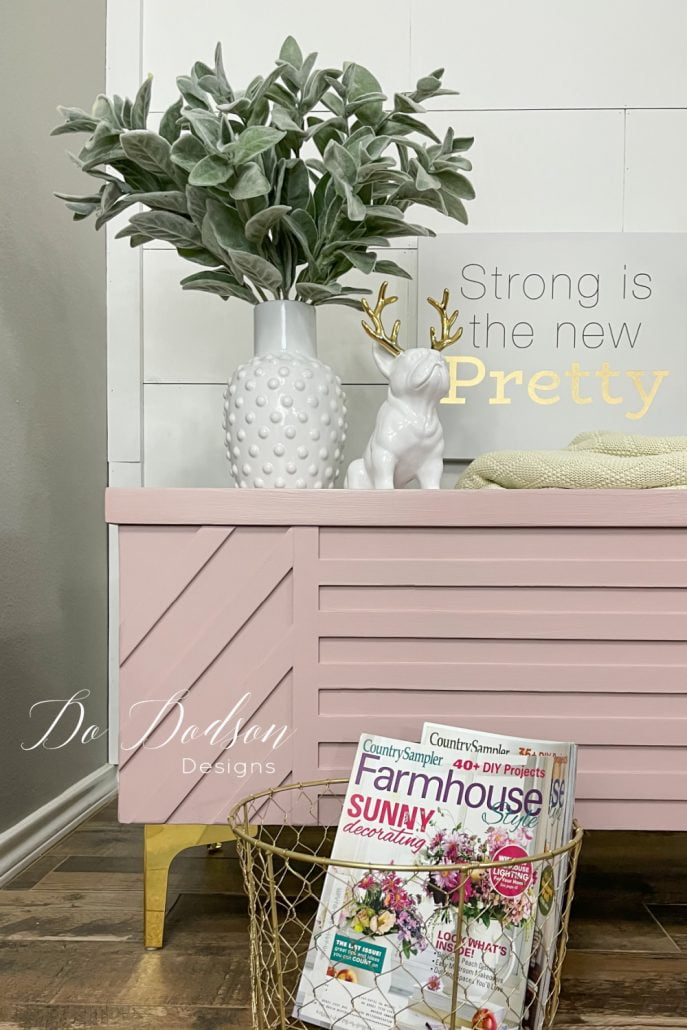
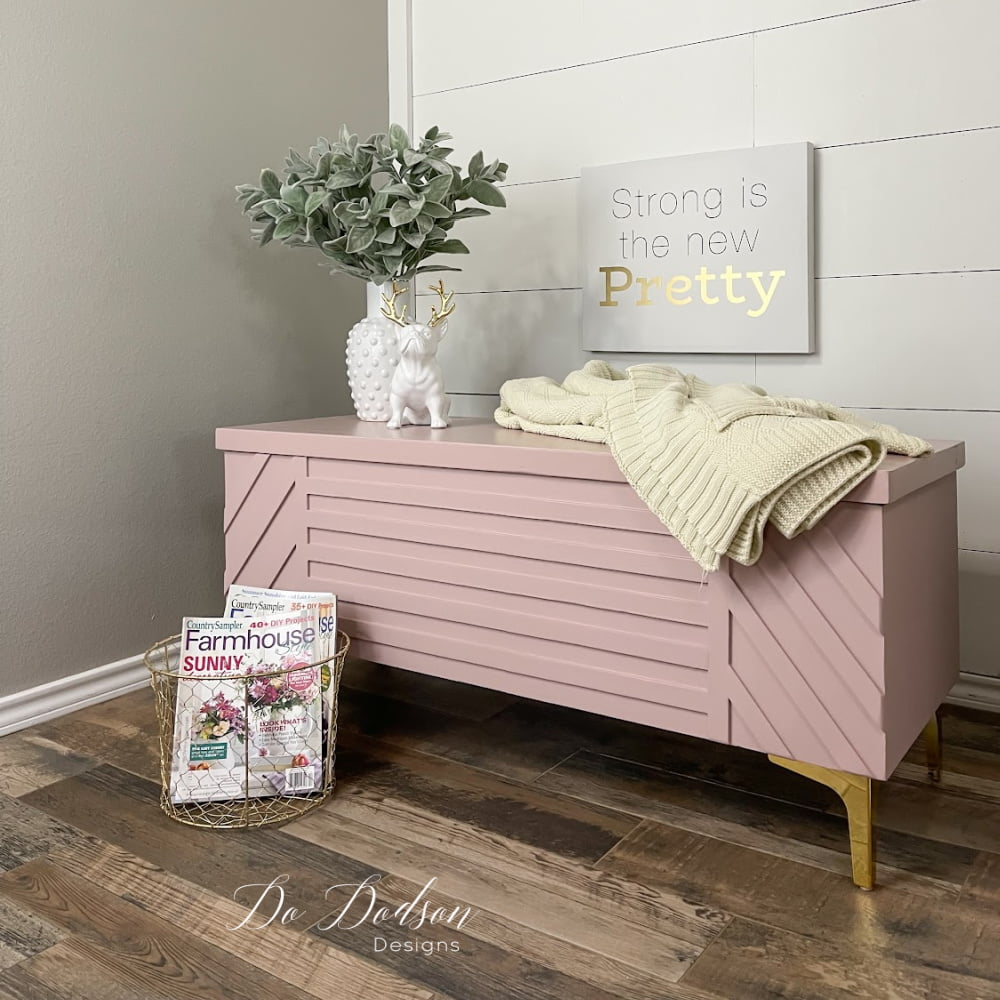
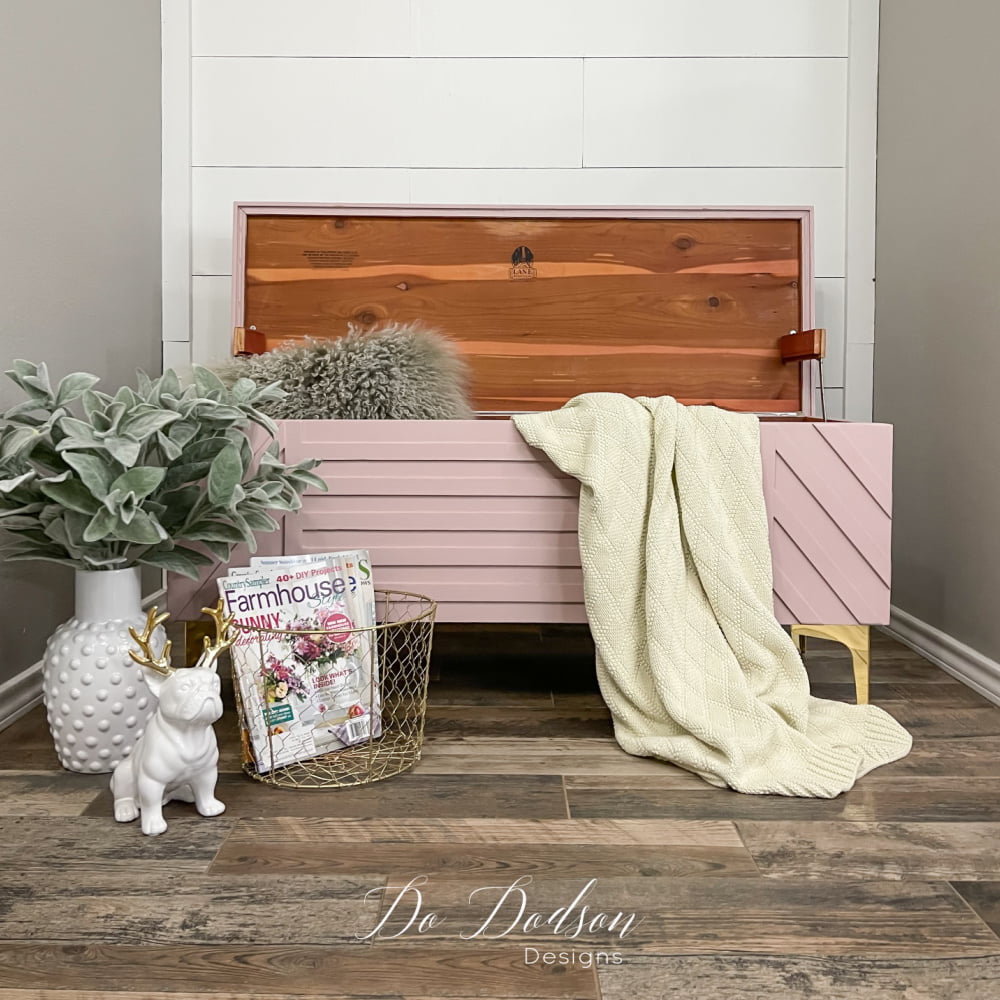
How about this before and after cedar chest makeover!? I bet you’re telling yourself I shouldn’t have passed up that janky old piece last week. Am I right?
I’ve learned to go with my intuition over the years, and it usually doesn’t fail me.
Well, now you have some ideas on how to repurpose them into modern showpieces. Are you up for a challenge? I can see this design on the front of a dresser too.
Let me know what you think of this idea? Is this something you can incorporate with your furniture makeovers? I’d love to hear from you. Comment below or just let me know you were here. Oh, and don’t forget to pin and share. You’re the best! 😘
Until the next project… xo, Do

This. Is. Awesome. I love this, Do! Those edges look great rounded. They really gave this a perfect look. Bravo! I need to try this.
🙂 It was so fun, Wendy! You totally need to try this. xo
Well I’m loving this one, for sure! Thanks, Do
Thank you, Sharon! Have a beautiful weekend. 🙂
Absolutely beautiful and I have two cedar chests that I bought really cheap when I rented a storage unit. Great idea for the bigger one ! I’ve been really enjoying all of your posts in my email box. Q: can I use Dixie Belle Boss over my paint and the top it with another layer of paint? I didn’t use a primer :/ and I have bleed thru 🙁 TIA 😊
Hi Dawn! Thank you for joining me. I’m so glad you are enjoying my posts. You absolutely can use Boss over that stain and repaint. You can also use Shellac that comes in a spray can. It’s great for those small spots that bleed through.
O my Goodness!! It is so amazing what you come up with! I love this ‘new’ piece!
Thank you, Toia! I’m so glad you enjoyed this. It was amusing to see the transformation. I can’t wait to try this on a boring dresser. 🙂 xo
Once again you’ve managed to amaze me! You have such a wonderful gift for turning your projects from blah to SPECTACULAR! The detailing you added to the front of the chest has my mind running through my furniture pieces in hopes of finding a piece I can do this to. The pink color you chose is perfection!!
Hi Catherine! Thank you so much for joining me. My mind is running away too. Look out boring furniture! We are coming for you! LOL 🙂
Love the way you added the slats to modernize this great chest! Love your transformations! Jayne
Thank you, Jane! I’m so glad you could join me. I’m thrilled with the new look. Now I’m searching for a dresser to try this on. Wish me luck! 🙂 xo
Wow! What a transformation. The chest is beautiful. I always look forward to your make-overs.
Thank you so much, Joanne! I appreciate you. 🙂 xo
Love it, just beautiful! The new legs made a huge difference too! 💖
Thank you, Kimberely! I think so too. I think I’m a bit obsessed with adding new legs to my projects now. 🙂
I like your idea of the furring strips along the front, especially sanding them down to meet the edges. I could just see them reaching out and grabbing clothing as I walk past it.
I recently refinished an old dresser that I bought in 2020. It also had veneer damage in several spots, where it had broken away or was just pulled up but still hanging on. I used that to my advantage and continued to de-stress it. I pulled off the loose pieces and gave the edges a bit of sanding. After using two coats of DixieBelle chalk paint (Vintage Duck Egg), I went over the entire piece and sanding along all the edges to antique it. It looks beautiful in our Farmhouse-style living room!
Hi Diane!
Furring strips… I had no idea. Thank you! As for your dresser, I can clearly picture the beauty. Sometimes the imperfections are what really make a piece. It tells the story. 🙂 xo
Oh my goodness, this is such a gorgeous transformation. I love the modern update to this piece.
Thank you, Tammy! It really needed something. 🙂 xo
Love it!! I have a Lane cedar chest that I received about 35 years ago that I would love to have redone. Maybe we can talk about how to redo it ☺️
Hi Bobbie, I’m always open for a chat. 🙂 xo
Great Transformation!
Thanks, Paula! I’m so glad you joined me here. 🙂 xo
I’m swooning over this makeover Do! Absolutely gorgeous from the wood detailing to the legs to the color…everything is simply stunning! XOXO
Thanks, Denise! I’m pretty smitten with it. 🙂
I love this soooo much! Great job!
Thank you, Leslie! I think I might need to keep this one. 🙂
Beautiful I’m in love with the pink conch color !! I gave an old lane hope chest a facelift last yr. I use it to store my quilts. Of course I did a costal nautical theme & using it in Fl.
Thank you. I agree, Bev! It is a beautiful shade of pink—:) It’s so good to hear from you. Blessings
You are so creative. This cedar trunk looks so beautiful. The details makes this trunk just stand out as a piece of art.
Awe, thank you. I try to make my pieces unique. I appreciate you, Tammy. 🙂 xo
Wondering why you took off the original base? It was also linear. The legs you chose needed to be able to support the load, correct?
Hi Robin,
I removed it because I wanted to add the gold legs for a more modern look. You are correct in that the bottom was modified to attach the legs. These legs are very sturdy and can hold up the weight. The full video tutorial is in my private subscription library. You can learn more about it here. https://members.dododsondesigns.com/join-the-art-of-painting-furniture-subscription-group/
This is SO beautiful!! We have almost the same one sitting in our basement collecting dust. (it was from an old bedroom set of my moms that had been seperated thoughout the years.) The inside is immaculate, but the outside is shabby and painted and not very pretty. I believe the bottom of mine might have a seperate drawer though (not home to double check!), so replacing the legs might not be possible for us, but I know the front panel is exactly the same. We have recently dicussed redoing it so we can get some use out of it, and I came across your post. This is truly an amazing makeover. Can’t wait to show my husband.
Hi Lisa!
It’s so good to hear from you. I love salvaging these old chests and having your Moms chest makes it all the more special. Wishing you all the best with the makeover. Send me a pic if you can. I’d love to see it. 🙂
Yessssssss, one of my all-time faves! Everything about this chest makeover is pure perfection! Pinned… again, lol. Happy Valentine’s Day my friend. XOXO
Thank you, Denise! It’s one of my faves too. Happy Valentine’s Day! ❤️ xo