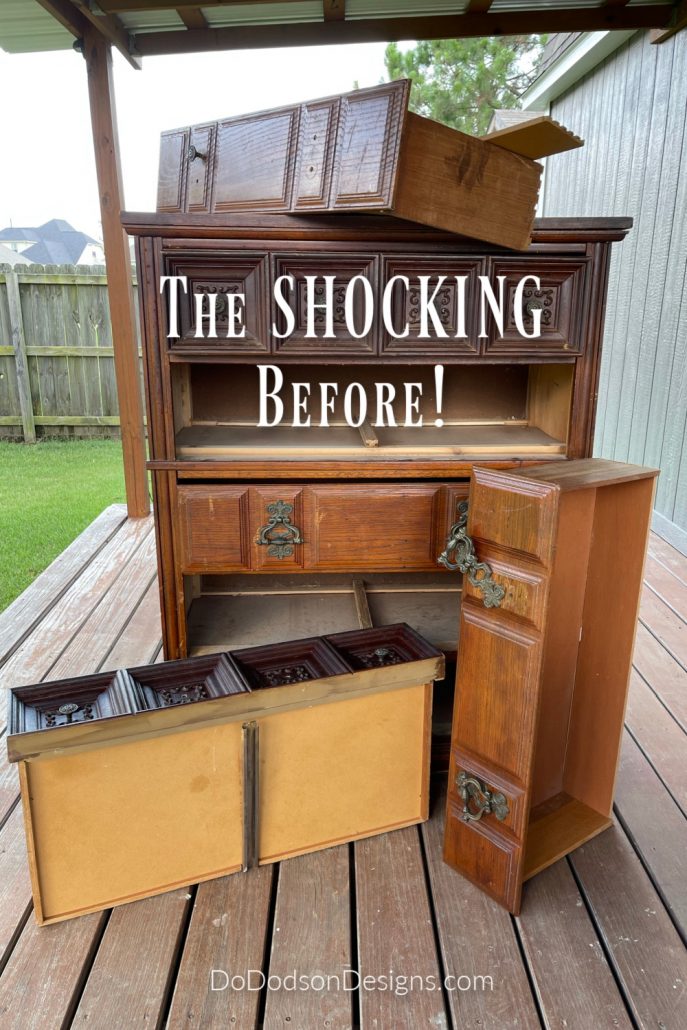
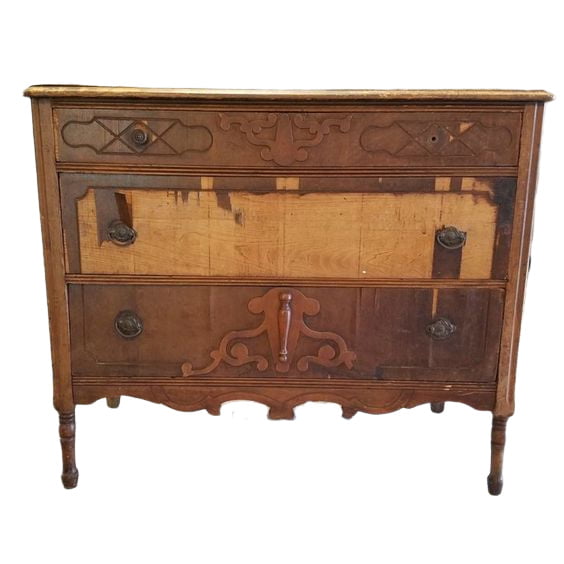
I always say you get what you get, and you don’t pitch a fit. Well, I had to eat those words the day I drove 45 minutes to get this JANKY dresser after purchasing it on Facebook Market Place. I was looking for a dresser redo project, but this was more like a roadside kill. DOA
* As an Amazon Associate, I earn from qualifying purchases and through other companies as well. You are not charged extra to use any of the links, but any income I make helps me create more amazing DIY projects to share with you! To see my full disclaimer, click here!
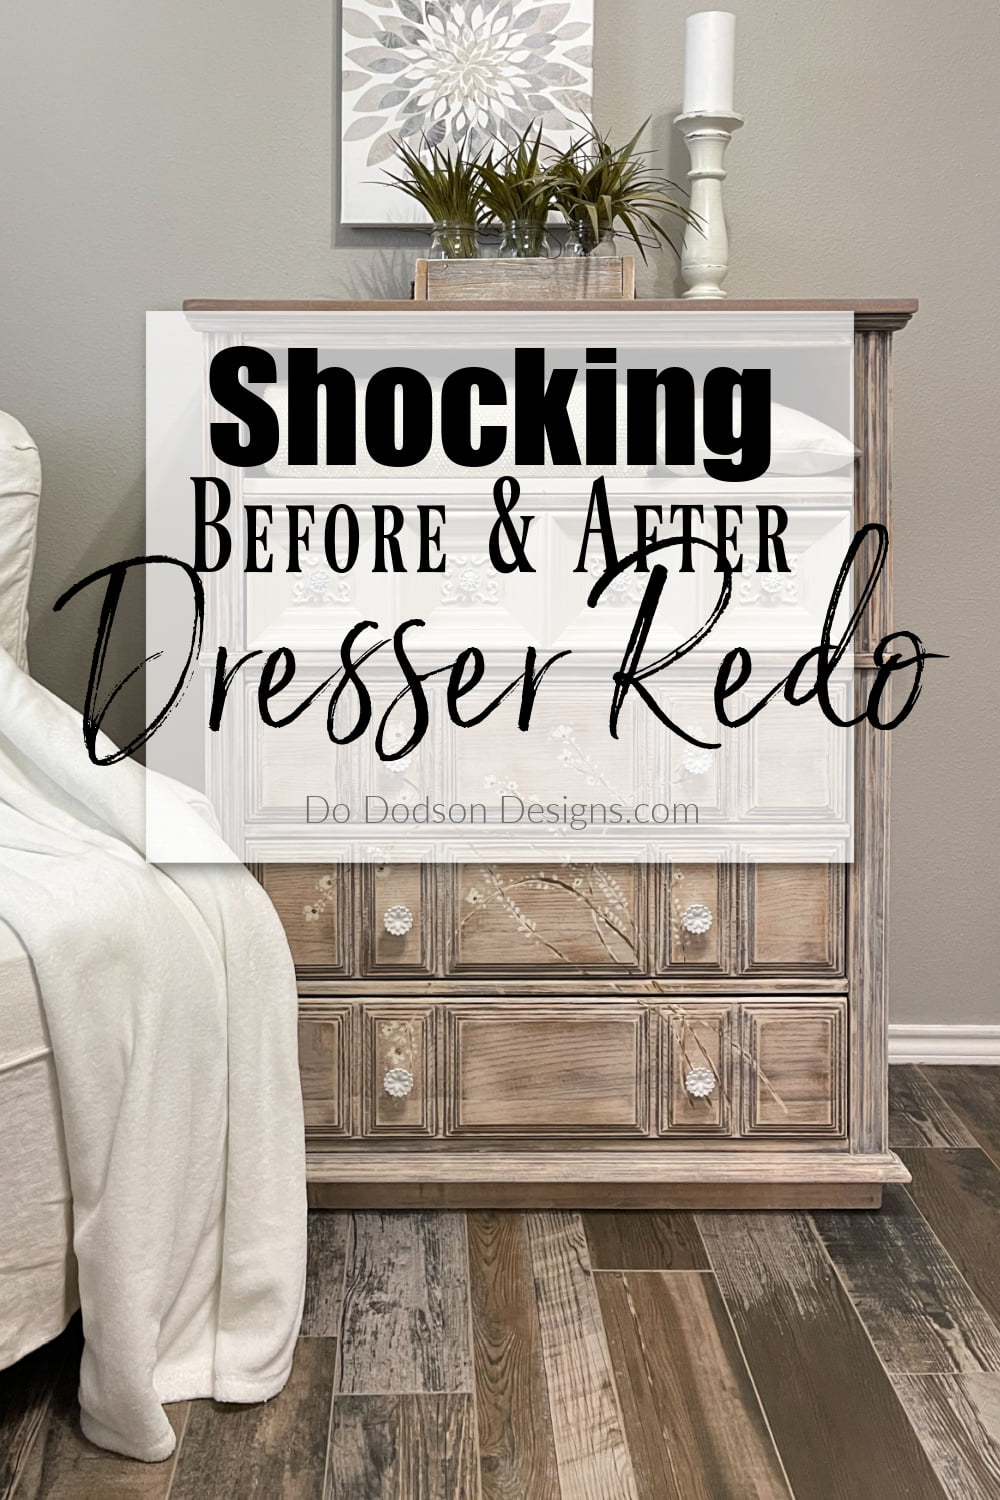
The SHOCKING Before & After Of The Dresser Redo
There were too many things wrong with this whole deal, but I could tell the woman that sold it to me needed the money, so I did the right thing and loaded it up with full intentions of trashing it when I got home. I was shocked at how someone could think it was okay to sell something in this bad condition. I’m not even telling you how much I paid.
Instead, I hauled it to my studio (because hubby wouldn’t allow it in his garage), and it sat outside for six months! And guess what? Six months didn’t help it one bit. LOL

SUPPLY LIST:
- White Lightning (powerful degreaser – removes dirt and grime from wood furniture before painting)
- SurfPrep Sanding System
- BOSS stain blocker
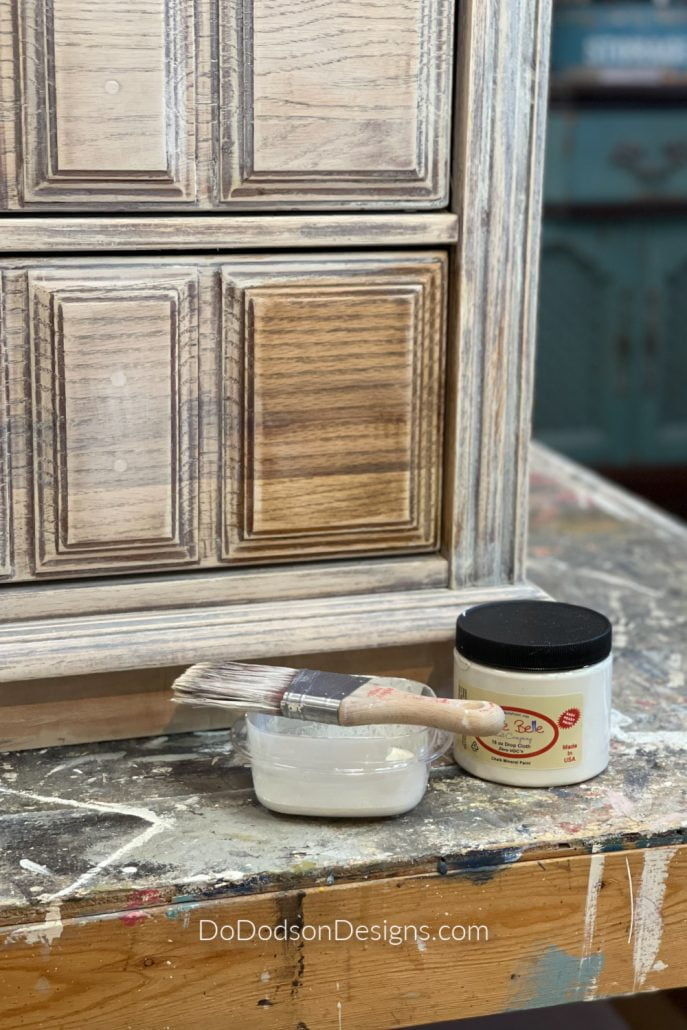
- Butter Cream chalk mineral paint
- Pine Cone chalk mineral paint
- Art Brush Set
- Mini Angle Brush
Repairs – Before The Dresser Redo
Here’s a list of the repairs that happened before I could even think about giving it a well-deserved dresser redo with chalk paint.
- repair all broken joints on the dresser drawers
- repair broken slides
- bondo repair (wood damage)
- remove all veneer on both sides (water damage)
- built a shelf for missing drawer
- rebuilt a new wood top (the old top was particle board and had water damage)
Oh, and did I mention? The dresser had mismatched drawers. That’s one of the reasons it sat for six months. Getting those drawers to slide well was quite the task.

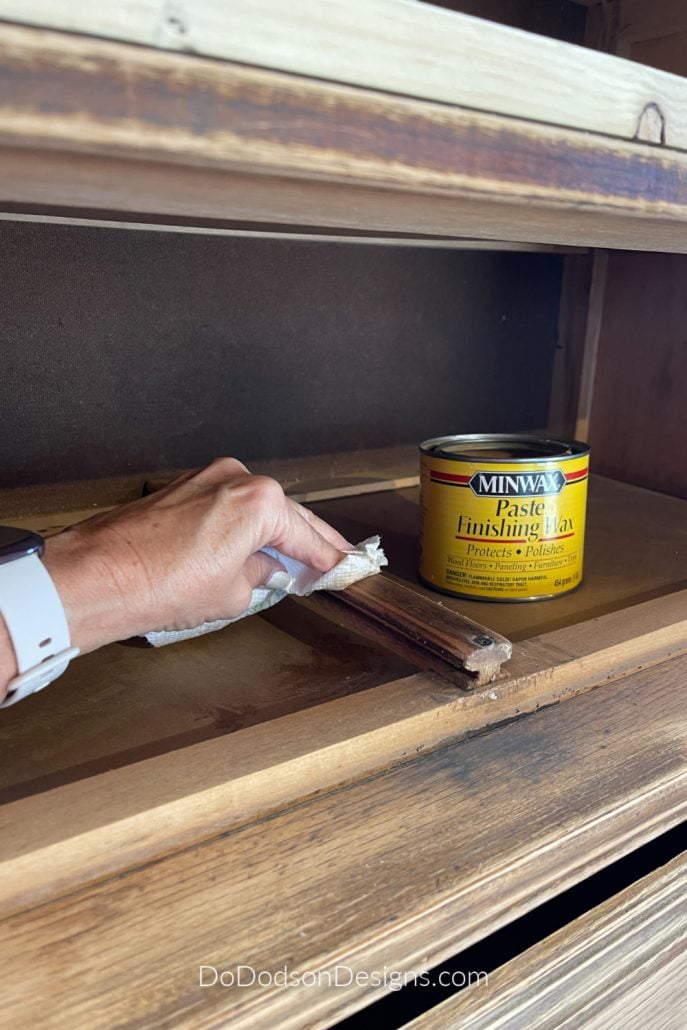
How To Make Wood Drawers Slide Easily
The drawers were the worst I’ve seen, and I had to dig deep to convince myself this was going to work.
The dresser redo would be a big fail without wood drawers that slide easily. And honestly, I didn’t think it would ever come to fruition.
After repairing the broken doors (all but one), I sanded all the wood drawer slides and then used paste wax to make them slide like butta. It hasn’t failed me yet. CLICK HERE to learn more about repairing sticky drawers.
Got an old wood dresser drawer that doesn’t slide well? Try this! Almost 99% of the time, this works!
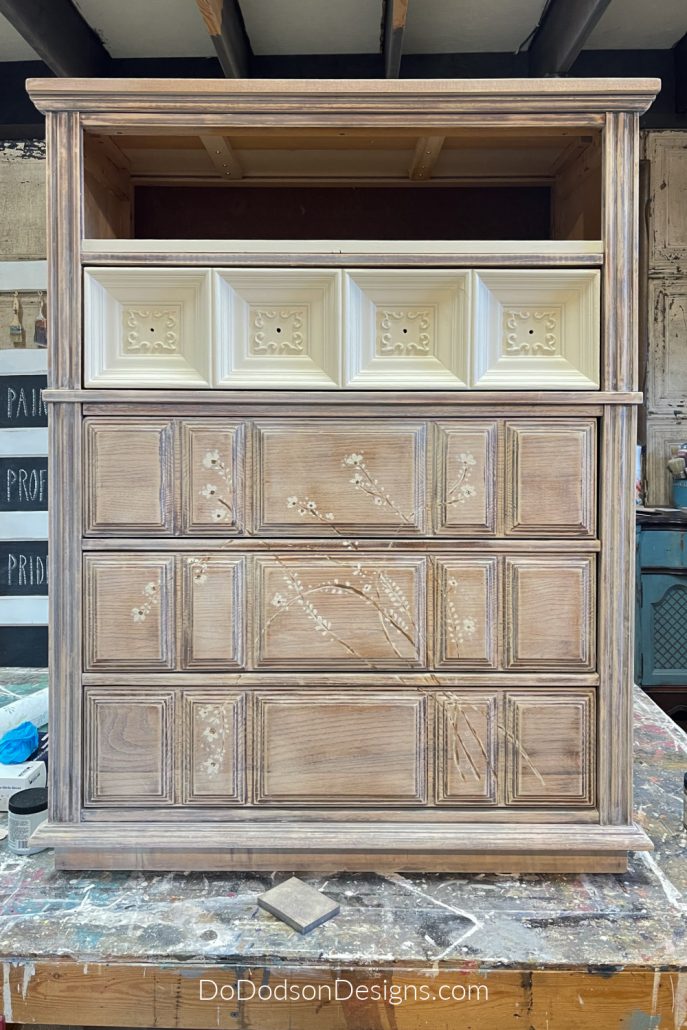
Mismatched Dresser Drawer Redo
All the drawers were solid wood except two, and one was beyond repair. It had a plastic facing over particleboard. Yikes! If this were going to work, I would have to paint it to match the other wood drawers. But I didn’t want to paint those beautiful wood drawers. Removing a finish is hard work, and after all that, I’m not about to cover it up with paint. Or will I?
I was still unsure of the dresser redo phase, but I had a plan.

Chosing The Paint For The Dresser Redo
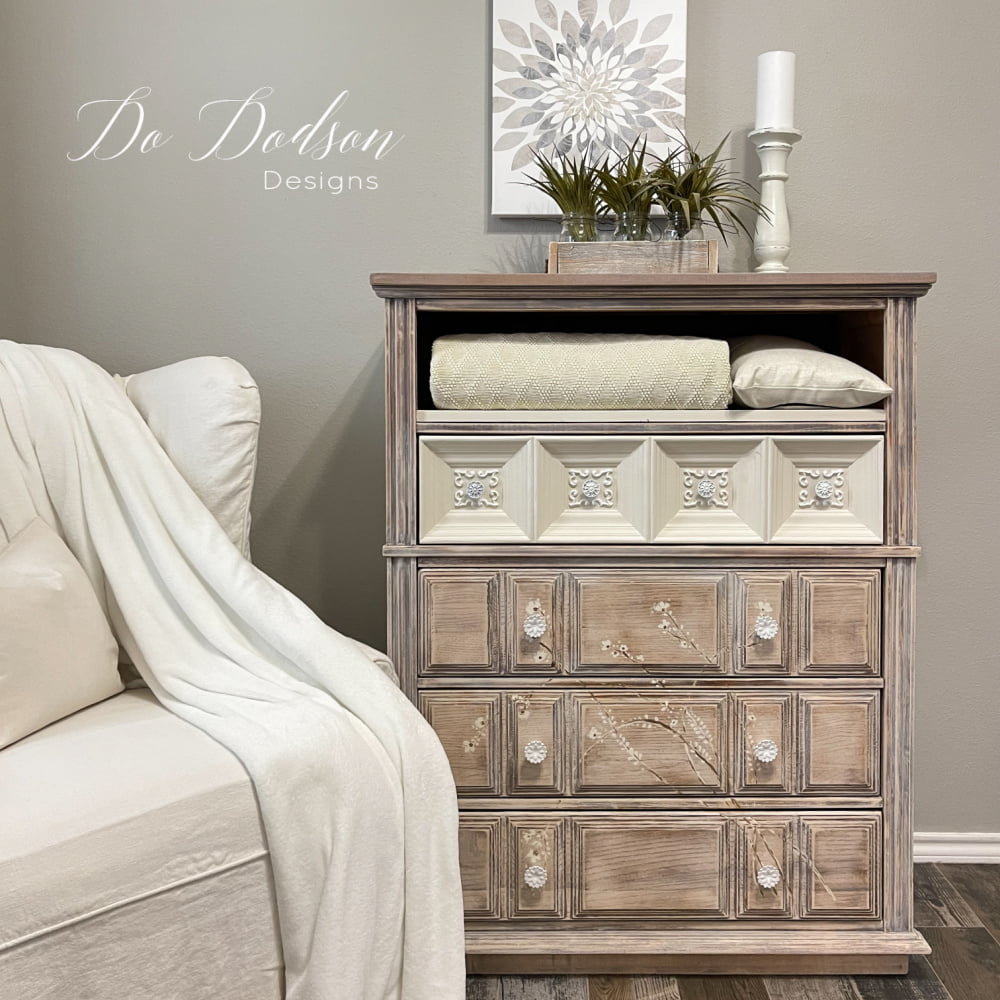
I decided to go with chalk mineral paint in the color Butter Cream. It’s a beautiful neutral shade and more straightforward than trying to figure out a color combo at this point. I needed easy. All my brain waves were used up on the repairs.

I used the same color to make a color wash (whitewash) that would hopefully tie in the mismatched dresser drawers.
Making a color wash is simple. The recipe is a 1:1 mixture of chalk mineral paint and water. It’s a watery paint that is transparent when applied over raw wood. Apply it with a good quality synthetic paintbrush and wipe it back with a soft cloth.
It was the perfect background for what happened next. It’s called doodling. Do is doodling on furniture. LOL
Doodle Art – Dresser Redo
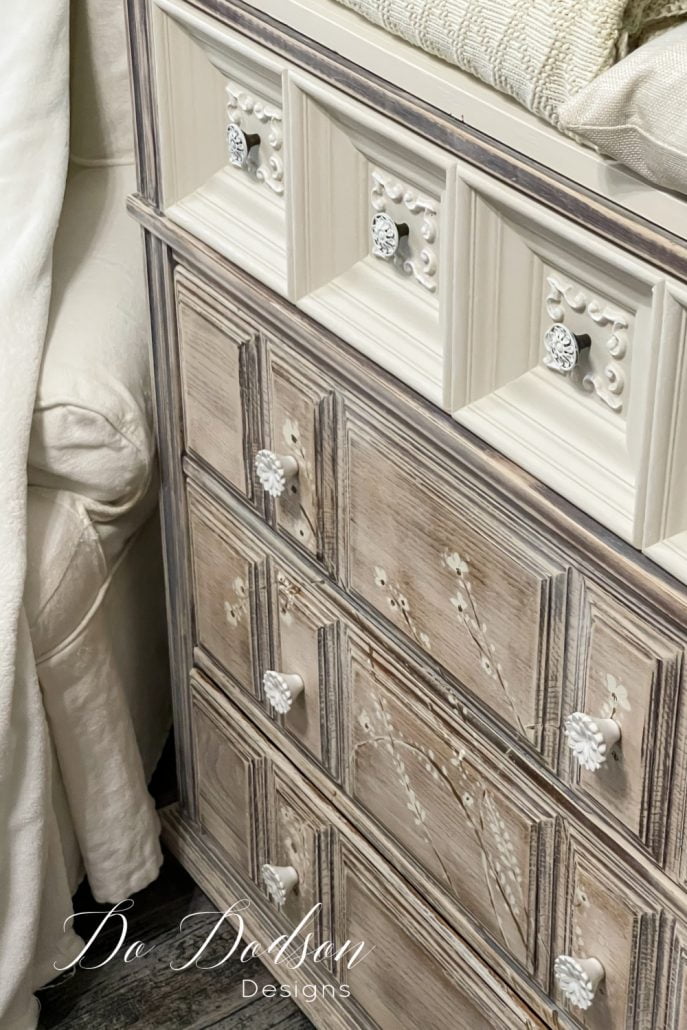
I came up with a plan based on the hardware pulls. The original pulls had a floral design, so I followed where that led me.
Then I thought about hand-painting a design instead of transfers or decoupage paper. It would be quick and easy. I could doodle a flowing trail of flowers across the dresser with a simple design. So, that’s what I did.
The complete video tutorial is available in The Art Of Painting Furniture Library. To learn more about doodling on furniture. CLICK HERE to learn how to join me.
The SHOCKING after – Dresser Redo

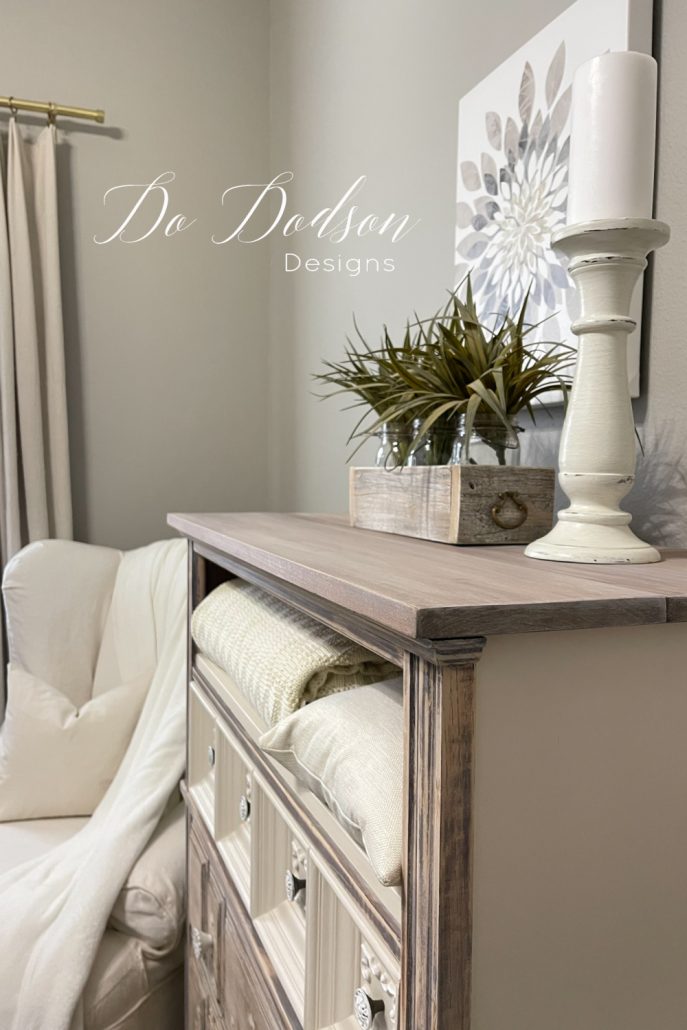

I’m still shocked at this dresser redo! This one goes down in the Do Dodson Designs book of I didn’t believe it was possible. LOL, even Mr. Honey Do was surprised when I called him to the studio to help me carry it inside for staging and photos.
That’s when I knew I needed to tell this before and after story. Here’s to new beginnings!
Happy New Year, everyone!
Until the next project… xo, Do
Stunning!!!
Thanks, Michele! Happy New Year! 🙂 xo
I miss painting SO much since going back to a “real job”… I love seeing your posts. They make me want to go buy junk and make it beautiful! Thank you dear!
I remember those days of coming home from my full-time job before starting my business and painting until midnight. It was tough, but it fulfilled my need to create and made me happy. Find the time to create. You won’t regret it. Happy New Year! 🙂 xo
Wow. Gorgeous, Do! I love your vision.
Thanks, Wendy! It turned okay after all. 🙂 xo
You did a wonderful job with the the janky dresser. It doesn’t eve look like the same mess that you originally bought. Thank you for the inspiration that furniture can be made beautiful again.
Thank you! It can be done if you have the tenacity and perseverance it takes. A labor of love, that’s for sure. Happy New Year! 🙂 xo
Truly a work of art! ❤️
Thank you, Judy! Happy New Year! 🙂 xo
Oh my goodness, Do! You made this dresser so stunning! I absolutely love how it turned out. The colors are beautiful. The wash and the butter cream perfect choices along with all of the details to embellishments in the hardware and flowers. I love it!
Thanks, Tammy,
This one was a great challenge. I always learn a lot when I push myself on these pieces. Thanks for joining me here on the blog. 🙂 xo
WOW. That before is truly shocking. I don’t think I would have tackled this one, but you pulled it off beautifully! Congrats and Happy New Year!
Thank you, Sandy.
It was my New Years Day miracle. LOL Happy New Year to you as well. 🙂 xo
Did I see a glimpse of the side? Are the sides painted solid buttercream to go with the top drawer? Is the inside of the top space (where the pillows are) also painted solid buttercream? Really like the wispy, airy floral doodle. Just enough design without distraction.
Hi Robin!
Thank you so much for joining me. Yes, the sides are painted with Butter Cream as well as the shelf that I built. 🙂 xo
Stencil is a lovely addition!
Hi Terry,
It does look like a stencil, but it’s actually hand-painted. That’s a great compliment to me. Thank you! 🙂 xo
Do, this is absolutely BEAUTIFUL! The colors you chose are so pretty. May I ask if you hand painted or stenciled the flowers on the front? Just a really appealing piece of finished furniture!!! You are just so good at what you do, I hope you don’t stop sharing your pieces. The before and after is stunning!
Hi Marilyn!
Thank you so much for reading my blogs. The flower design was created with the paint colors Butter Cream and Pine Cone. I drew them on by hand and painted them. It’s actually very simple. I call it doodle art. The full tutorial is in my private membership, The Art Of Painting Furniture. Blessings to you and Happy New Year! 🙂 xo
This piece is absolutely STUNNING! What a great job you did!
Thank you so much, Donna! 🙂 xo
Just beautiful! My moto No Pain No Gain.
I totally agree! No pain, no gain! 🙂
Way to knock this outta the park my friend!!! It’s just stunning! You are such a smart cookie!
Awe, thanks, Tammy! It was a big relief to get to that point. I had my doubts. 🙂 xo
Omgoodness, girl you are a furniture miracle maker!! Love how you used different techniques to mesh the mismatched drawers! Perfection! Pinning 🙂
Thank you, Cindy! It was one of my greatest challenges to date. I’m sure there will be others. 🙂 xo
I love this and am a little confused. Where is the color pine cone? And is the solid color drawer buttercream and the rest whitewashed in drop cloth? You did an amazing job.
Hi Peggy,
Yes, the drawer is Butter Cream, and the wash was made with it for the wood. The pine cone was used in the floral (stems) design painting. I didn’t show that process because I have a video tutorial in The Ar Of Painting Furniture ( my membership) that teaches how I did that. It’s called doodle art, and it’s super fun to create. I’m so glad you liked this.
Do – this is a beauty! 💕 this one reminds me of the other favorite one you did… the refurbished one 🥰 you saved that one also!!
Hi there, Judy! LOL, they all kind of blend after a while. I appreciate you. 🙂 xo
All your hard work paid off on this one my friend. Absolutely gorgeous! Happy New Year! XOXO
Thank you, my friend. Hard work always wins in the end. Happy New Year! 🙂 xo
Well look at you changing the bad into beautiful. I can’t believe you left that odd drawer in place but it’s fabulous. The color, the wash, the doodling…love it all.
This redo reminds me of a line in the movie, Seabiscuit. “You don’t throw away a whole life just because it’s banged up a little.”
Well done!
Hi Joanne! That’s a great line! And that line reminds me of a quote by the famous designer Elsie De Wolfe. “I’m going to make everything around me beautiful, and that will be my life.” This one hangs in the entryway of our home. Nothing is impossible. Everything is DO-able. 🙂 xo
HI Donna!! What a great makeover!! You love buttercream. I have some hut I haven’t used it on a piece yet. Looks good with Putty. I dont know what you thinking when you bought it but what a great piece.
I wasn’t thinking clearly. LOL
Absolutely stunning. Looks like a high-end piece.
Hi Jo! Well, we both know it isn’t. Thank you so much for reading and for your kindness. Happy painting! 🙂 xo
I absolutely love your projects!!! So all you did was a whitewash with buttercream mineral paint for the front, minus the one drawer of course? Amazing. I do have a question. I stripped a dresser and have just left it raw for now, but am seriously considering copying this. Love the knobs, but the drawers on mine have pulls with 3 inch center holes. Just wondering how I could fill those and just have one hole for knobs. I am concerned that the holes would stand out. Not sure what to fill them with if I just leave the wood raw. Thank you so much for your inspiration. You make me want to go buy furniture just for projects!!!
Hi Lee! That’s a great question and great timing. I just completed another dresser makeover I’ll be sharing next week where I had the same issue. After filling the holes with wood filler it was still visible with the natural wood finish I was doing. So, I strategically added a stencil over the drawers to hide the holes but the wood is still visible. I can’t wait to show you. And I used a new product to seal the raw wood that I think you’ll love too. 🙂