
Hey, triple-D friends! In a world where cozy and charming Fall decor is highly looked upon, the one seasonal item that can instantly transform your front porch into Fall is a DIY wood pumpkin. These easy pumpkin creations can add rustic charm and be a budget-friendly way to impress yourself and your neighbors. So, get ready for a crafting adventure that will leave your front porch looking like it was plucked from a Pinterest board. I L O V E Pinterest!
Thanks to Dixie Belle Paint Co. for sponsoring this post. While I was compensated to write this post, all opinions are my own.

* As an Amazon Associate, I earn from qualifying purchases and through other companies as well. You will not be charged extra when you purchase through these affiliate links, but any income I make helps me create more amazing DIY projects to share with you! To see my full disclaimer, click here!
Easy DIY Wood Pumpkins
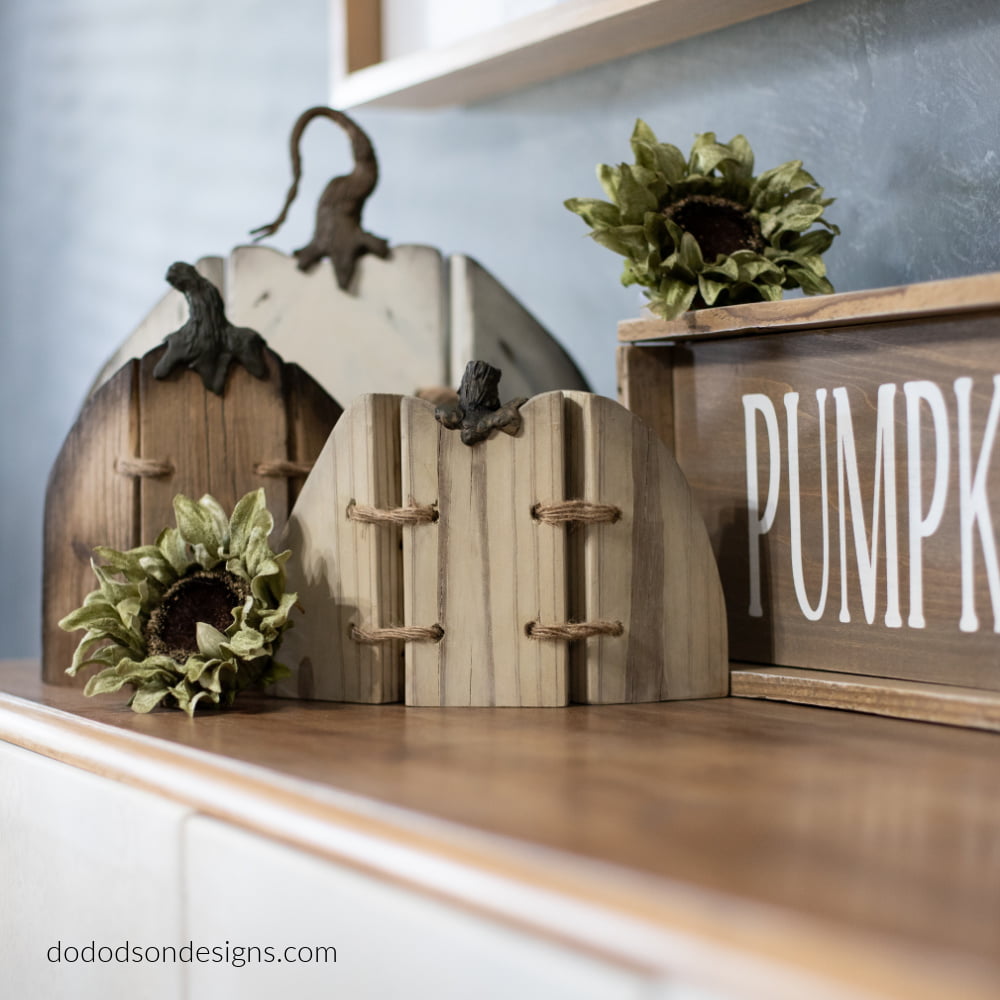
To say this is my favorite time of the year is definitely an understatement. Every year around this time, you’ll find me digging through my wood stash, hoping to create another unique Fall pumpkin creation for my front porch display.
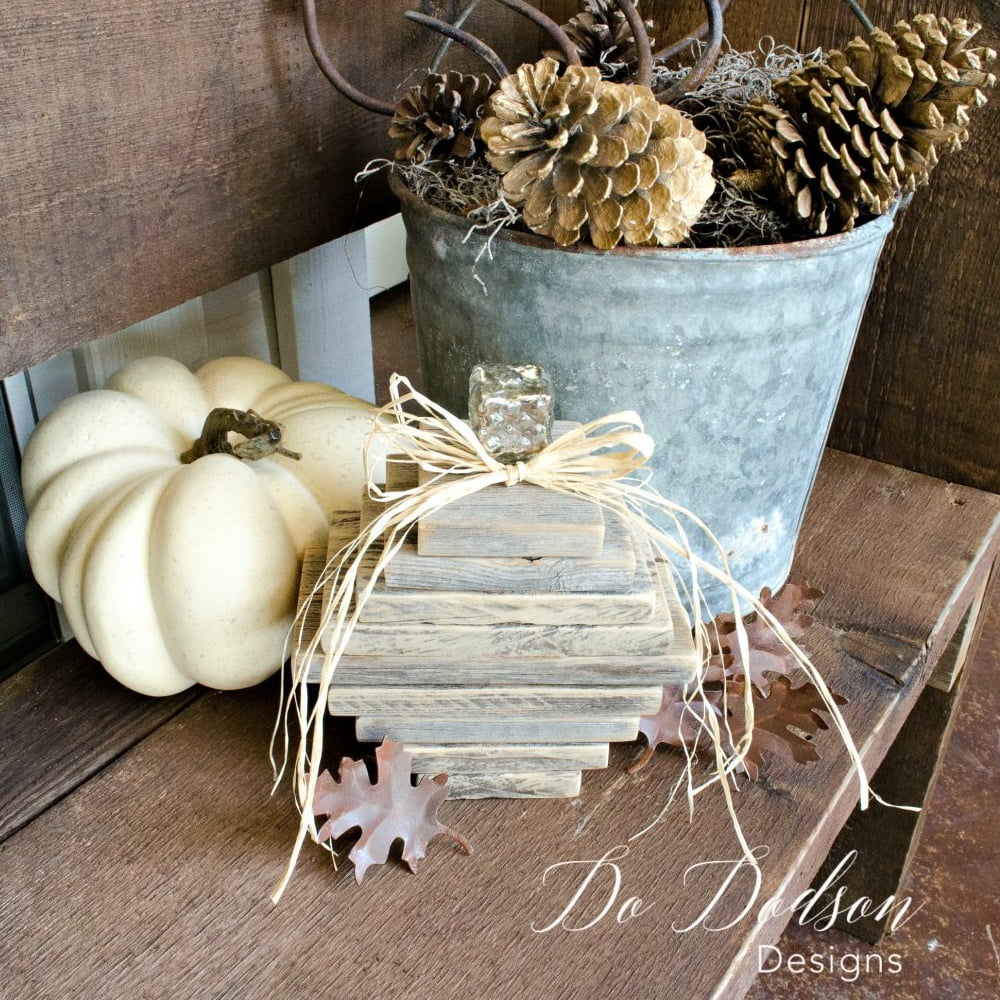
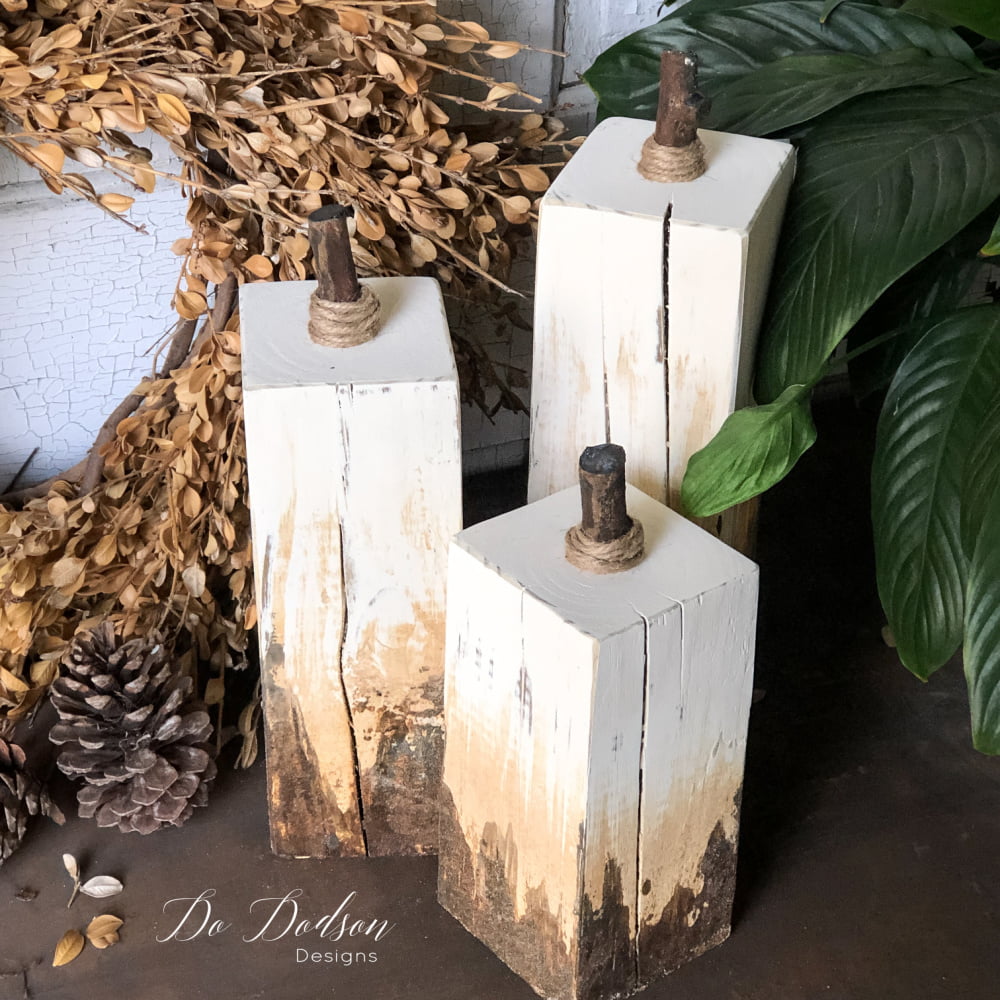
I thought it would be fun to also share with you my past year’s pumpkin creations here. These are a few of my favorites. Enjoy!
SUPPLIES YOU’LL NEED: DIY WOODEN PUMPKINS
- scrap wood
- chop saw
- tape measure
- pencil
- wood glue or construction adhesive (liquid nail)
- nails or wood screws
- sanding blocks or sandpaper
- paintbrushes
- artist brushes (for blending and shading)
- BOSS (stain blocker for wood)
- Drop Cloth (Chalk Mineral Paint)
- Coffee Bean (Chalk Mineral Paint)
- Pine Cone (Chalk Mineral Paint)
STEP 1: Gather Your Supplies for your DIY Wood Pumpkins
First things first, gather all the necessary supplies for your DIY wood pumpkin project.
- Wood: Choose a sturdy and weather-resistant type of wood if your DIY pumpkin will be exposed to the weather, such as rain. If you have a covered porch or plan on using the decor inside, you can use any wood you have on hand.
- Paint: Select a variety of colors that will complement your porch decor or match the festive spirit of the season. Consider orange, white, black, or even metallic tones for a unique touch.
- Adhesive: Invest in a reliable adhesive that securely holds the pieces of wood together. Wood glue or a strong construction adhesive should do the trick.
- Jigsaw, Chopsaw, or handsaw: Depending on your preference and availability of tools, use any of these to cut the wood into the desired shapes and sizes for your pumpkins.
- Sandpaper: Smooth out the rough edges of the wood and create a smooth finish with sandpaper. Opt for a medium-grit sandpaper for this step.
- Paintbrushes: Have a variety of paintbrushes on hand, including large brushes for broad strokes and smaller brushes for detailed work.
- Pencil and ruler: Use a pencil and ruler to mark and measure the dimensions of the wood before cutting.
- Optional: If you want to add extra embellishments to your wood pumpkins, consider gathering additional supplies like ribbons, faux leaves, or wooden stems.
STEP 2: Measure and Cut the Wood
First, grab your measuring tape and pencil. It’s important to have precise measurements for a professional-looking wood pumpkin. Start by deciding how big you want your pumpkin to be. You can go for a traditional-sized pumpkin or get creative with different dimensions.
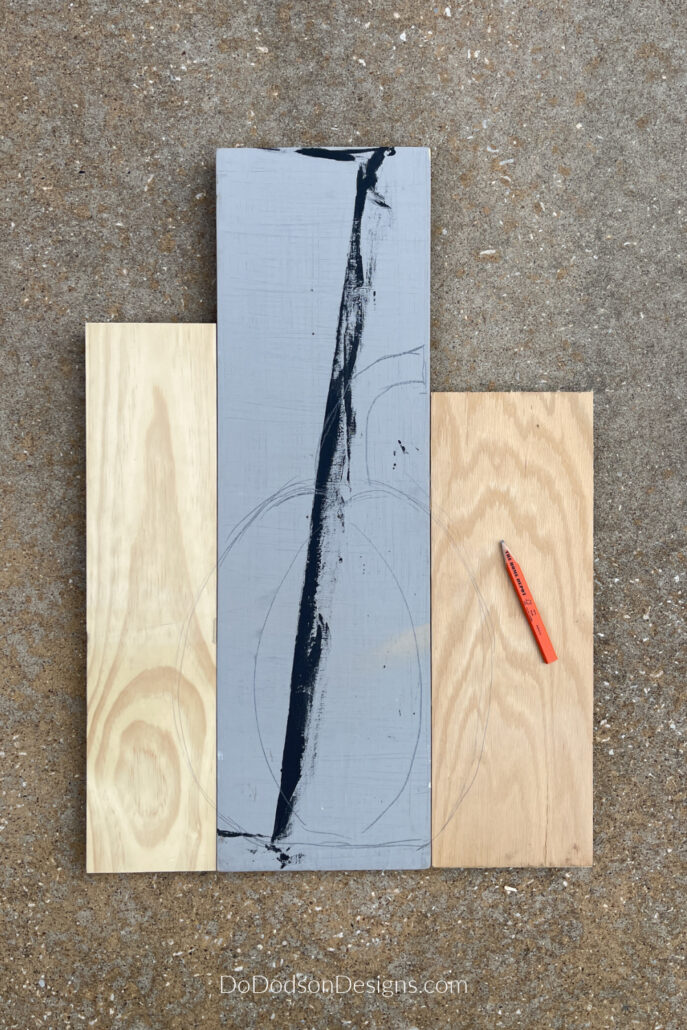
I used three pieces of scrap wood. You can use random sizes. Basically, you will be laying them side by side to make one large board. It’s a great way to use up all those odd-sized scrap pieces.
I placed the taller of the three in the middle. The middle board should be the tallest, as we will be cutting the pumpkin stem from that one.
Using a pencil, draw the outline of the pumpkin and the pumpkin stem on the boards. Don’t worry; pumpkins are easy to draw. If you need to, practice drawing on the back of the boards first.
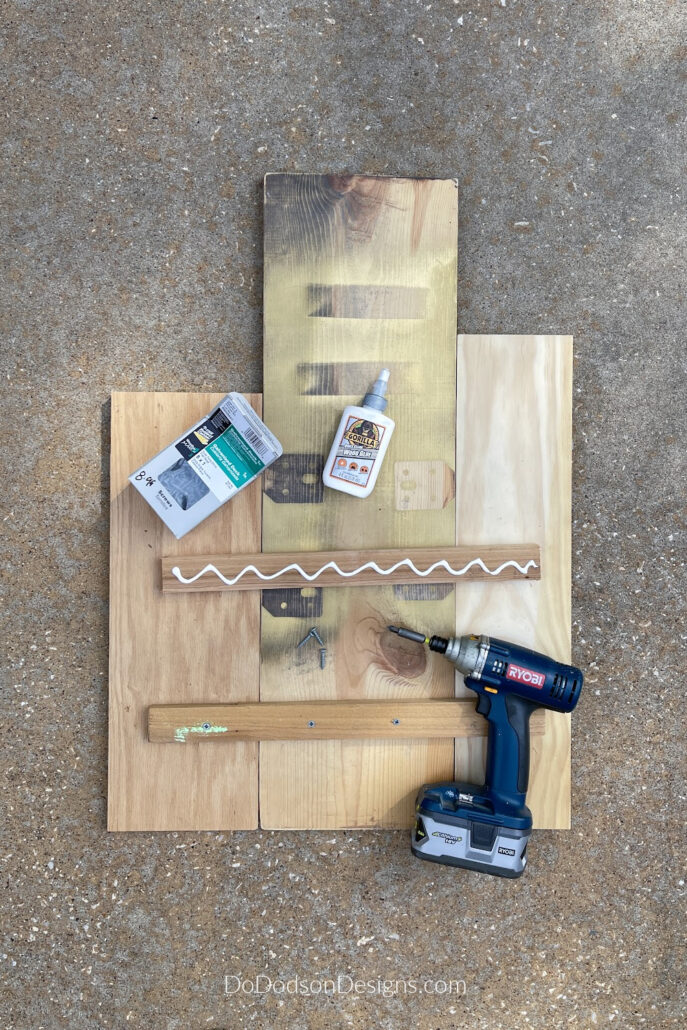
STEP 3: Connect the Boards Together
Once you have decided on your DIY wood pumpkin size, flip the three pieces over and secure them together with two cross pieces of wood. Small strips of wood are perfect for this, but make sure they are big enough to be secured with screws or nails without splitting the wood. If the wood is brittle and dry, drill a small pilot hole in the wood before securing it together with screws.
Apply a good amount of wood glue to the back of each cross piece and secure with nails or wood screws. Doing this will ensure a strong connection between the three boards.
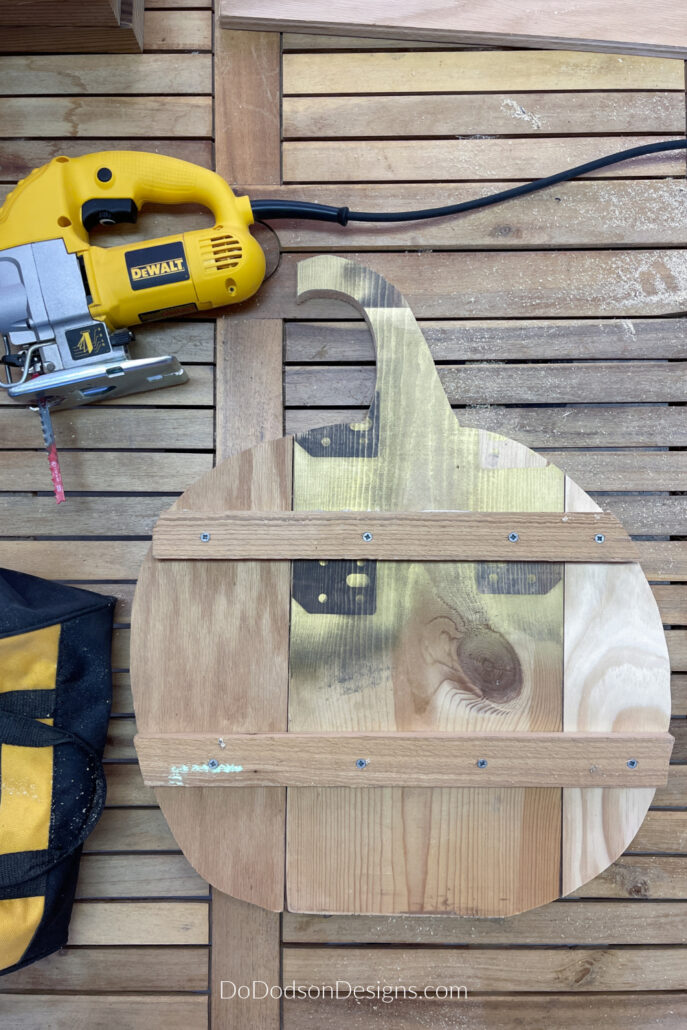
STEP 4: Cutting The Shape of the Pumpkin
Now that your boards have been secured together and the glue is dried, it’s time to cut out the shape of the pumpkin. This step will be a breeze if you have a jigsaw. Position the wood on a stable surface and carefully follow the lines you marked. Take your time and cut slowly to ensure a clean and precise cut.
If you don’t have access to a saw, don’t worry! Ask the neighborhood DIYer. Most people are happy to show off their skills. 🙂
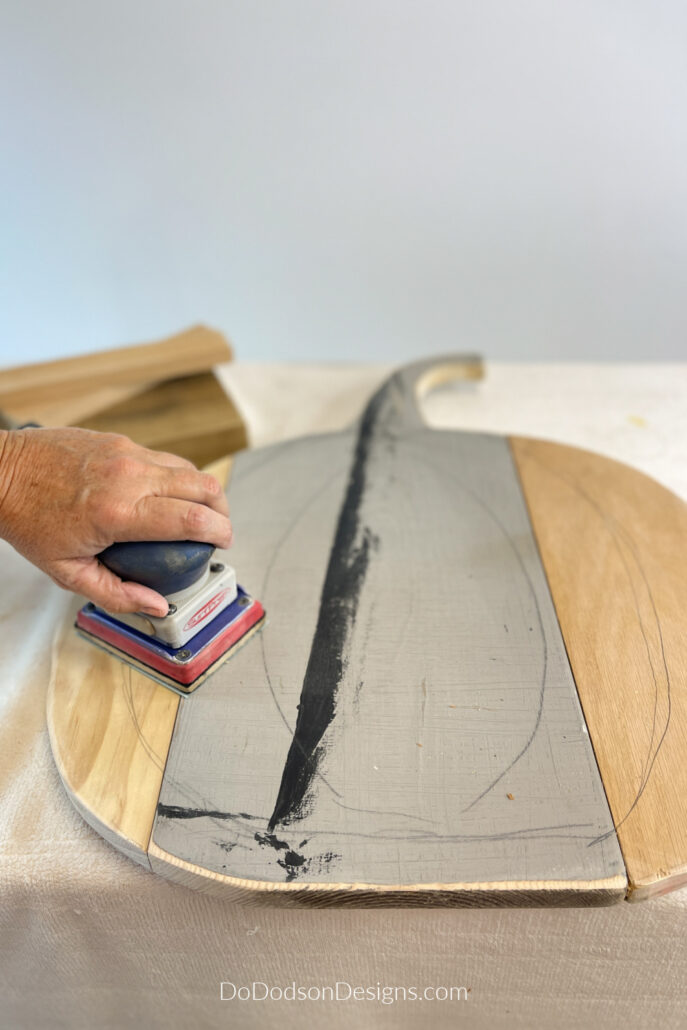
Once you have cut all the necessary pieces, give them a quick sanding to smooth out any rough edges. This will make your wood pumpkins safer to handle and give them a polished finish.
Now that your DIY wood pumpkins have taken shape, it’s time to paint and decorate. Let your imagination run wild as you transform your wooden beauties into charming front porch decor that will delight you anytime you walk past them.
Step 5: Painting The Wood Pumpkin
Before you begin painting, make sure to prepare your surface properly. Sand down any rough edges or uneven areas to create a smooth canvas for your creativity. Wipe away any dust with a clean cloth, ensuring a clean surface for optimal paint adhesion.
Because I’m painting over bare wood, I used a wood tannin blocker called BOSS. Apply two coats, allowing each coat to dry before applying the next. This will prevent any surfacing stains and ruining the painted pumpkin finish. If you use a darker color, you can skip this step. But I’ve never seen a black pumpkin. 🙂 Have you? That could be fun!
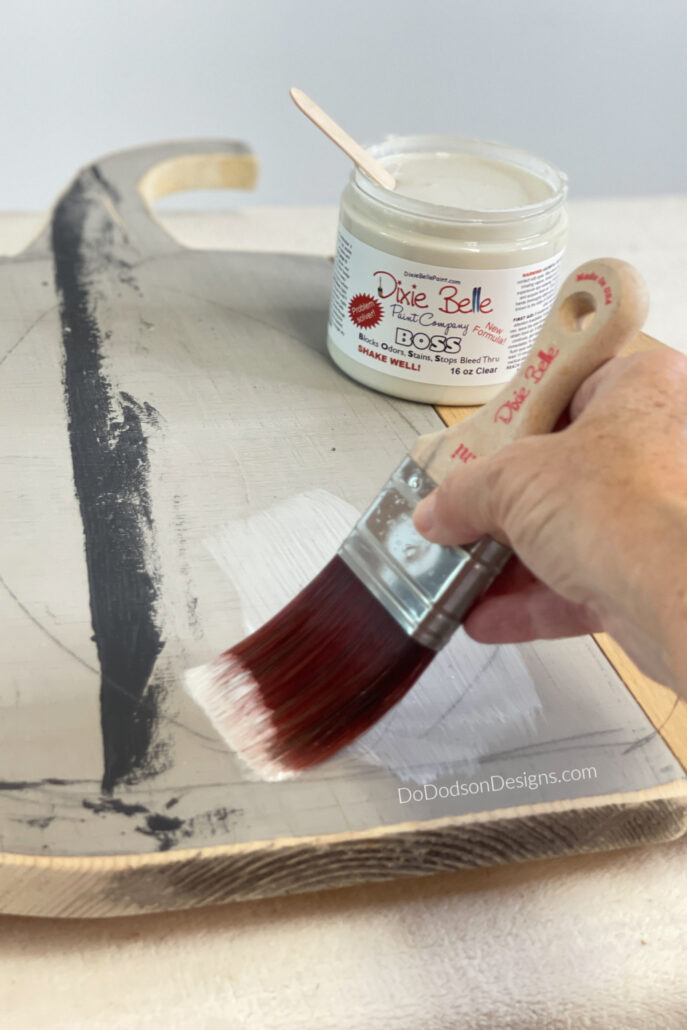
Once your pumpkins are prepped, grab your paintbrushes and let the magic happen. Apply a base coat of paint to the entire wooden pumpkin, covering it evenly. This will serve as a foundation for any additional layers or decorative elements you want to add later. Let the base coat dry completely before moving on to the next step.
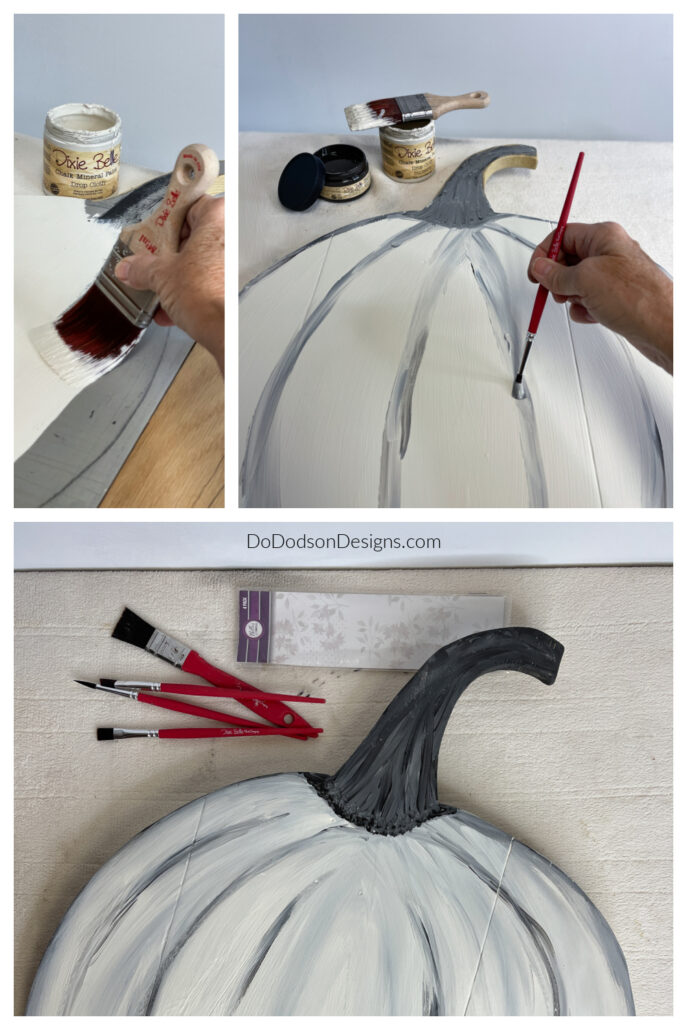
Now comes the fun part – painting your pumpkins! You can use various techniques to add texture and visual interest. You can also use stencils, stickers, or even freehand painting to create designs like polka dots, stripes, or floral patterns. If you’re feeling adventurous, you can even try your hand at faux finishes, such as distressing or antiquing, to give your pumpkins an aged and rustic look.
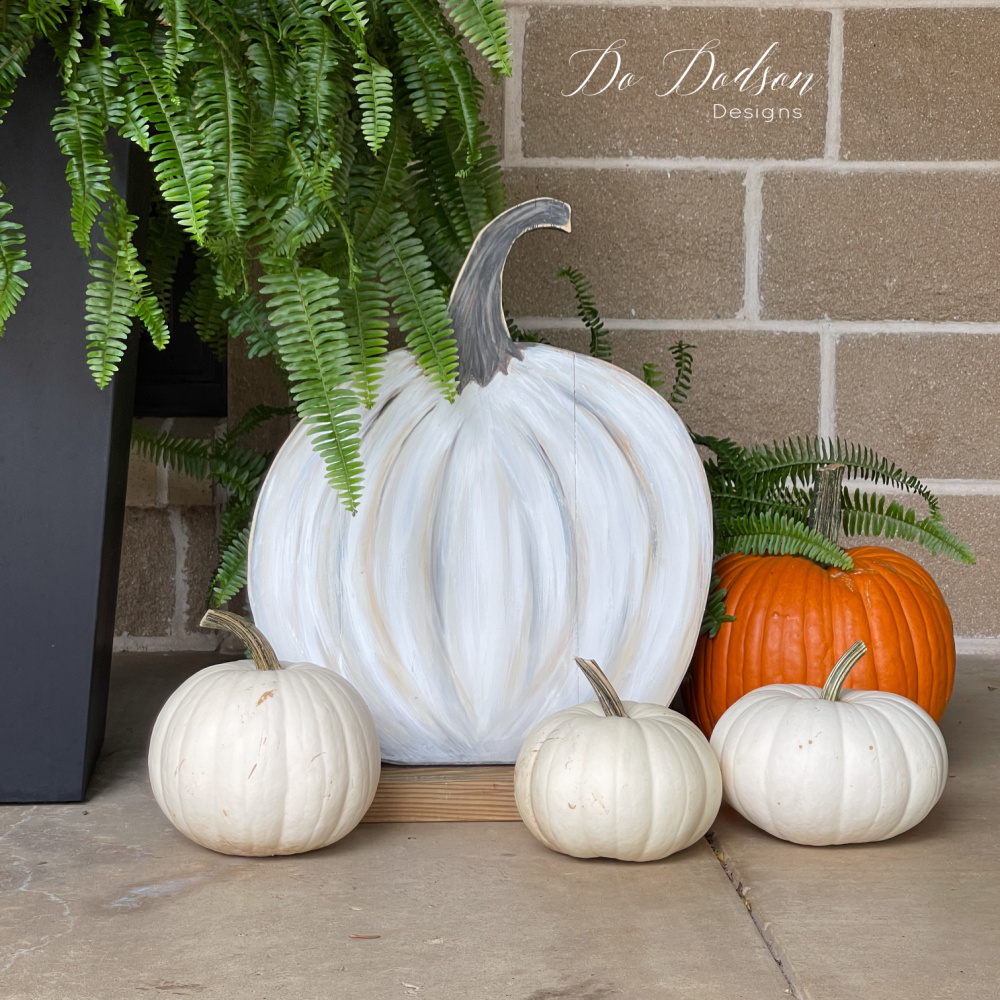
For my DIY wood pumpkin, I decided to go with white (Drop Cloth) with accents of brown/black (Coffee Bean) and (Pine Cone) by Dixie Belle Paint Co. While I won’t go into great detail on the painting technique, I used, I will share my VIDEO TUTORIAL on how to paint pumpkins on wood here. It’s easier than you think! 🙂
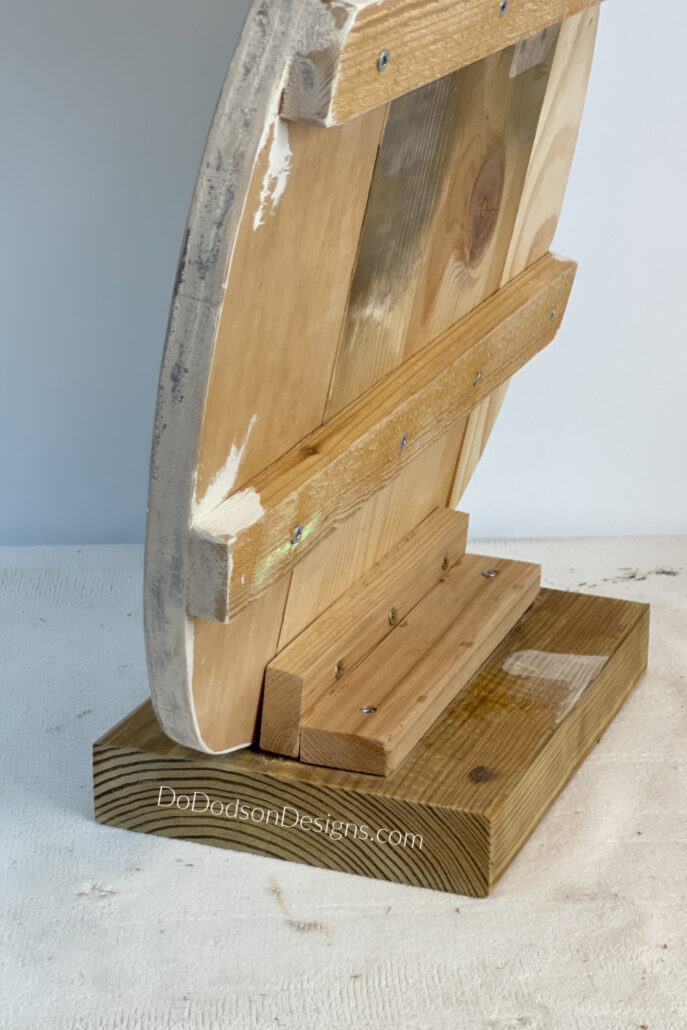
After you’ve finished painting and decorating your DIY wooden pumpkin, you’ll need to construct the base that will allow it to stand independently.
STEP 6: Making The Base For The DIY Wood Pumpkin
Here’s where all those little scrap pieces of wood come into play.
The size really isn’t that important, but it depends on how large your pumpkin is. For my DIY wood pumpkin, I’m using 1X2 cedar wood. You could also use 1X4s.
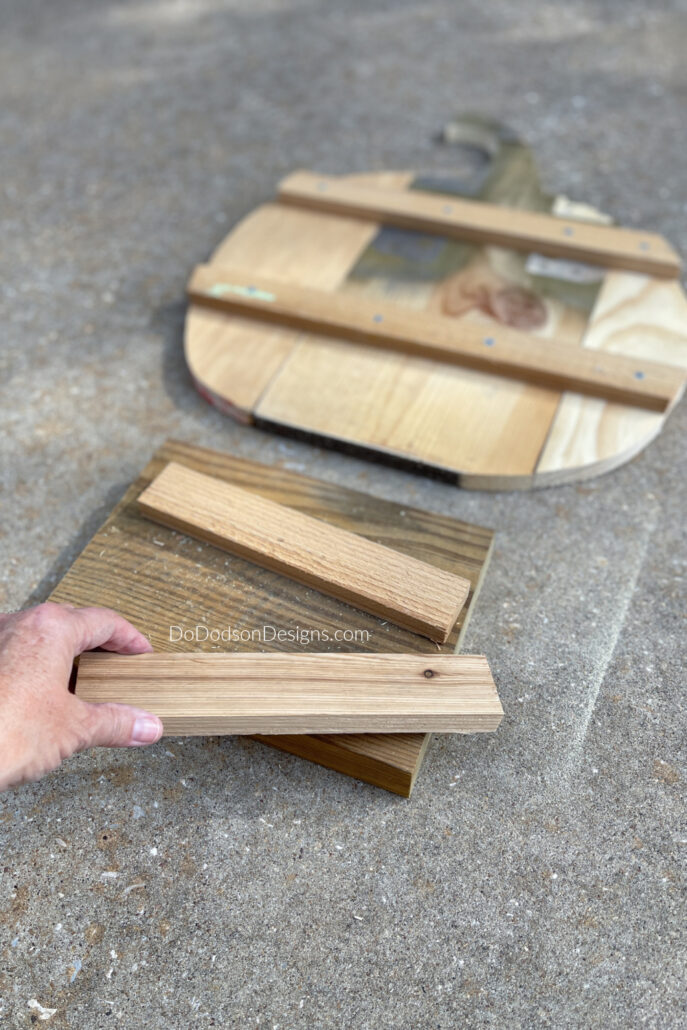
I predrilled holes into the back pieces and secured the pumpkin to the base with wood glue and screws.
The base is made from a 2X8. Don’t skimp on the base. You’ll need a heavier, wider board to hold the pumpkin upright and from toppling over.

Especially if you’re putting this on the front porch, you need the base to withstand the wind! The last thing you or I want is to see that beautiful painted pumpkin flipped upside down, or even worse, in the neighbor’s yard. They might keep it!
Display Your DIY Wood Pumpkins and Enjoy
First, consider the layout of your porch and how the wood pumpkins will fit into the overall design. Think about the available space, the existing decor, and the desired visual impact. Will you place the pumpkins in a straight line or cluster them together? I personally like to add real pumpkins mixed in with my display. Play around with different arrangements until you find one that tickles your fancy.
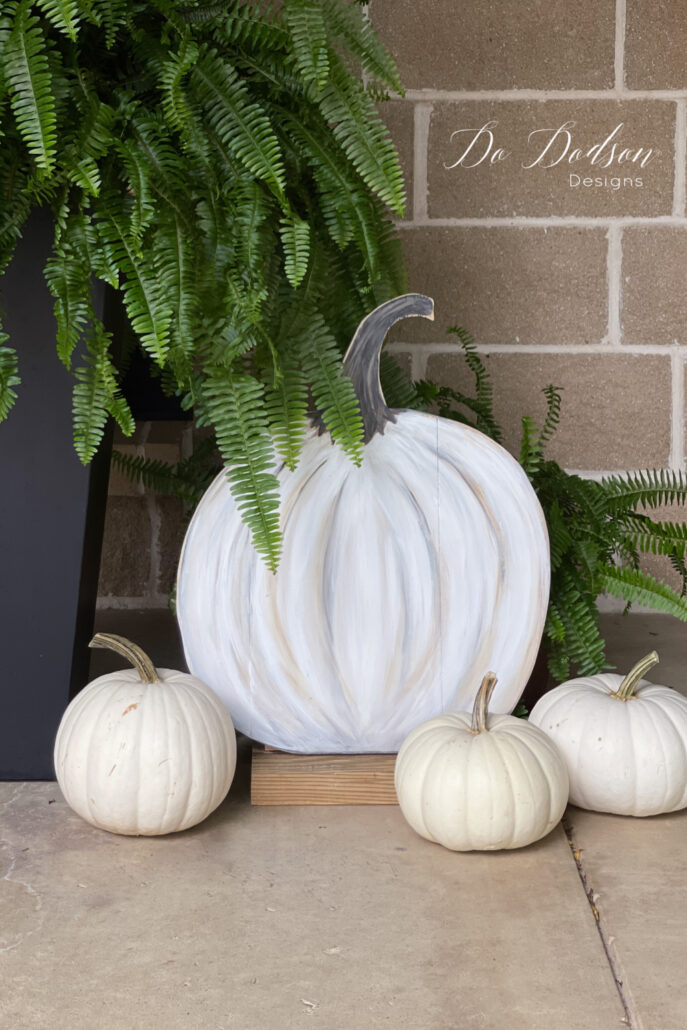
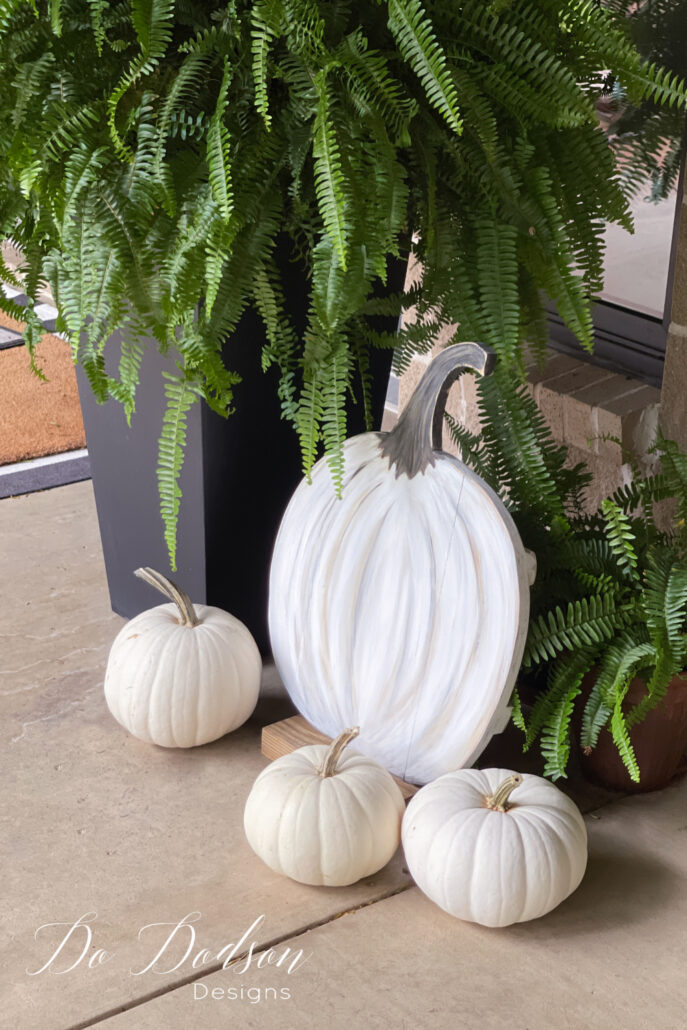
Don’t forget about lighting. Adding some warm glow to your front porch will create a cozy and inviting atmosphere as the days grow shorter. Stringing fairy lights around your wood pumpkins or incorporating battery-operated lanterns can enhance the overall appeal and make your display stand out day and night. I may have to try this.
Remember, this display is a reflection of your personal style and creativity, so make it uniquely yours.

I love how easy this DIY wood pumpkin was to build, and it was budget-friendly, not to mention a charming way to convert my front porch into a cozy Fall retreat.
Hey, and don’t be overly concerned that you can’t paint a pumpkin. Trust me, I’m not the best painter by far, but I have a will to create that won’t stop no matter what. Enjoy the journey. I DO! 🙂
Thanks for joining me today, and as always, I would love your feedback on this project. What would you do differently? How would you display it? Or just say hello in the comment section so that I know you stopped by.
As the saying goes, “Crafting is not just a hobby. It’s a way of expressing oneself.” Happy crafting!
Until the next project… xo, Do
You’re inspiring me to bust out my scrap wood and start a project my friend! This is so adorable and I LOVE the way you paired it with the real pumpkins on your front porch. Super sweet! Enjoy your weekend. XOXO
Thank you, Denise!
My goal is to use up all those scraps but I keep adding to the pile. 😂 Thanks for reading. Have a great week, my friend. xo 😘
Omgoodness, that’s the cutest pumpkin on the planet! Thanks for sharing your creativity with us Do! Pinned 🥰
Thank you, Cindy!
I think I’ll get a lot of use from it. I’ll just add it to the stash of DIY Fall decor in the attic after Thanksgiving. I bet you have one too. 🙂 xo
Do, this pumpkin is beautiful. It looks lovely on your porch. You have the best projects, my friend.
Thank you, friend! You know me and my scrap wood pile. It’s never ending. Have a wonderful weekend. xo 😘