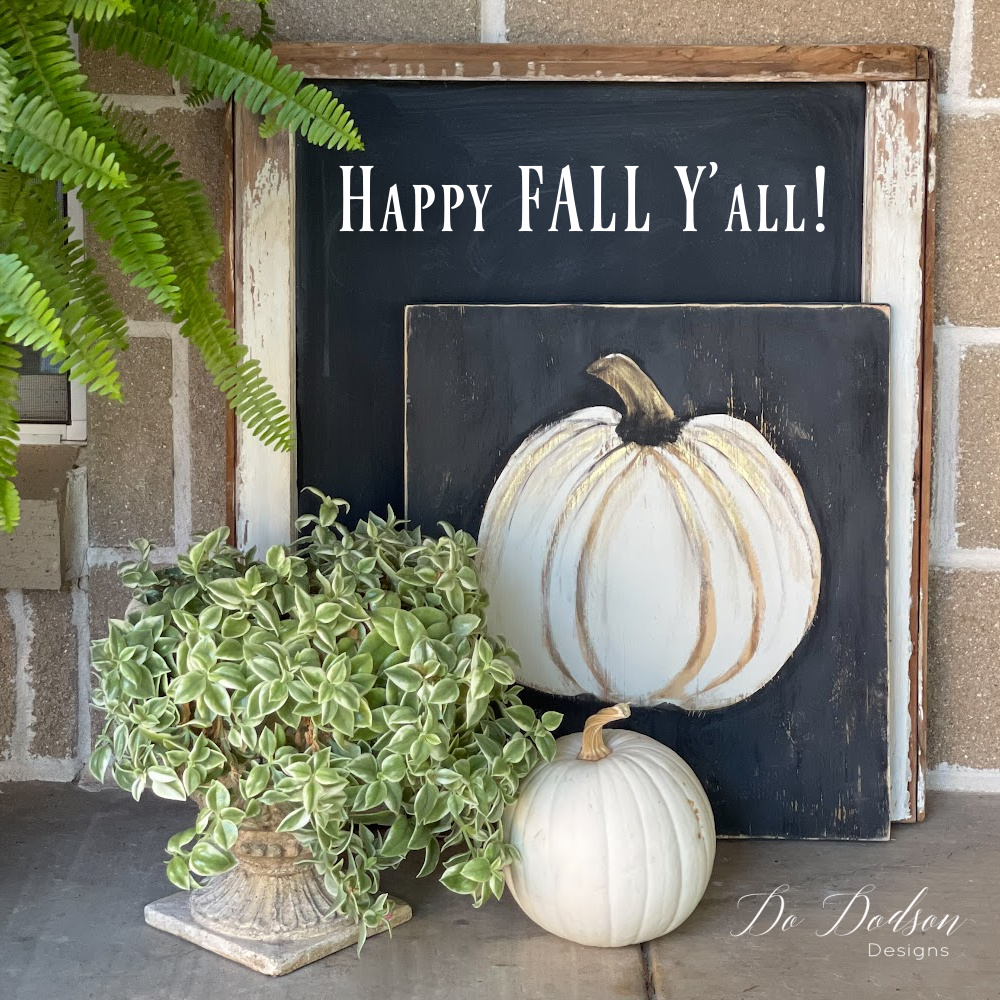
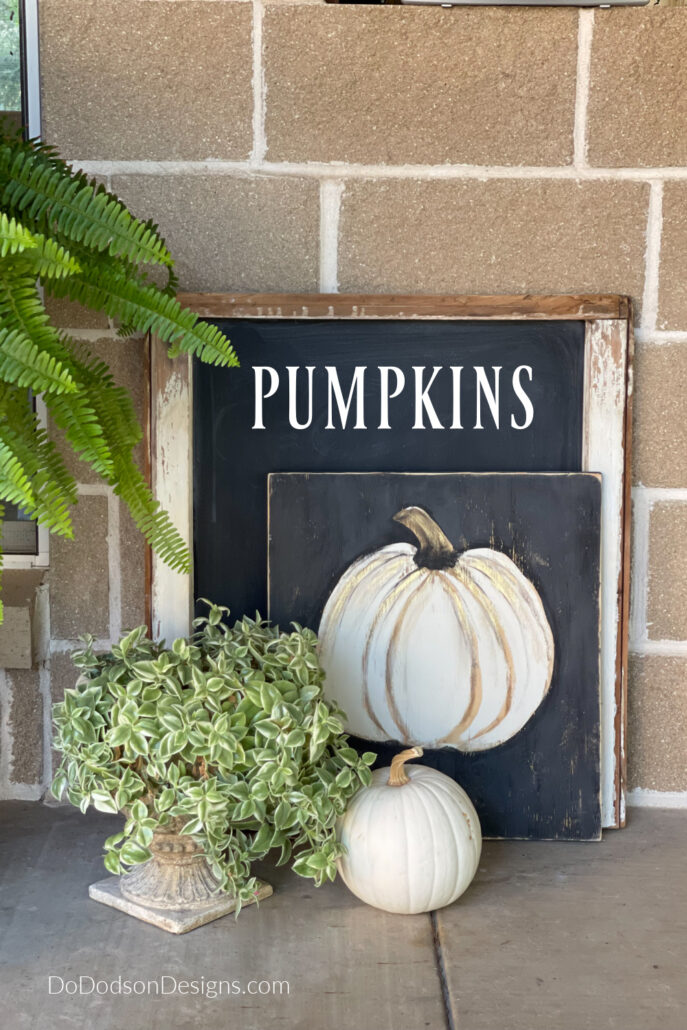
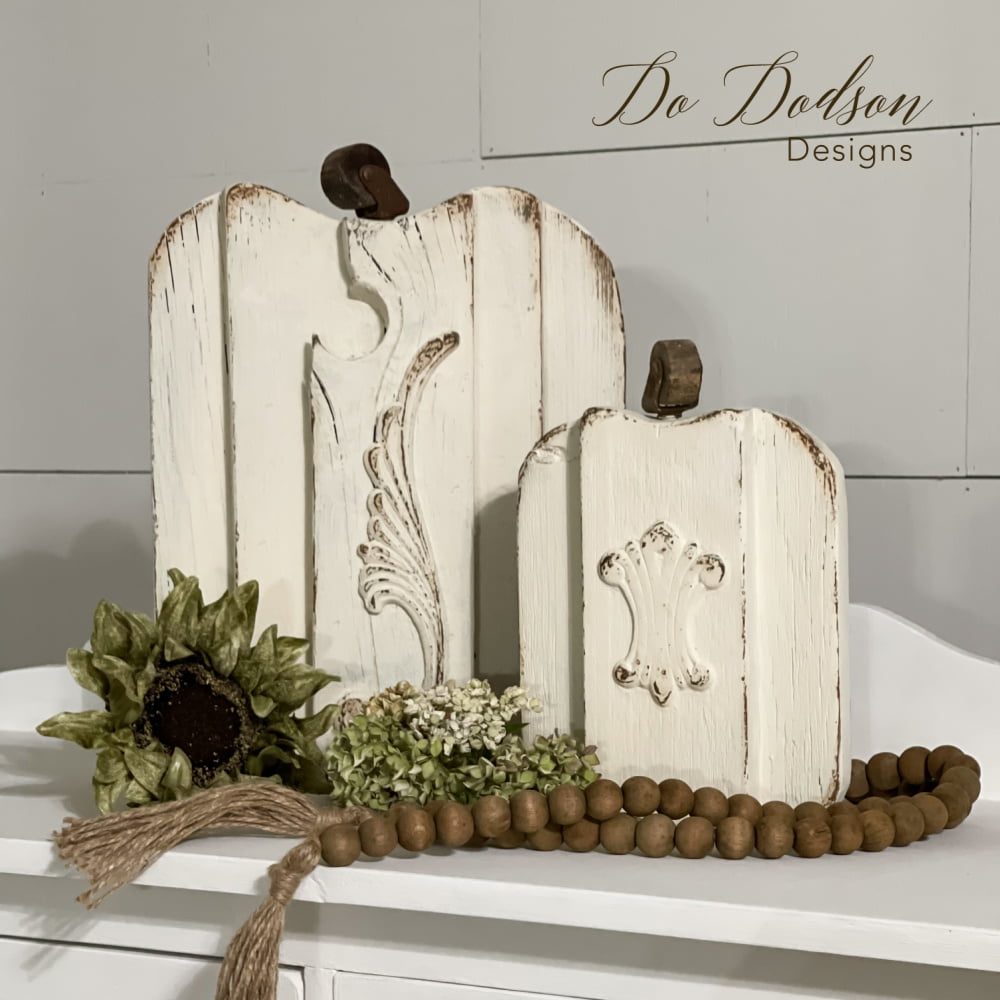
I’m always looking for fun new ways to display pumpkins with my front porch Fall decor. This year, I thought I’d add some quick DIY projects to the mix by painting pumpkins on some scrap wood. They turned out so stinking cute and I think it’s the perfect project for Fall. Watch the “how to paint pumpkins on wood” step by step video tutorial below so you can paint them too.
Thanks to Dixie Belle Paint Co for sponsoring this post. While I was compensated to write this post, all opinions are my own.
* As an Amazon Associate, I earn from qualifying purchases and through other companies as well. You will not be charged extra when you purchase through these affiliate links, but any income I make helps me create more amazing DIY projects to share with you! To see my full disclaimer, click here!
Watch The Video Tutorial Here – How To Paint Pumpkins
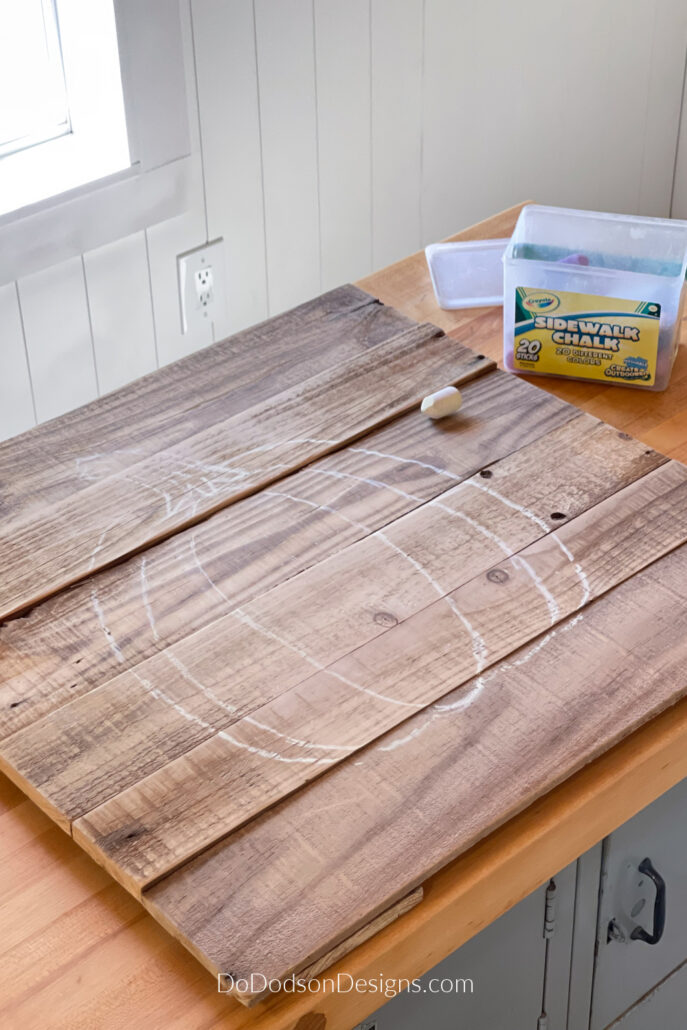
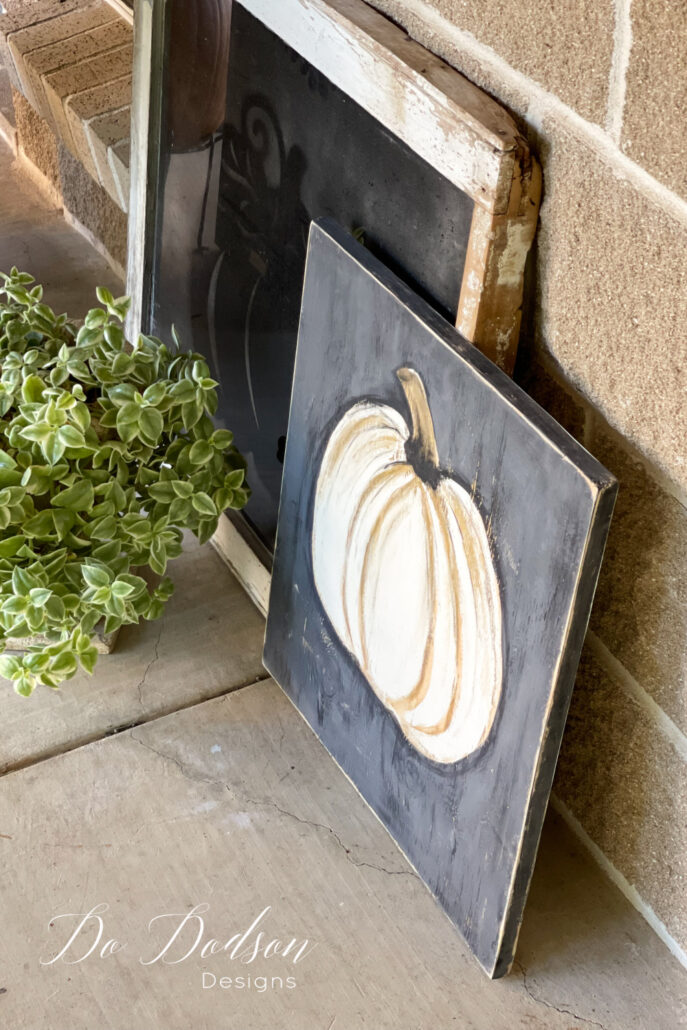
The first step is to grab some scrap pieces of wood. I like painting on different shapes and sizes of scrap wood so use up what you have. It adds character and gives a rustic vibe to your painted pumpkin signs. Any scrap wood piece you have will work for this craft project.
I had this pallet wood sign I made a few years ago that I had forgotten about in my attic. SCORE! I knew at some point I would have a home decor idea for it.

SUPPLY LIST:
What you’ll need to paint pumpkins quickly and easily on wood.
- scrap wood
- chalk stick (outlining pumpkin)
- chalk mineral paint (drop cloth, pine cone, caviar)
- artists brushes
- sandpaper 220 grit or sanding block (I used an electric sander)
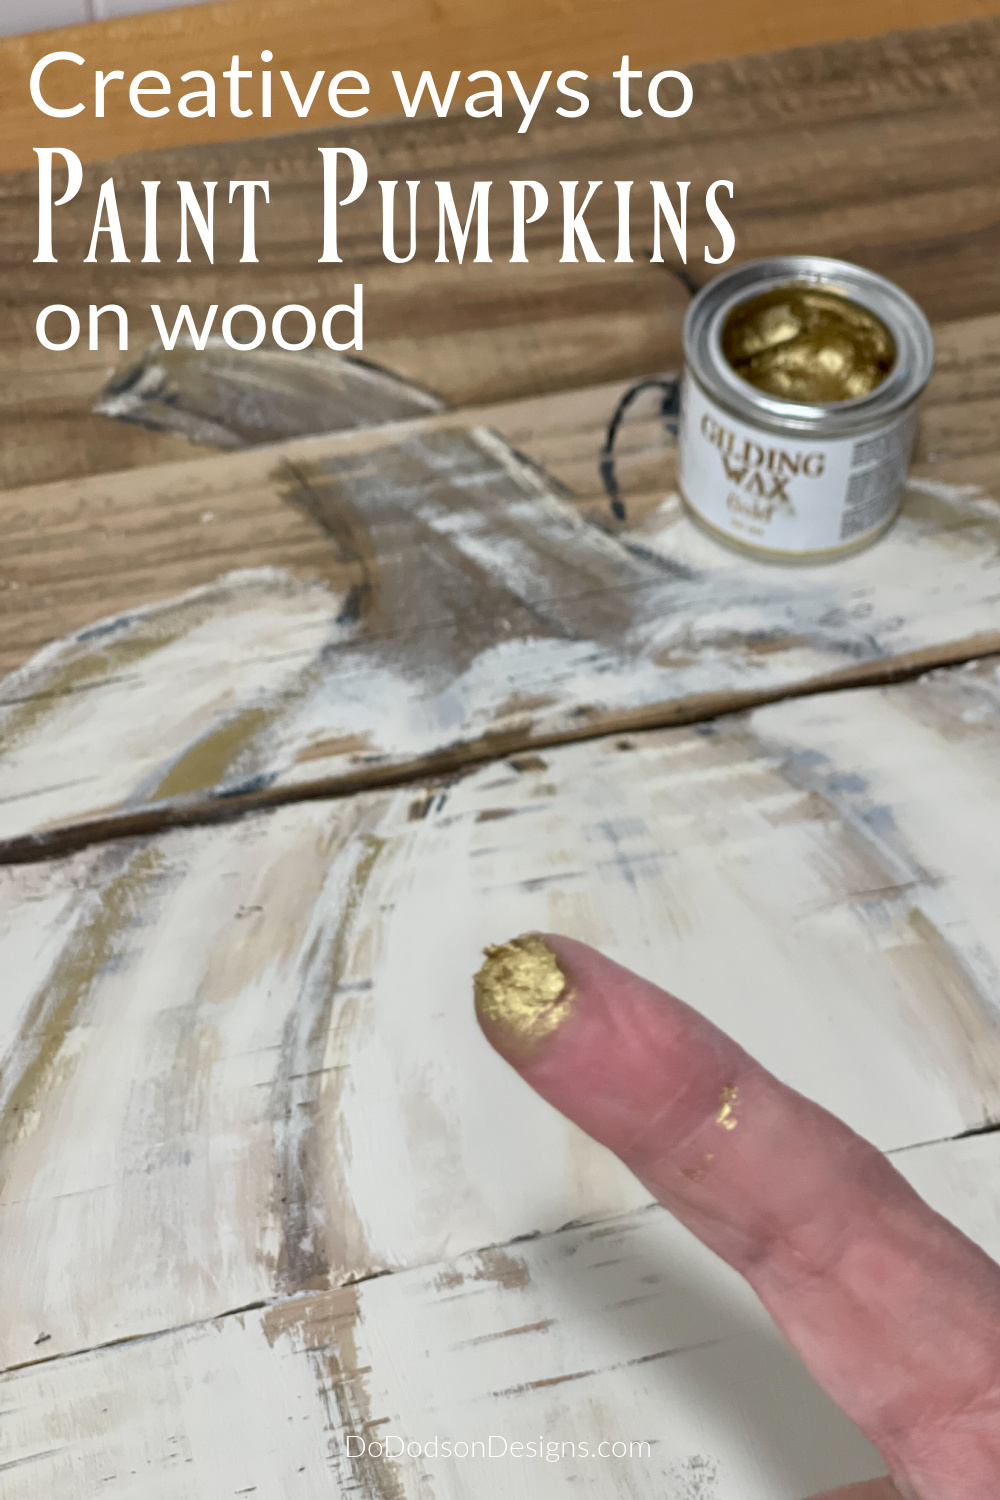
- GOLD gilding wax
Drawing The Outline Of A Pumpkin
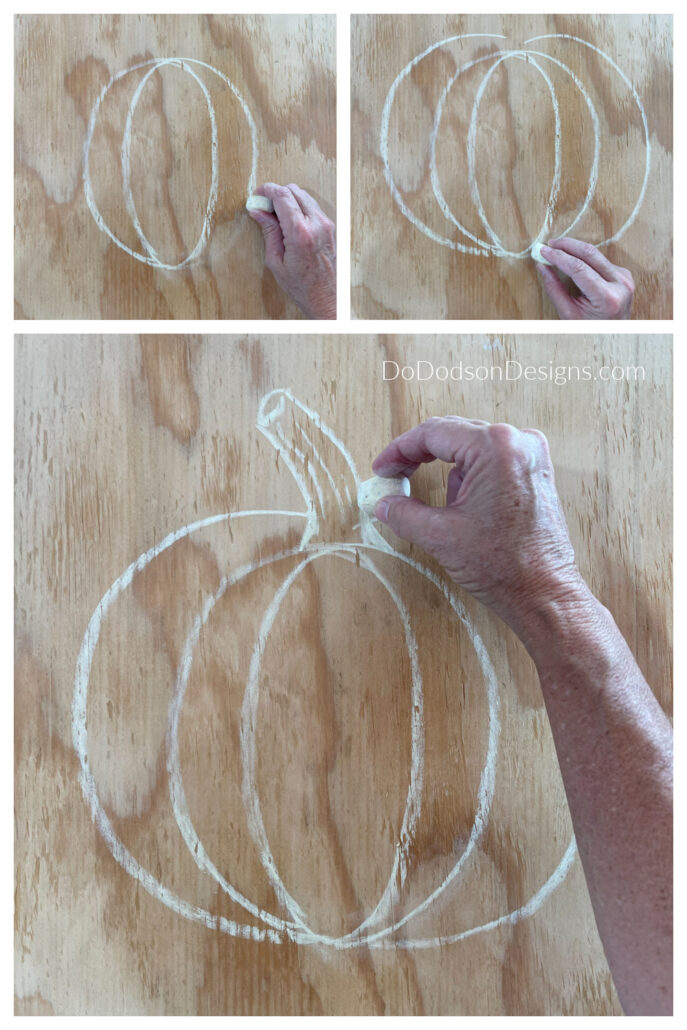
Using a chalk stick or your Grandkid’s sidewalk chalk (that’s what I used) draw your outline first. Start with the top of the pumpkin and make the center by creating two curved lines that connect at the top and bottom. This will be the center of the pumpkin.
The next step is to draw two more connecting lines from each side, starting at the top and repeating on the opposite side. You should start seeing the shape of your pumpkin now. Last, draw two more of the same again on both outer sides. It will look like a C and a backward C that connects with the top and bottom.
Don’t forget the stems of the pumpkins! Here’s where you can add your own flare. Real pumpkins out of the pumpkin patch have either a straight cut on the stem or a jagged one where it was broken away from the vine. Long, short, curved, or straight you get to decide. There are lots of different ways you can add personality to your pumpkins.
Acrylic Craft Paint Or Chalk Paint
I say use whatever paint you have on hand except for spray paint. You can usually get acrylic paint from the dollar store in a pinch but I prefer chalk paint.
For this pumpkin painting project, I wanted the look of real white pumpkins. But if you’re on team orange paint, there are no rules. Heck, if you want to paint bold colors and polka dots or even buffalo check pumpkins, I say go for it. You match your pumpkins to whatever color palette and design that fits your style.
Quick Steps For Painting Pumpkins On Wood
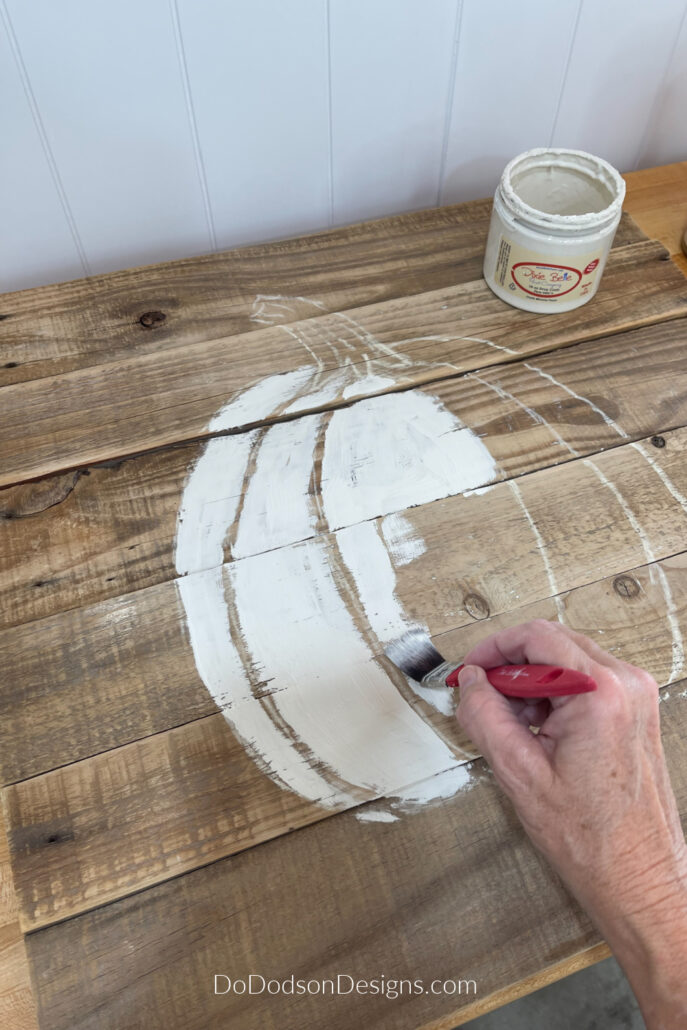
STEP 1:
With a small artist brush, paint inside the outlines of the pumpkin being careful to leave the chalk outline unpainted. This area will be filled in later with darker paint color to add the detail work. Don’t worry about the chalk, it will mix with whatever paint you’re using.
I little bit of paint goes a long way here. There is no need for multiple coats of paint. The base coat color you choose will be the predominant color and there’s no need for full coverage with your paint as this will give it a rustic look on the wood.
For my pumpkin, I used a color called drop cloth by Dixie Belle paint. It’s my favorite vintage shade and I use it all the time. It goes perfectly with my Farmhouse style.
Blending Paint Colors
STEP 2:
For the next step, the second color I used is a brown paint called Pine Cone by Dixie Belle Paint Co. It’s a lovely shade of brown and reminds me of Fall in Texas. BROWN! Ha! I only wished we got those lovely shades of pumpkin spice. The only pumpkin spice color we get is in our PSL. Yum!
With a beveled artist’s brush, apply the darker shade (Pine Cone) of paint inside the unpainted lines and a little on the outer edges too. Just enough to fill in the blank areas inside the pumpkin.
Immediately after applying the darker color to the pumpkin indentions (creating depth), start blending the wet paint from the top of the pumpkin down in a curved motion following the smooth lines of the pumpkin. If you get too much paint or you simply don’t like what you’re seeing, use a damp cloth to remove a bit of the paint and start over. There’s no perfect way to paint a pumpkin. Just you’re way. You are the artist and practice makes improvement.
Using this blending technique will give your painting of pumpkins on wood a rounded look. Pumpkins don’t have a straight edge so always paint in the direction of the curves.
Paint the Pumpkin Stem
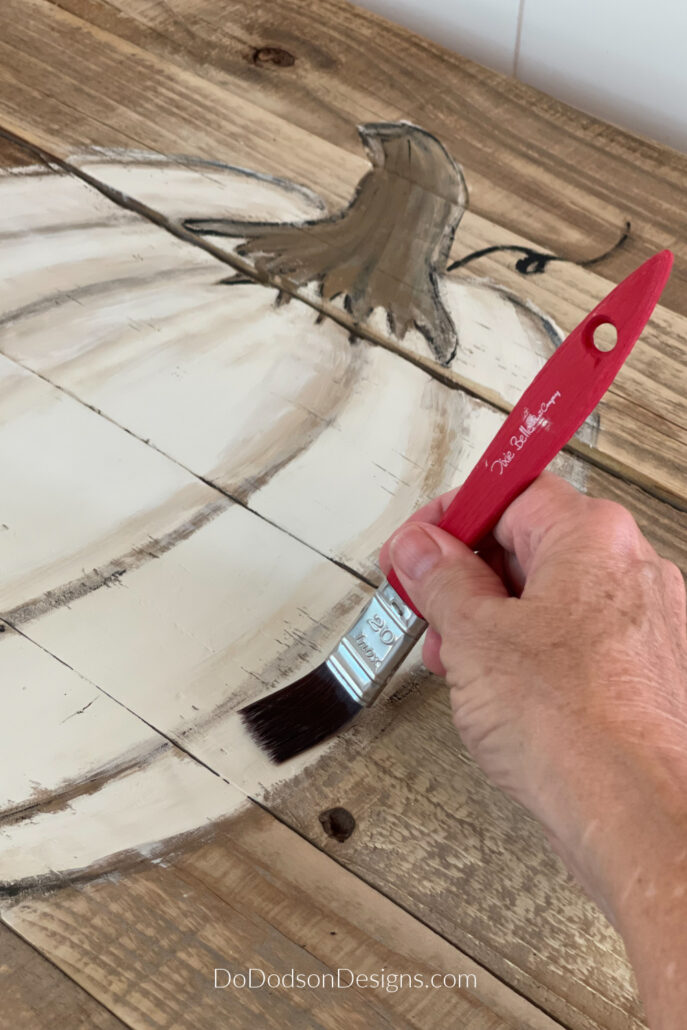
STEP 3:
With the same brown color, paint the inside of the stem outlined. Again, don’t worry about getting it perfect. We ain’t done yet!
Add a third darker color while it’s still wet and blend some more. I used caviar (black) by Dixie Belle Paint Co. This will give your pumpkin stem depth with a ridged appearance of crevices in the stem.
Adding Highlights And Low Lights
STEP 4:
Now, here’s where you’ll see the biggest change in your painting. Go back and add highlights with the lightest color of paint and even some low lights with your third darkest color. Wherever light hits the pumpkin and stem first (depending on the direction of light) is where you’ll add the lighter color.
The combination of the three colors is perfect for painting these large, round, globular pieces of fruit. I can never get enough fall pumpkins in any form.
Feel free to use different paint colors and let your mind wander. Try to come up with your own creative pumpkin painting ideas for your seasonal decor.
Refer back to the VIDEO TUTORIAL above if this is all overwhelming. LOL, it’s not easy to put artistic painting techniques into words. I promise you can DO this with a little patience and practice.
Distressing Your Pumpkin Painting On Wood
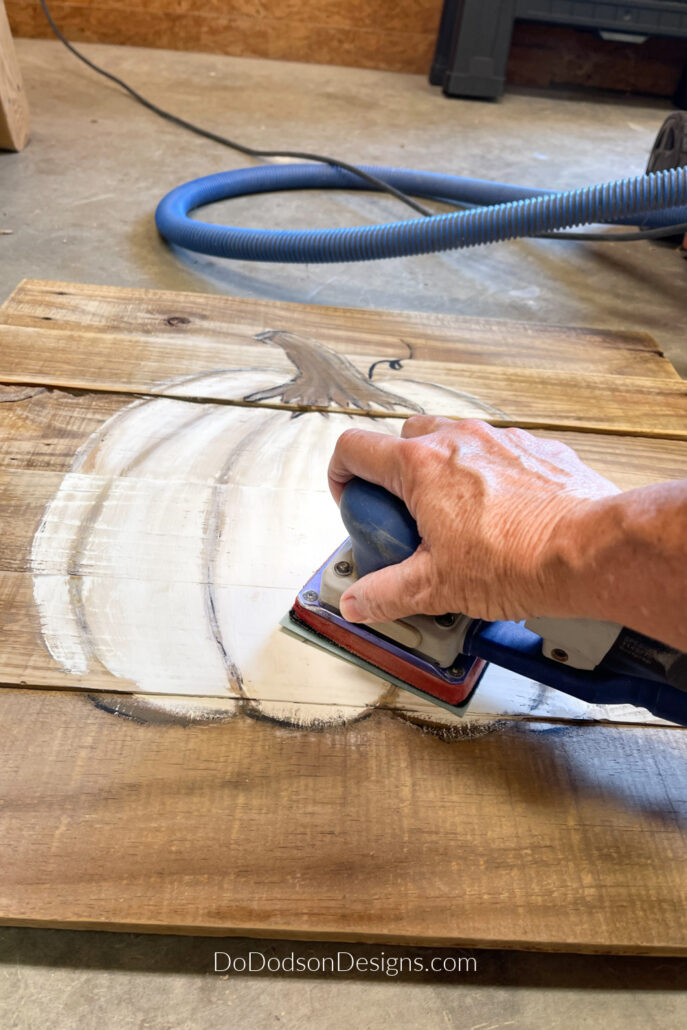
STEP 5:
Here’s a great way to salvage artwork if you hate it. I know, I’ve been there. I know this to be true because it works with artistic furniture painting.
If you’re not liking what you see, use 220 grit sandpaper or an electric sander to soften and add “character” to your painting. It’s pure magic, I tell you. I sanded over the entire pumpkin painting on both my projects.
Sanding over it added a rustic softness and gave it that dreamy feeling with bits of the natural wood showing through.
Can You Ever Have Too Much GOLD?
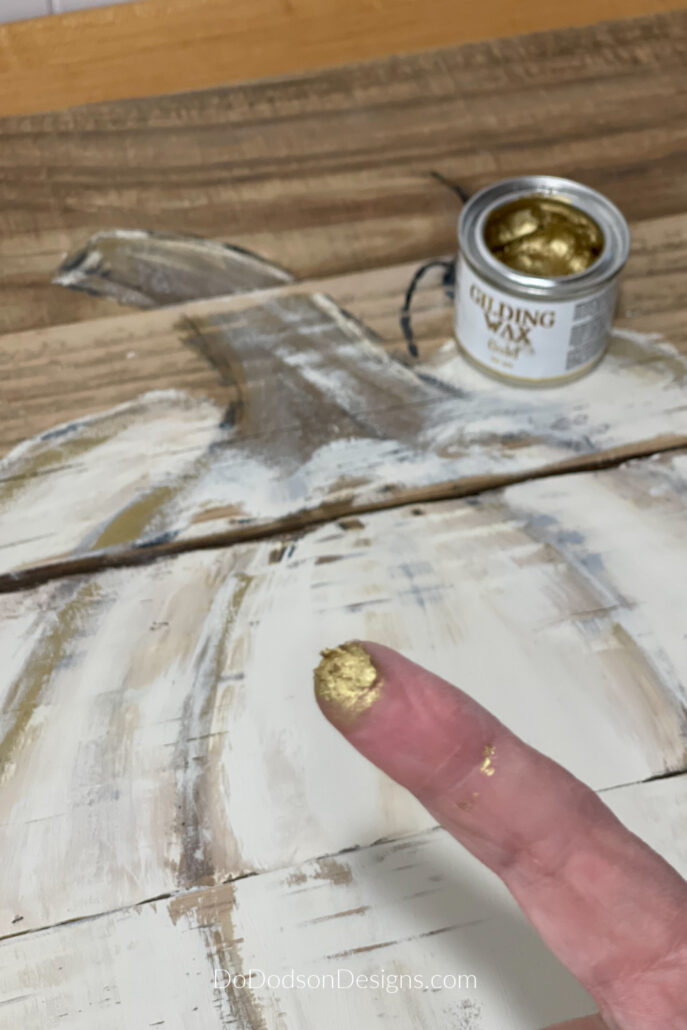
STEP 6 Optional:
And if sanding over the wood doesn’t DO it for you, grab some gilding wax as I did and add even more highlights to your pumpkin painting. I LOVE gold gilding wax. The application is best applied with your fingertips. It’s better than metallic paint on these small projects and you can add as much or as little as you like in a few seconds. Quick and easy!
The Results Of This Fun Project
I decided to paint the board on one of my projects after painting my pumpkins on the wood. You can choose to paint the board before or after. It really is up to you. Or you can just leave it natural for a rustic farmhouse vibe.
Which one is your favorite?

Full disclaimer here:
I am in no way the best at painting pumpkins on wood. But the one thing I am the best at is having FUN when I create!
If you’re looking for a fun Fall project and you have scrap wood that you don’t know what to do with, get to painting! These make great gifts and if you teach art, how fun would this be as a Fall art class?
Hey, thanks for joining me here while I paint my idea of “my” perfect pumpkin. Art is in your mind and it’s up to you to paint it on wood.
As always, I’d love to hear from you and what you think about these wooden pumpkins. Leave your comments below or just say hi so I’ll know you stopped by. Oh, and don’t forget to pin this idea to your favorite DIY Fall Decor board on Pinterest.
Until the next project… xo, Do
Super cute! I love it. Hugs to you.
Hello there, my friend! It’s always good to see your pretty face even if it is through a blog post. I hope things are going well. I’m excited for you and your upcoming event. 🙂 xo
So cute! I have more confidence in drawing a pumpkin now!
Hi Cletia! I hope you guys are getting some cooler temps. It’s hard to be creative with anything Fall when it’s still in the high 90s. Thank you for stopping by, and have a fantastic week, my friend. 🙂 xo
I love both pumpkins. You did a really good job with each.
Hi Jo! Thank you and thanks for stopping by. Have a fantastic week. 🙂 xo
You come up with great ideas Do! I love easy and simple projects like this especially when all the supplies are easy to get. Having scrap wood around is so useful! Pinned 🥰
Thank you, Cyndy! Just messing around with leftover paint. I have plenty if you need some. LOL 🙂 xo
Do, this pumpkin on the wood is gorgeous. I enjoyed watching your video. I am going to feature you in
my newsletter on Sunday. Just love this project!
Hey friend! That is so kind of you. I wish you were here in person to paint with me. We would have a ball! Thank you so much. 🙂 xo
Cute idea! Do you use a sealer or top coat when you paint on wood? If so, which one?
Thanks,
Joy
Hi Joy! Normally I don’t. But if I did, I would use a water based top coat. But be mindful that most can turn yellow over time. That’s why I don’t use them on signs. I hope this helps.