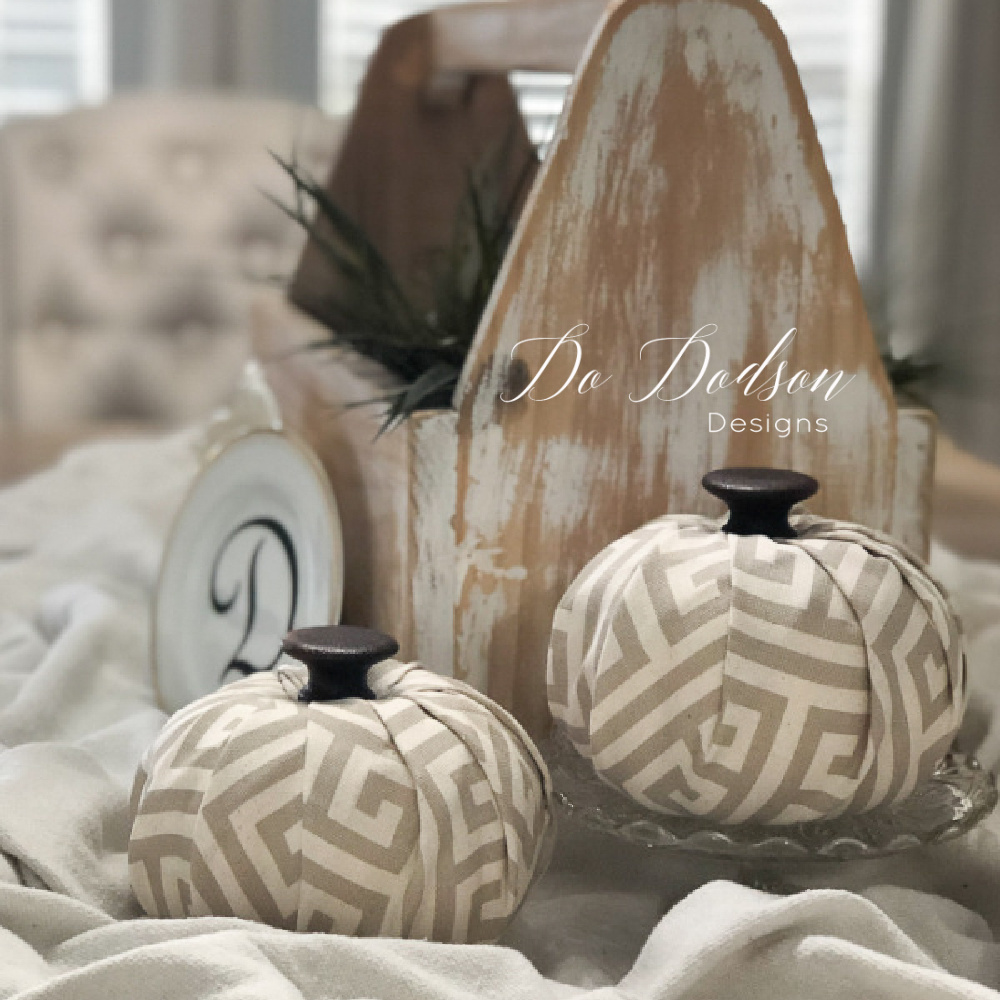
Hey, thanks for joining me today. These rustic wood pumpkins make my heart happy, and I hope you enjoy making them as much as I have.
So, you know I’m gonna ask, what do you think about this DIY project? Would you make these for your home? Let me know, or just say hi and let me know you were here. Don’t forget to share with your bestie!
Until the next project… xo, Do
To say Fall is my favorite time of the year is an understatement. Well, there are many reasons, but the best one is that I get to dig out my scrap wood to create fun rustic pumpkin crafts. Yay! And then I share them with you. That’s why I PREACH save those wood scraps!
* As an Amazon Associate, I earn from qualifying purchases and through other companies as well. You are not charged extra to use any of the links, but any income I make helps me create more amazing DIY projects to share with you! To see my full disclaimer, click here!
DIY Rustic Wood Pumpkins
To make these rustic wood pumpkins, you’ll need a few things, and I have created a supply list below just for you, but more than likely, you probably already have most or all of the items on hand. Feel free to improvise with alternatives. These are NOT the perfect Fall craft but they are cuter than whoda thought it.

SUPPLY LIST:
- scrap wood (fence pickets, 1×4, 2×6, or even 2x4s) whatever you have
- jig saw
- wood sander (my favorite tool) Use my discount code DOIT10 for 10% off
- drill set
- jute twine
- polymer clay (for the stems)
*Embellished with Best Dang Wax and Chalk Mineral Paint by Dixie Paint Co.
How To Make DIY Rustic Wood Pumpkins
I have several renditions of these rustic wood pumpkins because once the first pumpkin was done, I was hooked and that lead to me further digging in the wood scrap pile. LOL
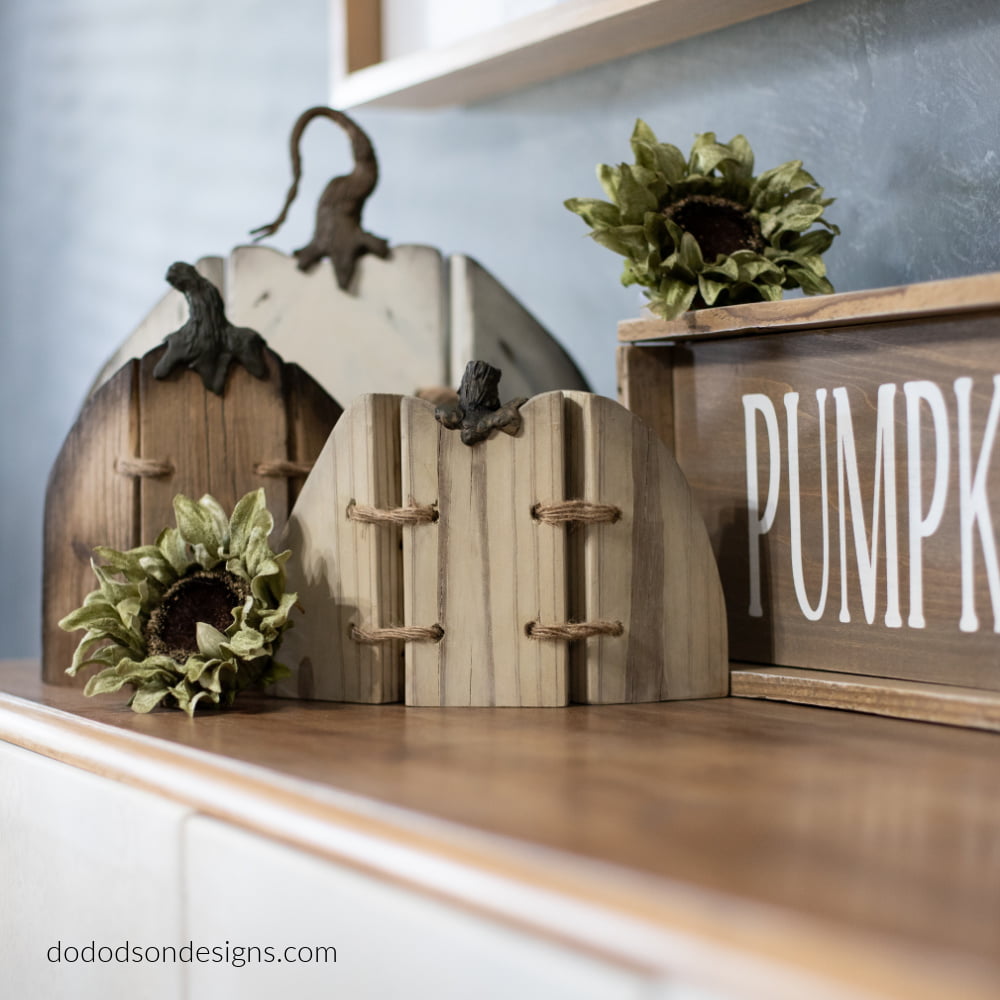
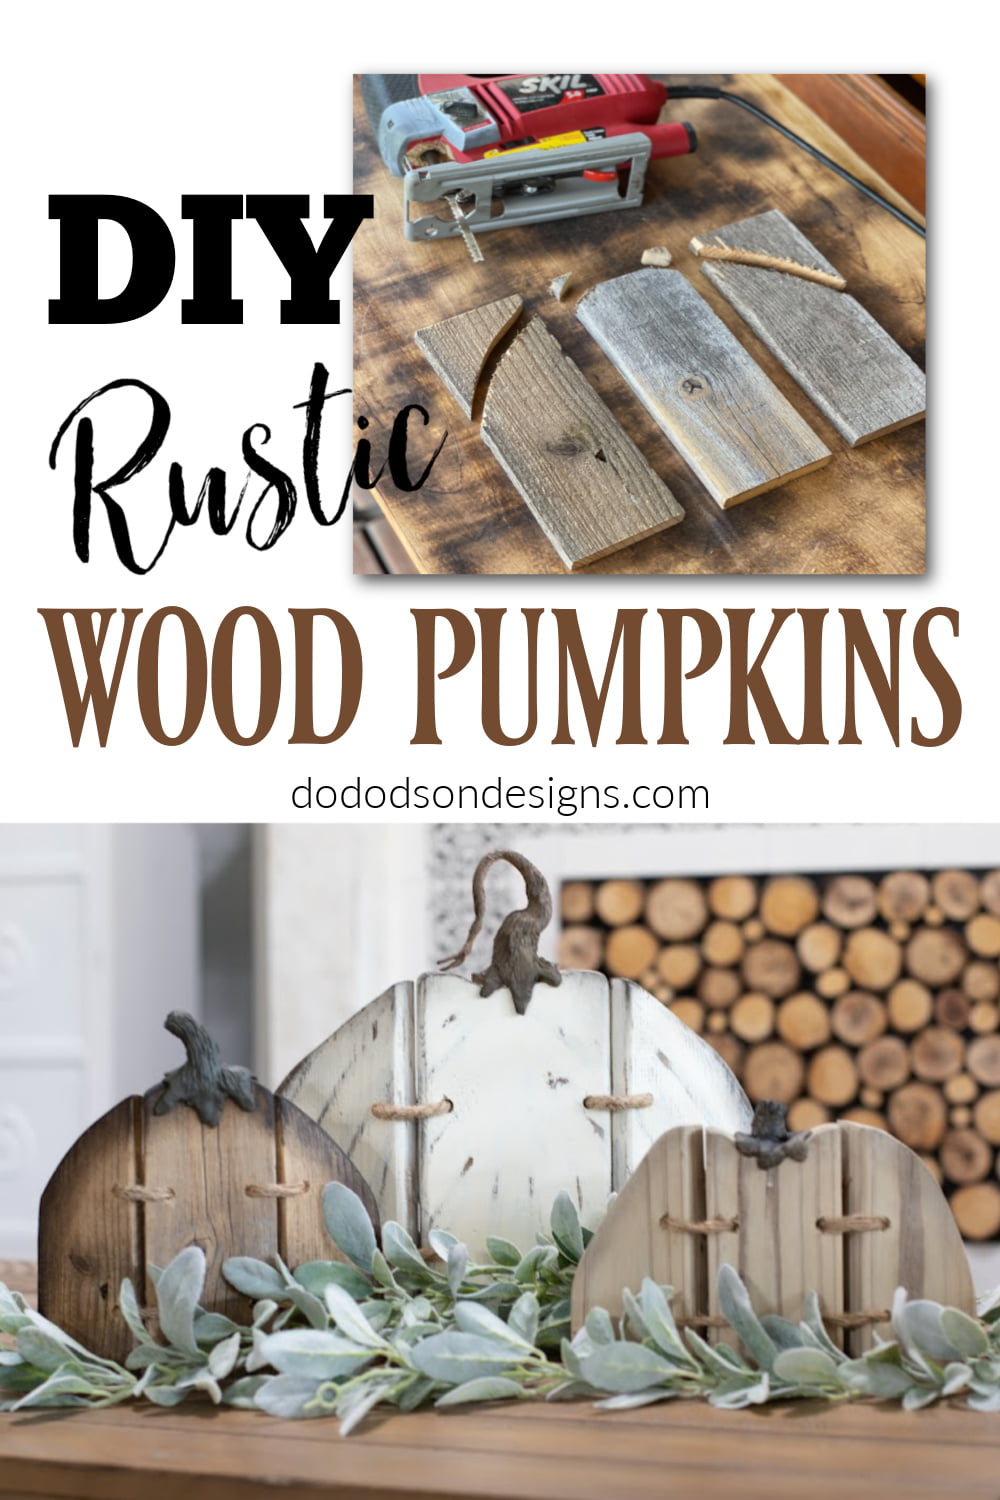
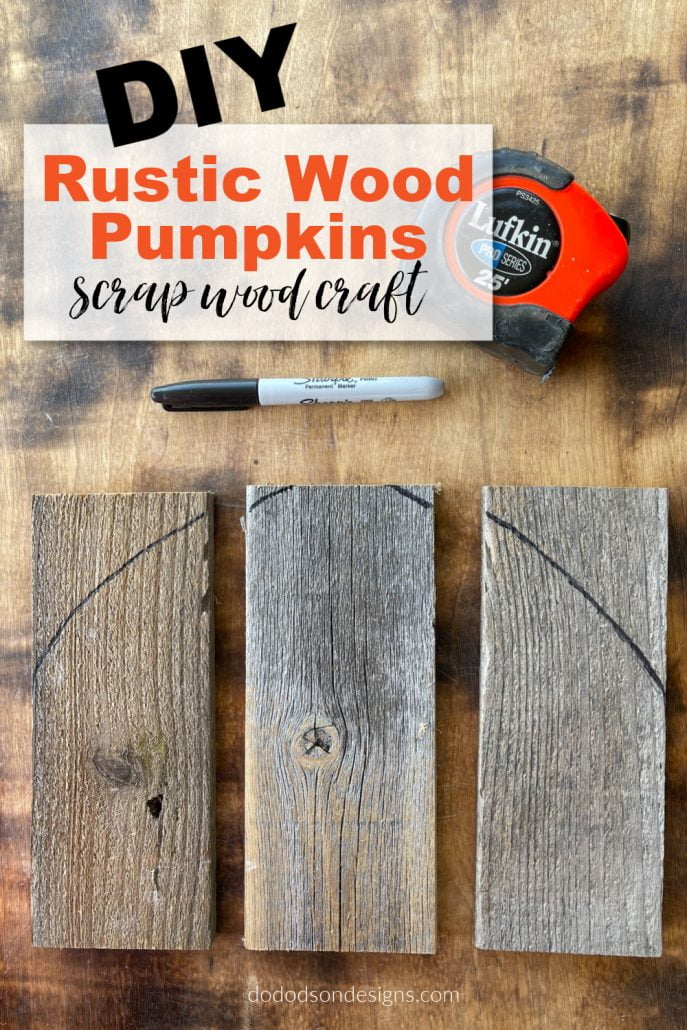
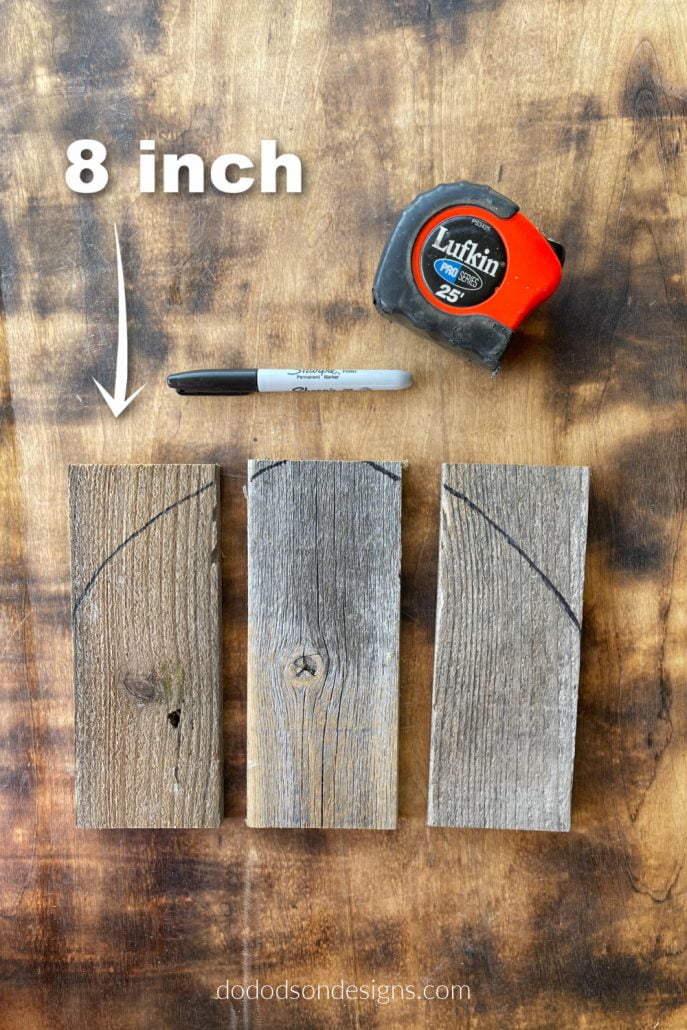
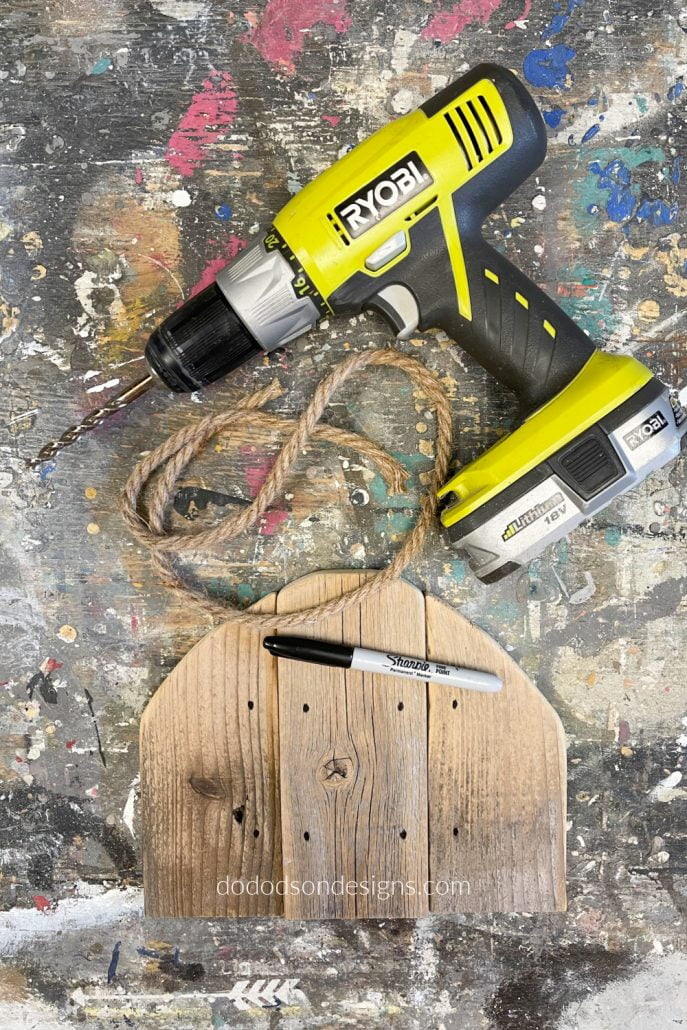
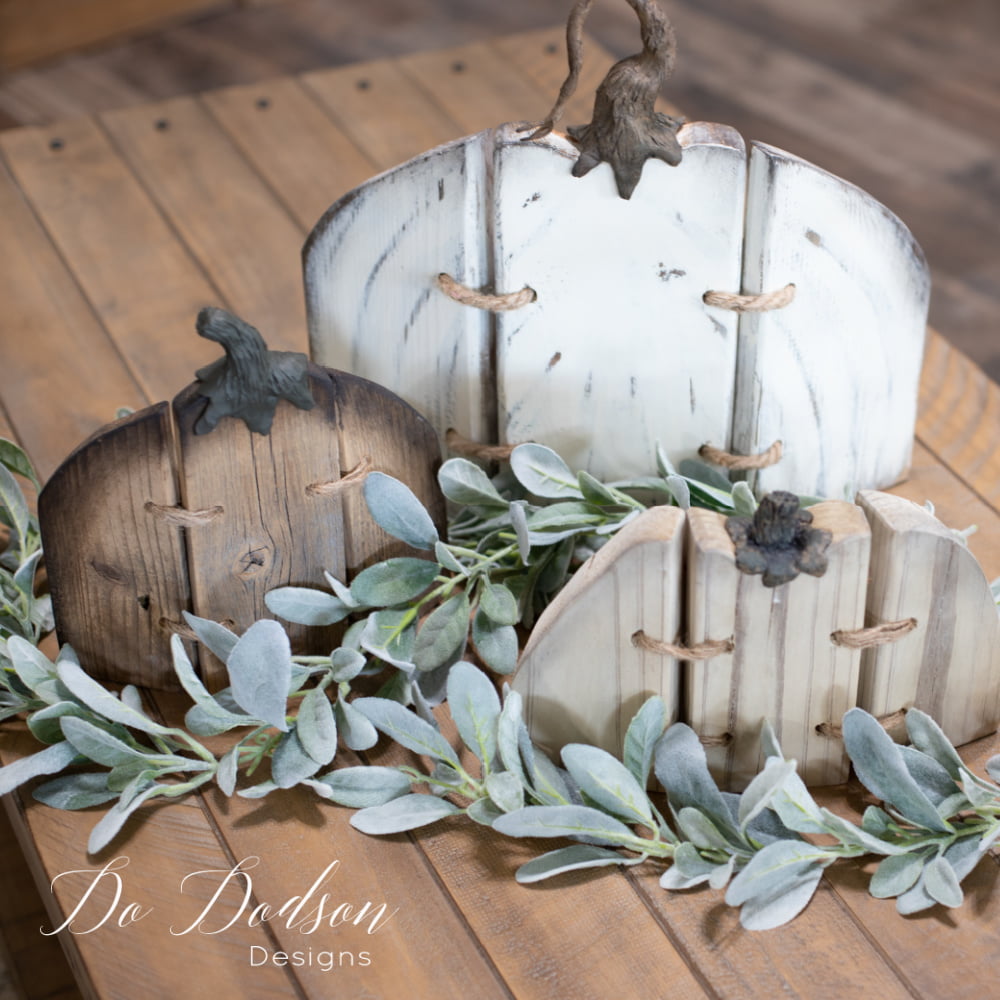
STEP 1 For my first wood pumpkin, I used 8 in fence pickets that measure about 4 inches in width, give or take. I used a sharpie marker (because that’s all I could find) and drew the shape of what I thought a pumpkin would look like. Don’t judge my artistic drawing abilities. My brother got those genes, not me.
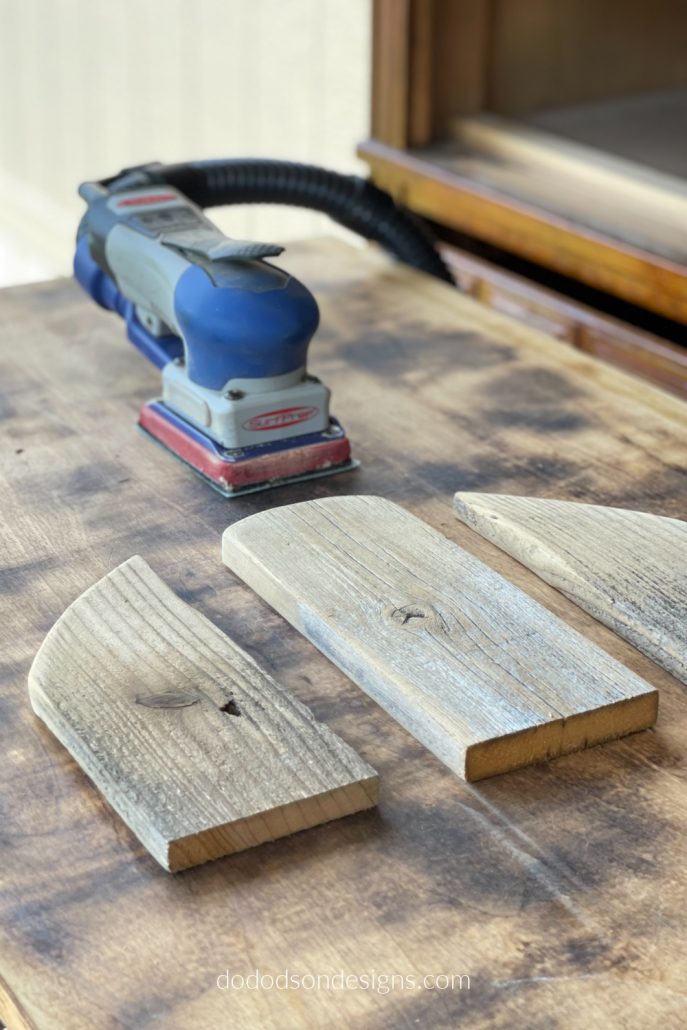
STEP 2 Use a jigsaw to cut away the wood from the top of each board. If you have never used a saw, go next door and ask your neighbors hubby. Those guys are always willing to help out a damsel in distress. No, I cut my own wood, but I’m not opposed to playing that card when needed. 🙂

STEP 3 After cutting the wood, you’ll need to sand the rough edges. I used my favorite sanding tool to get the job done quickly, but you can always use your muscles and sand it with a sanding block or pad.
Assembling The Rustic Wood Pumpkins
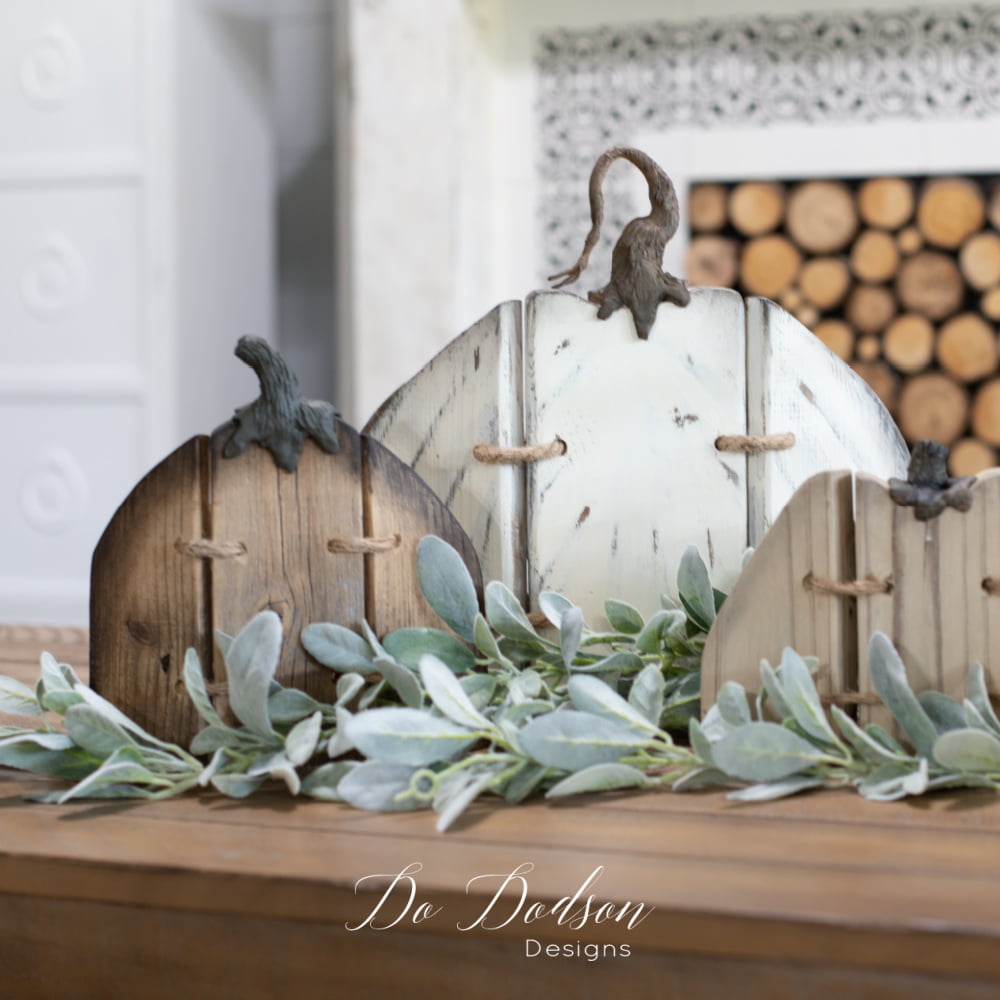
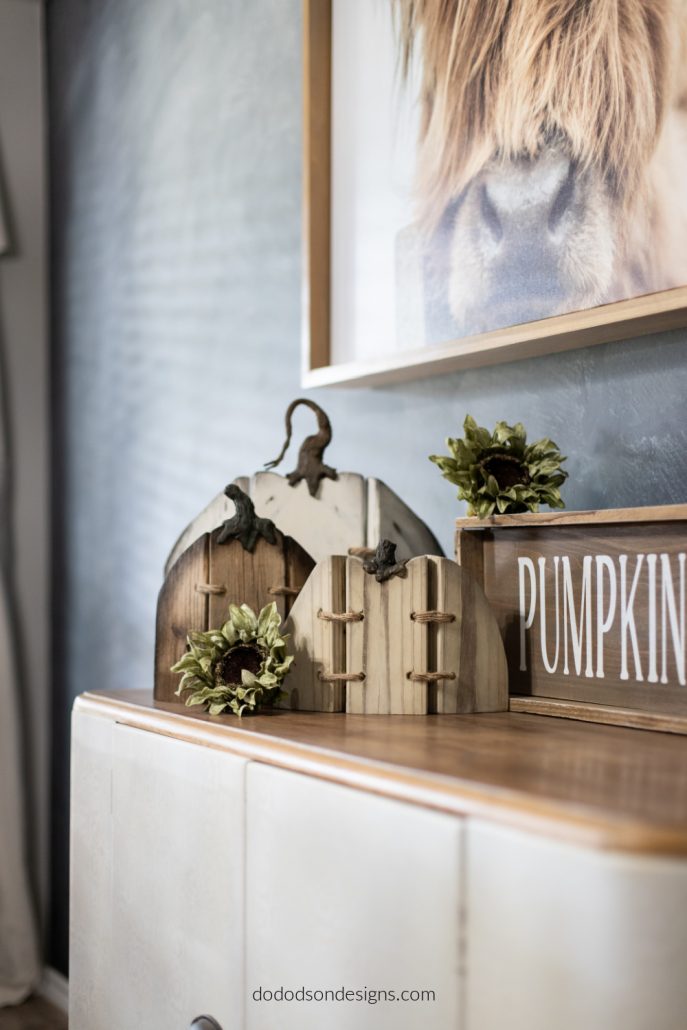
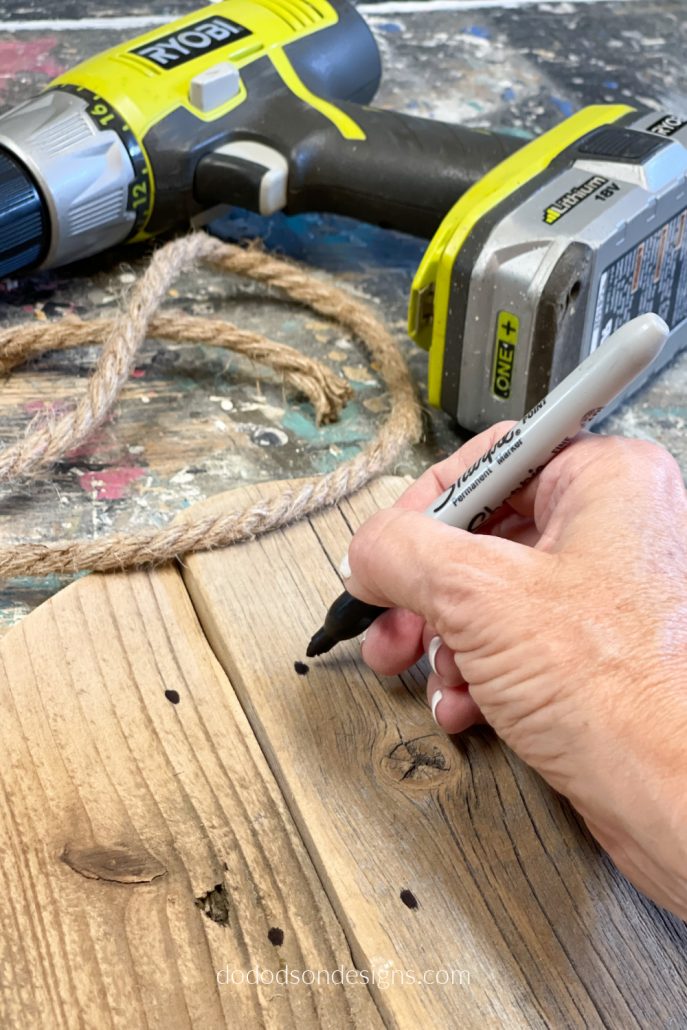
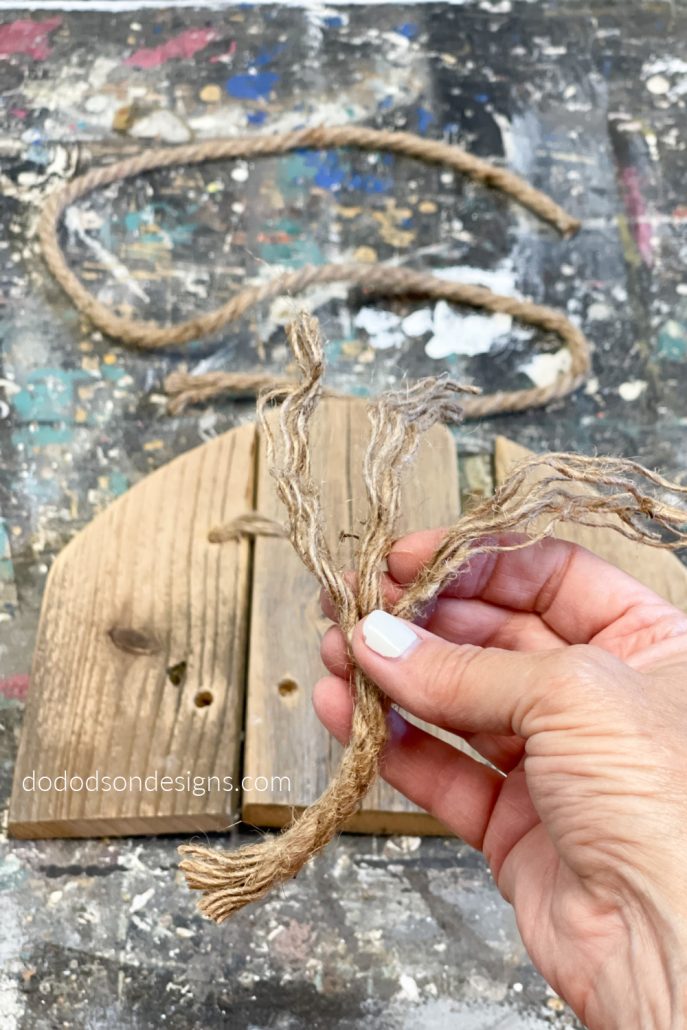
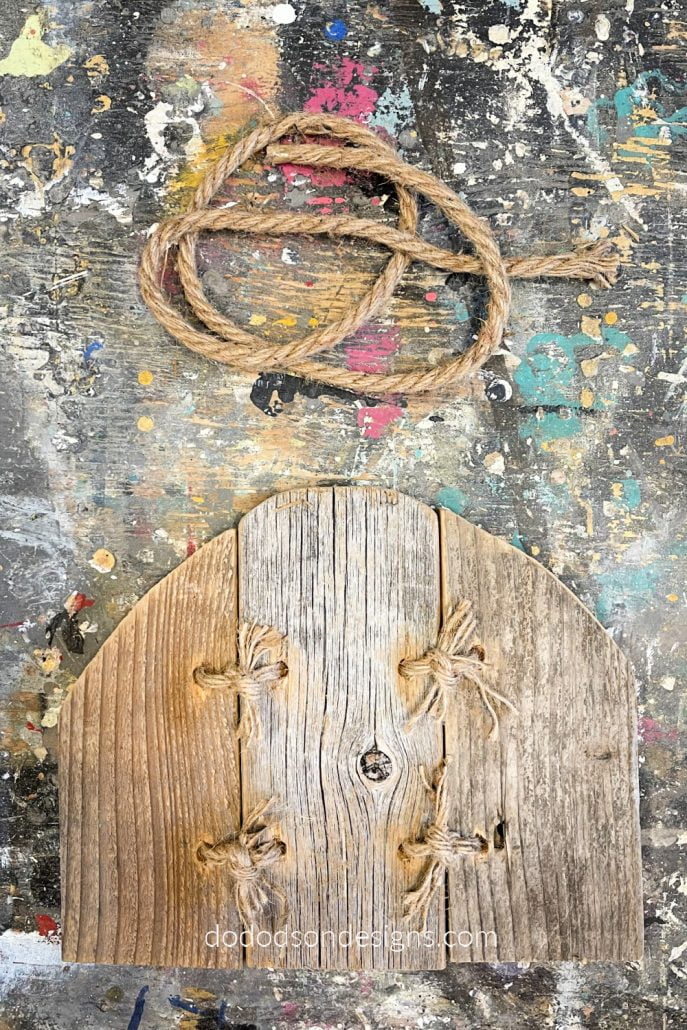
STEP 4 To attach the three pieces of wood together, I decided to use some jute twine I found in my crafting supplies. My thought was to give these rustic wood pumpkins a 3D effect. Well, maybe not quite 3D, but to give them dimension. A curviness like real pumpkins. That’s it! Dimension and a lot of character!
Start by marking where the holes will be drilled on each piece of wood. See pics below. Then drill to holes large enough for whatever jute twine or cotton rope you want to use.
STEP 5 My jute twine was a little large for the holes, so I split the stands. The same look of the jute twine, just smaller, and it took less. I always say less is more unless it’s chocolate cake. 🙂
Insert your twine through the holes and tie a knot in the back to secure the wood pieces together. Be mindful to leave enough room when tieing them so that the pumpkins are bendable.
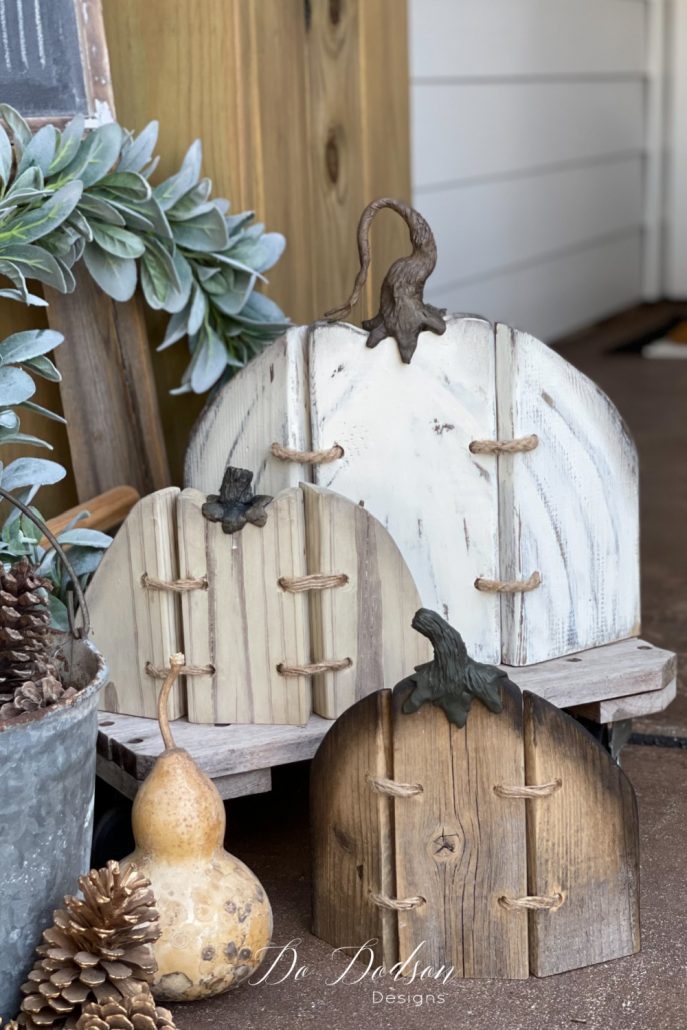
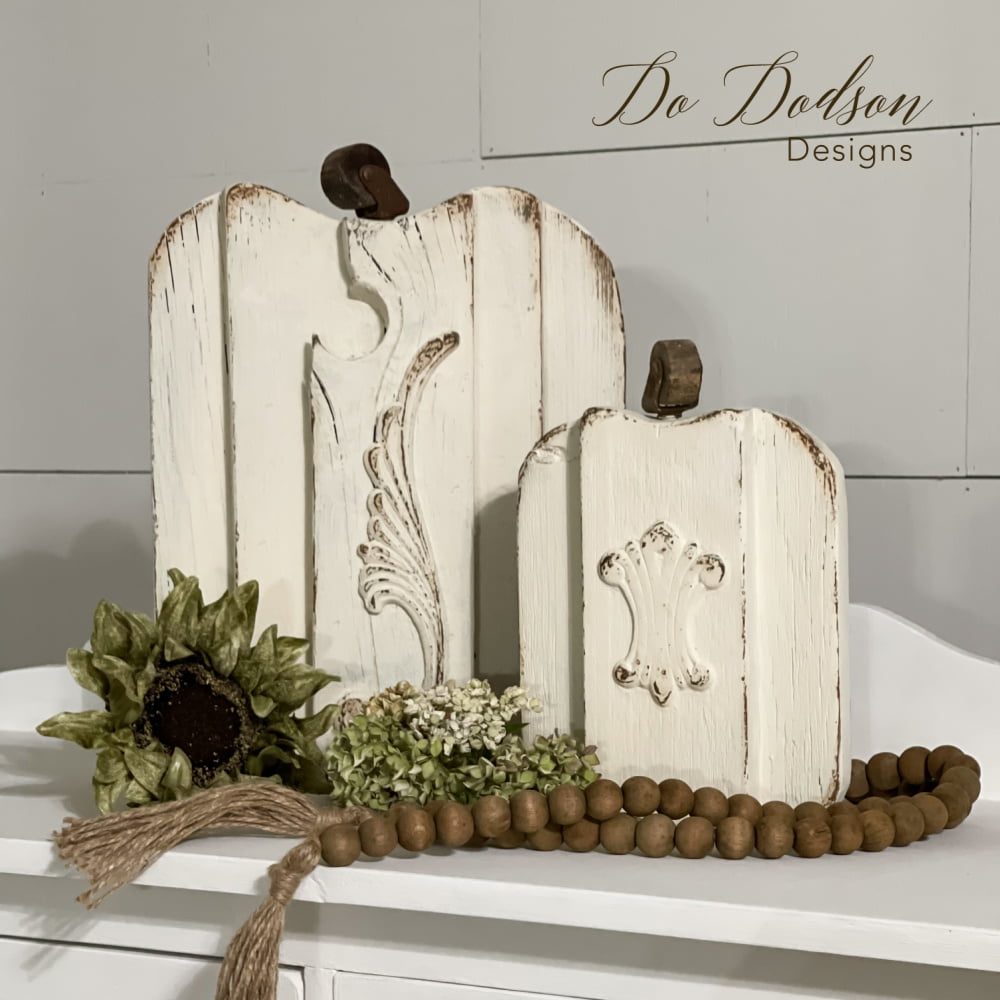
And that’s it! Feel free to paint and embellish your rustic wood bendable pumpkins any way you want. I used Dixie Belle’s chalk mineral paint and Best Dang Wax to give mine a hint of color and a farmhouse vibe.
Personalize Your Rustic Wood Pumpkins
You can be as creative as you like making the pumpkin stems, or you can learn how I made mine from polymer clay. Don’t worry! I’ll never leave you hanging on a fun DIY project. CLICK HERE to learn how I made these DIY Pumpkins Stems That Look Realistic. Super fun!
Hey, thanks for joining me today. These rustic wood pumpkins make my heart happy, and I hope you enjoy making them as much as I have.
So, you know I’m gonna ask, what do you think about this DIY project? Would you make these for your home? Let me know, or just say hi and let me know you were here. Don’t forget to share with your bestie!
Until the next project… xo, Do
Girl, you know I love anything picket fence related! These are the cutest pumpkins! I’ll be sure to check out the stem tutorial!! Pinned!
The stems I made are so realistic. It just makes any DIY pumpkin look better. 🙂
These are so stinking cute! I love them. 🥰
Hey Wendy!Thanks for joining me. I think so too! 🙂 xo
Donne, are you going to tell me how you have lost your weight? I am over here gaining (and it’s not because I over eat). I need help sis. What can I do?
I always look forward to your fall and christmas handmade decor. I need a wood pile and a jigsaw. I live in an apartment so I cant run to the neighbors husband. . I will just enjoy yours.
Hi Cheryl, I’ve recently started moving my body… walking daily, and it has helped so much. Thank you for always supporting me. You’re the best. 🙂 xo
LOVE these!!! Getting my saw out!
YES! So fun to make. Send me pics of yours. I’d love to see them. 🙂 xo
Those bendable pumpkins are so darn cute. It’s always fun to see what you will come up with next.
Impressive weight loss. You have reason to be proud. Congratulations!
Thank you so much, Joanne. It’s always good to hear from you. They are cute! 🙂
These are so great! And yes! I went down the bunny hole to see how you made those great stems. Thanks for the inspiration. I love this project!
Hee hee, that was the plan! Thank you so much for joining me. 🙂 xo
These are definitely going on my fall list. Love using my scrap wood.
Hi Nelda! I think you will have fun creating these. Enjoy. 🙂 xo
How did you attach the stems to the bendable wood pumpkins? They are beautiful!
Hi Susan! You can do it two ways. Insert a wood dowel into the clay before baking it, and then drill a hole in the top of the pumpkin. I secured mine with wood glue. Or you can just glue them on. Have fun creating. 🙂 xo
These are so cute, Do! Thanks for the inspiration and for sharing!
Thanks, Kim! So glad you enjoyed them. 🙂 xo
I absolutely love them!!! We have a mutual friend Marni A. I use to watch your coffee chat on Sat. Mornings. I don’t get up that early now!!🤣
Thank you, Sylvia! Marni is a doll! So glad you enjoyed the pumpkins. My morning chats have turned into morning walks. 🙂 xo
These are just the cutest pumpkins. You are so creative!
Thanks, Tammy! I love coming up with creative ideas for Fall decor. Thanks for stopping by. 🙂 xo
I made these out of scrap wood & this was my first time working with clay. They are not as pretty as yours, but they will be ok for a first timer. Thanks for such a great idea and sharing.
I think they’re fantastic! I find that my DIY projects get better with practice. Thank you so much for the kind words. 🙂 xo
If you’re adding the stem to wood what’s the best way to attach it?
I glue them on, but you could use a small dowel and drill a hole in the top of the pumpkin to secure it. I’ve done this before, and it works well.
You always have the best ideas! And it is about time you were featured in a magazine!
Thank you. I try all of your ideas
Thank you so much, Amy! I get all giddy when I create something out of nothing. Well, almost nothing. Thanks for stopping by and have a fantastic week. 🙂 xo
Love it! Thank you for sharing…you always have the best ideas to copy😍
Hi Polly! 👋🏻
Thank you. My whole goal here is to create simple DIYs that can be shared with others. A life of DIY projects is good for the soul. Have a fantastic week and best wishes with your wood pumpkins. 🎃
I see why these landed you a magazine feature! Stinkn adorable and an amazing idea! not sure how I missed commenting the first time around, thanks for sharing my creative friend! Hugs 🤗
Hey friend! Thank you. You know me and my scrap wood projects. I’m getting a little low on wood so I need to start searching for more. Thanks for stopping by. I hope you have a good week. 🙂 😘
These are SO cute. I’ve attempted to make the pumpkins and today is stem making day – wish me luck. Hoping mine can turn out similar to the ones you posted, they’re adorable.
Oh, hey Sue! They’re so easy and I’m sure yours will look great. I’d love to see them.