
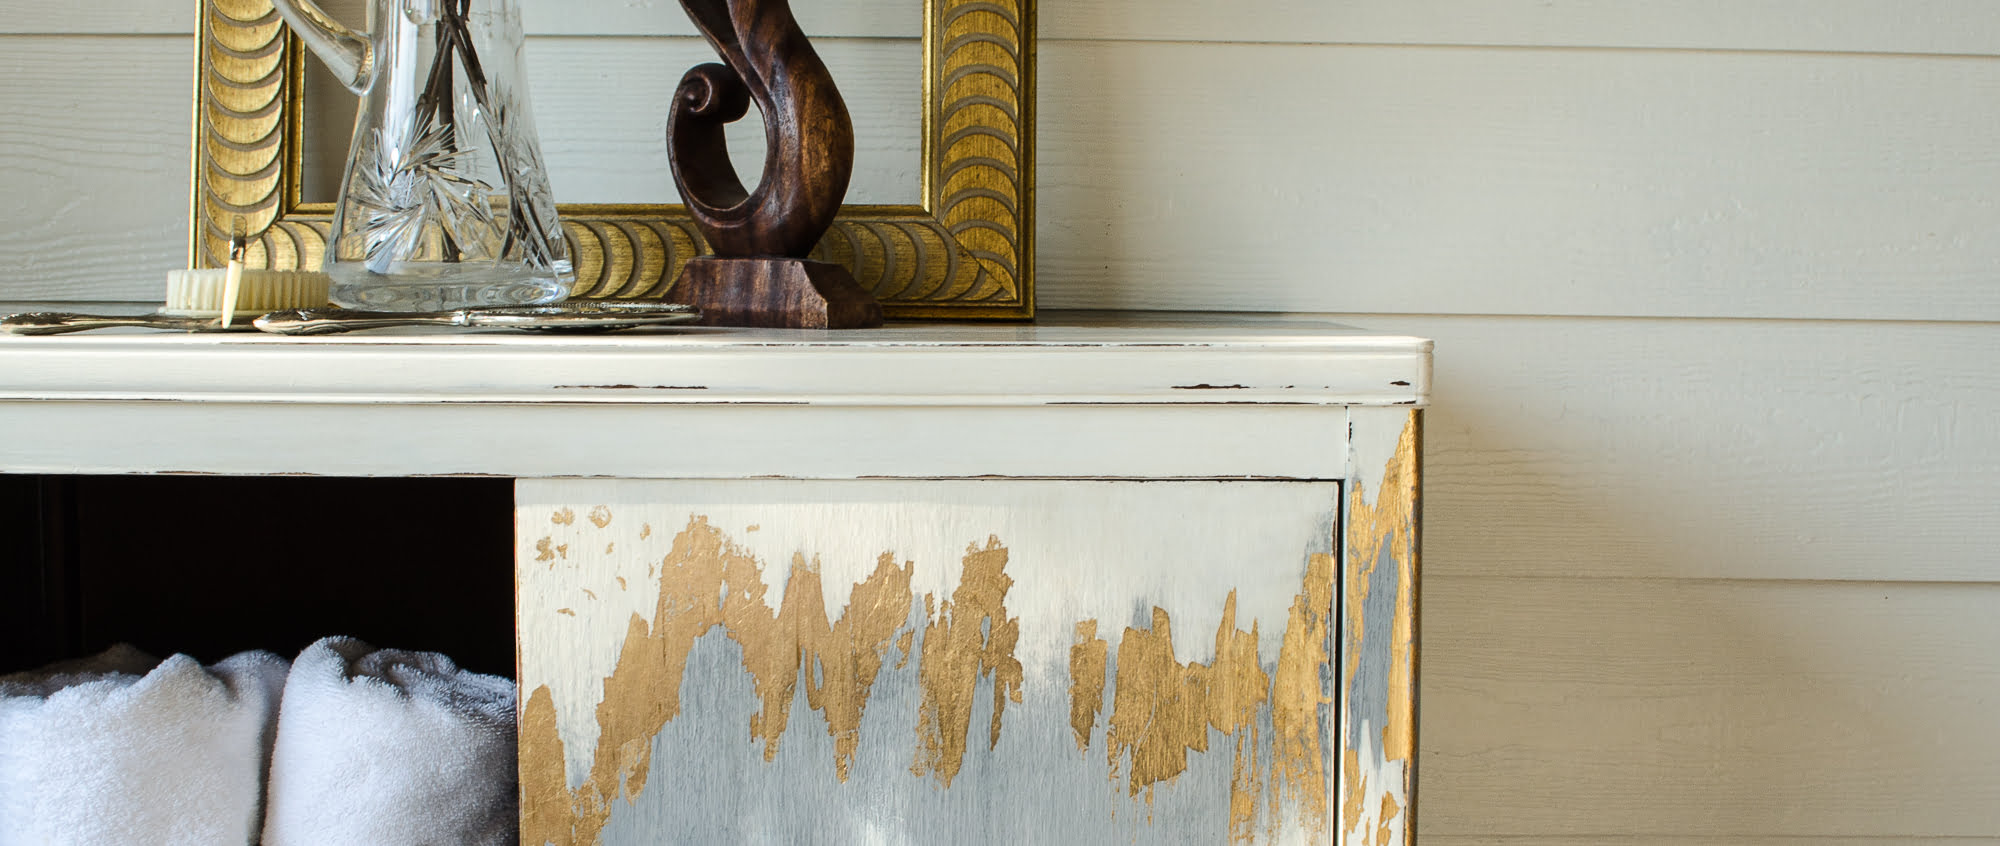
GOLD LEAF… those two words can stop a gold lover dead in their tracks. I’m that gal! This shiny metal leaf (I’m using imitation gold leaf)) that can literally float in the air and is nothing less than magnificent on almost any surface. It adds a bit of glamour to whatever it touches. In today’s post, I will show you how to apply gold leaf to almost anything. If you LOVE gold, this is for you.
This post contains a few affiliate links to help you find the products I use. You are not charged extra to use any of the links, but any income I make will be used for more fun DIY projects that I can share with you! To see my full disclaimer, click here.
How To Apply Gold Leaf To Almost Anything – Before


Below are links to the products I have used before, on this project, and on other metal leafing projects. The difference is in the size of your project. Small kits are available for smaller jobs, but if you’re tackling a massive project like this one, you will want to buy individual adhesives and sealants.
Product List:
Large projects
- Imitation Gold Leaf Sheets
- Metal Leaf Gilding Adhesive
- Sealant for the Gold Leaf (for large projects… furniture) Also can be used on metallic paint finishes.
- Caviar (chalk mineral paint)
- Paintbrush
- Artist Brushes (Don’t use your expensive brushes)
For Smaller Projects
- Gold Leaf Kit (small projects)
*Gold leafing can be applied to almost any surface that is clean and free of debris. Wood, glass, ceramic, metal, fabric, painted canvas, etc.
Preparation For Paint and Gold Leafing
To start with, my client brought me three HUGE oriental mirrors. WOW! That was my first thought. WOW! Was my second, third, and last thought. Applying gold leaf is pretty straightforward, but it takes a certain amount of WOWs to complete this size project.
- Clean the surface
- Paint the surface (background) first if you have a design that you want to apply the gold leaf to.
- Apply the adhesive.
- Apply the gold leaf
- Seal the gold leaf.
Things You Should Know Before Applying Gold Leaf
- Have a designated area to work in. One that isn’t going to get disturbed by your precious Pup or kiddos.
- Turn off your ceiling fan… if you have one. You might want to adjust the air-conditioned as well. No direct airflow should be on your project.
- You will need a shop vacuum. Wearing a mask is a good idea as the metal leaf is extremely fragile and will break off and float in the air. Protect your lungs.
- Don’t sneeze! LOL, I did.
- Don’t get in a hurry. This is a timely process and will be worth the effort and finesse you give it in the end.
- The adhesive is water-based, so wash out your brush after each application… or it will be a mess.
- Apply the gold leaf in small sections.
Adhesives Matter When Applying Gold Leaf
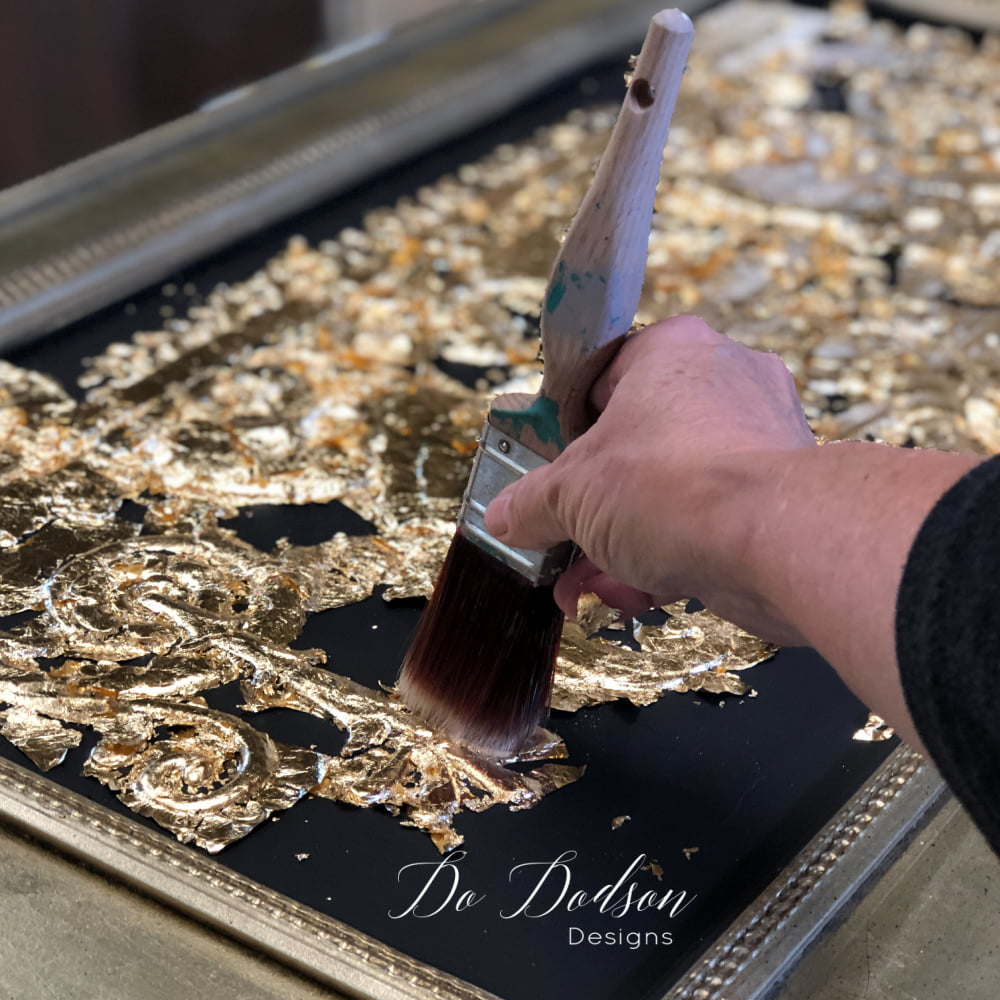
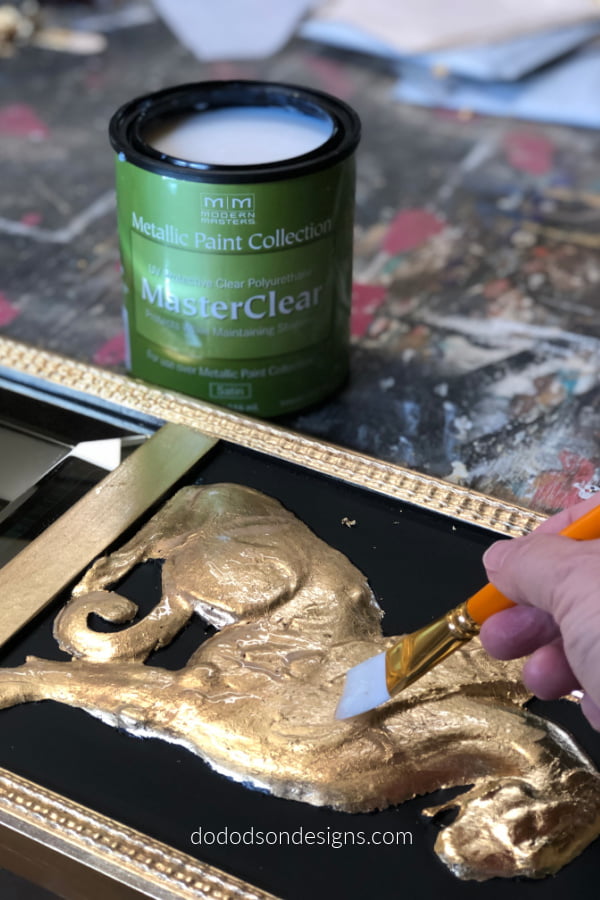
Adhesives matter. With an artist’s brush, apply the adhesive (it looks milky in appearance when you first apply it, and then it turns clear as it becomes tacky) to your project. Wait until the appropriate time for it to become tacky enough before applying the gold leaf. The instructions say anywhere from 15-30 minutes. That will depend on the temperature and humidity of the environment that you’re working in. My wait time was about 5-10 minutes in a 74-degree room. If the gold leaf is applied before the glue is tacky, it will not adhere. Carefully tap your finger on the surface after the adhesive has become clear to check if it has become tacky. This is the best way to know. Do not allow the glue to pool in areas. This will affect dry time as well.
How To Apply
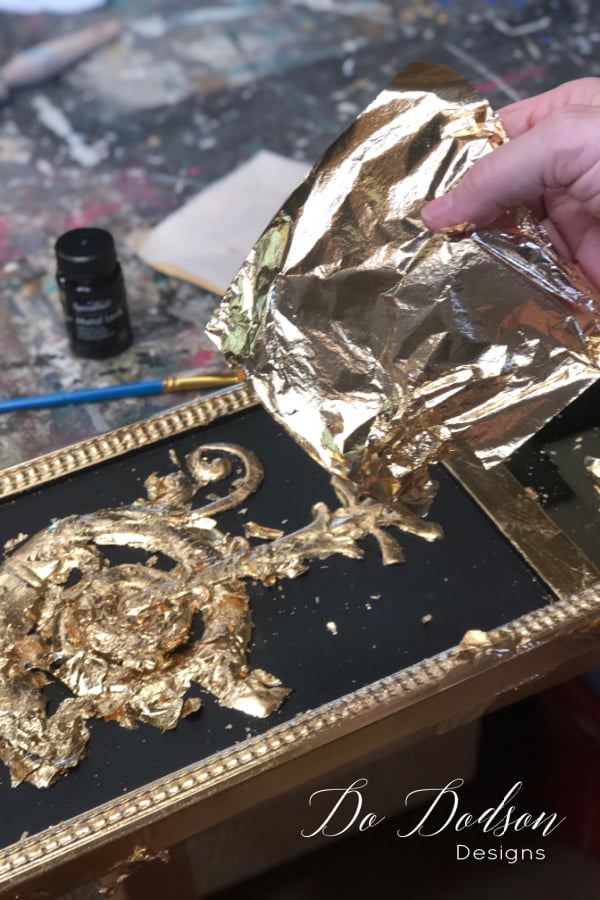
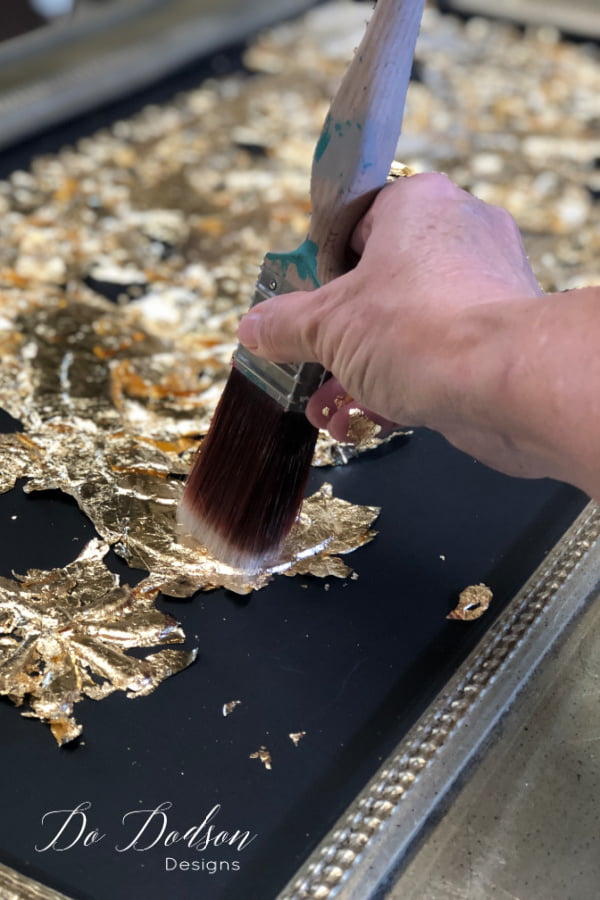
Once the adhesive is ready, “tacky,” gently lay the gold leaf sheet across the surface. I like to do this in small areas so that I have more control. Use a soft-bristle paintbrush to gently smooth over the surface so that the metal leaf comes in full contact with the glue. When you’re working with an uneven surface, you will need to use additional sheets. Full coverage can be tricky, and subtle cracks are almost always viable. If you don’t get the coverage, you want the first try…no worries. Just apply more glue and gold leaf over those areas. You can see how this could become time-consuming. That was my second WOW!
*Full disclosure… I wore gold leaves on my legs for days and didn’t even know it until my neighbor noticed. The adhesive works!
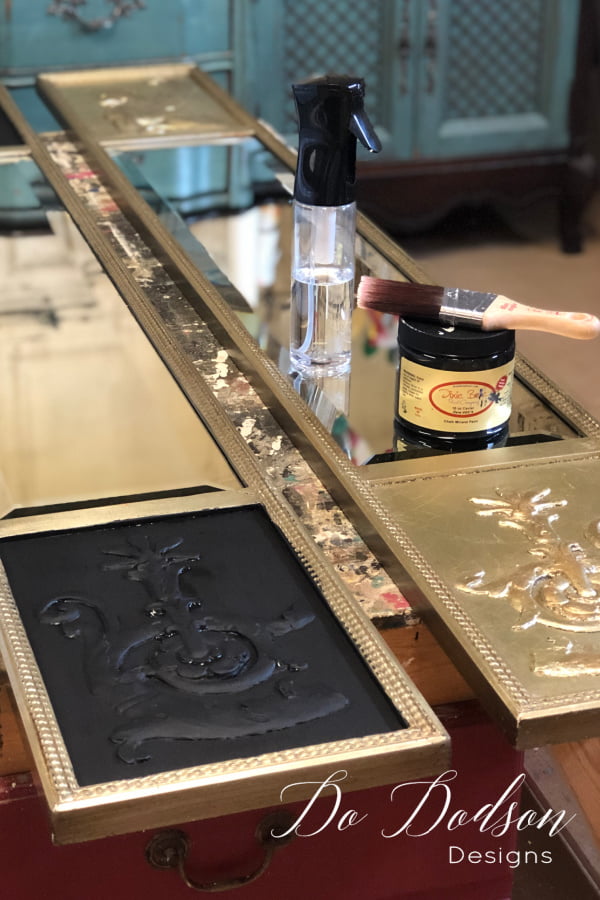
Sealing The Imitation Gold Leaf
Imitation Gold Leaf and Copper will tarnish, so it’s important to use a varnish or sealer over the top of these to prevent the tarnishing process. My go-to topcoat for metal leafing is Master Clear. I also use this topcoat on my metallic paint finishes as well. It’s good stuff! Apply a thin coat and allow it to dry. I only applied the gold leaf to the details on this mirror after painting the background areas with Dixie Belle’s Caviar (black), a flat chalk mineral paint. I did not apply a top coat to the painted surface… that’s why I used my artist brush. That was my 3rd WOW!
I used my usual Paintbrush when top-coating the gold leaf on the frame. Apply two coats of the Master Clear with light sanding after the first. I find this works well on larger pieces that are likely to have high traffic. Since these are mirrors, they will need extra protection from frequent cleaning if you’re doing a small project like a picture frame. One coat is fine.
The End Results
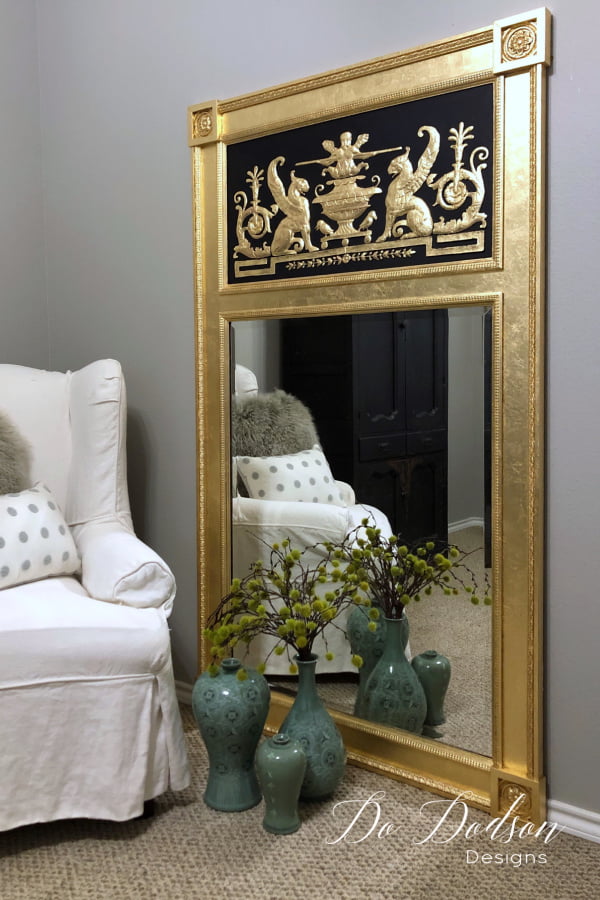
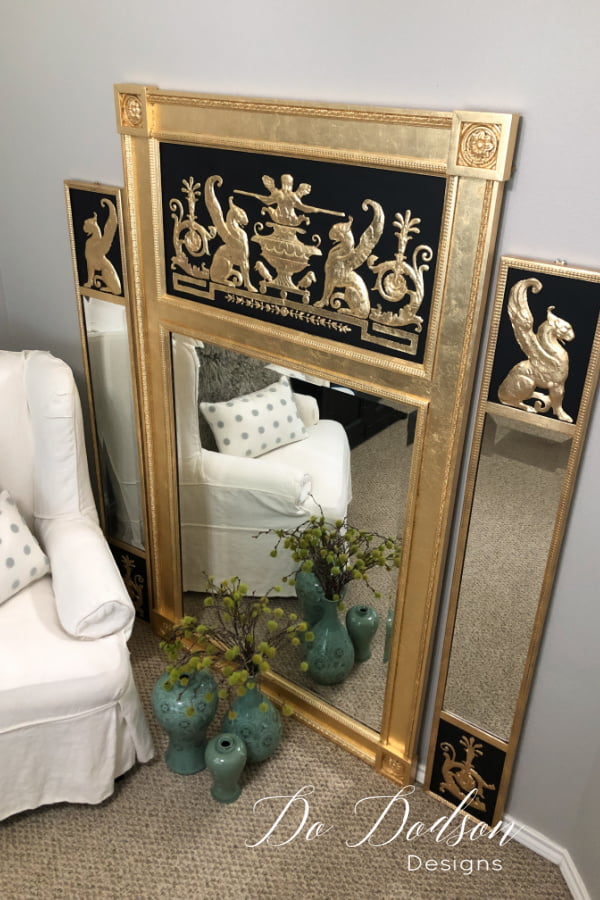
If you’re asking yourself, “did she gold leaf all three mirror frames?” The answer is yes! That was my last WOW. There’s no denying that applying gold leaf adds glamour and sophistication to just about anything it touches, and these are certainly swoon-worthy, in my opinion.
It really is easy. Try a small project first and before you know it, you’ll be gold leafing like a pro in no time at all. Try it on a glass vase!
Hey, thanks for hanging out with me today; I hope this inspires a gold leaf project for you, and I would love to hear any feedback, good, bad, or ugly, in the comment section. Tell me what you think.
Until the next project… xo, Do
Wow, you make this look so easy. Time to get the gold leaf out again. Thanks for the inspiration!!
It was a real booger to complete but the results are so worth it. 🙂 Thanks for stopping by. xo, Do
Thanks Do. I could try it on a smaller piece. Nah, too much just yet but I’ll get there.
It is beautiful.
Lynne
Thanks, Lynne! All in good time. xo, Do
I usually paint the entire dresser, but with the drawers out. Then I lay the drawers on their back and paint their fronts. You painted the drawers while they were still in the frame, but It doesn’t look like you painted the edges of the drawers or the frame. did you?
Hi Marilyn,
I’m confused as you’re referring to a dresser. This blog post is about gold leaf on mirror frames. Are you referring to a different blog post? Do
great job and blog this has given me the inspiration to give it a try .
Thank you so much, Steve! It’s fun to work with. xo, Do
very beautiful your work I love this technique.Congratulations from Argentina
Thank you so much, Marcela! It takes a bit of patience but worth it in the end. Blessings from Texas. xo, Do
Wow, that mirror I’m in love. How can I get 20 of them? You do amazing work. And I love how thorough you are when explaining every little thing.
Your a great teacher Do!
Thanks, Denise! So glad you enjoyed my tutorial. 🙂 xo
This is so helpful.
How do we smooth the gold leaf on canvas? Could you please help!
Hi Faria! If you’re applying it to a canvas, you can use a soft bristle brush. Just make sure the glue is completely dry before brushing over the gold leaf. 🙂
Wow, is right! I hope she is not only happy but ecstatic at the way they turned out. Did you antique them a little? From my small screen it doesn’t appear that you did…..I would have to tone it down a bit for me. Great job, Do….as always.
Hi Sharon, No antiquing, just pure imitation gold leafing. LOL, My client “HE” wanted the brilliance. I would have toned it down a bit too. Always good to hear from you. 🙂 xo
You are the gold leaf master Do!! My first leafing project was a set of pumpkins I did in copper leaf. I’m hooked! Thanks for the tutorial, my friend! Pinned 😊
Metal leaf is some fun stuff that’s for sure. Thanks for stopping by and for the pin. 🙂 xo
That oversized mirror is nothing short of stunning. Great job!
Thank you, Christene! That oversized mirror about killed me. LOL 🙂 xo
Can you use regular glue for adhesive? I have never tried this
Hi Kathy! Thanks for reading. No, it’s best to use glue formulated for metal leafing. Start with a small project like a frame. You’ll learn quickly. Best of luck to you. 🙂 xo
That was a huge project with a stunning finish. My first thought was “I want one!” Curiosity compels me to ask how long it took and how much gold leaf you used.
Sitting here deciding what small item to gold leaf first – there’s this boring lamp in the dining room…
Sheila
Hi Sheila!
It was a HUGE job and I said afterwards, never again. I can’t even remember how many sheets it took. A lot! About two weeks of work. But the results were stunning.
Quite wonderful! When applying glue before using the gold leaf, do you have to be very careful to only coat the EXACT shape (or the leaf would stick to sloppily used glue).
Also the adds on the rhs are annoying as they obscure your text.
Hi Audrey. Yes, if using metal leaf on intricate patterns, you’ll need to be very careful where the glue is placed. The glue is more of a liquid so it doesn’t take much and certainly will run.
Thank you the feed back on the ads. I’ll look into it. 🙂
Very enriching indeed…. thankyou so much!
Thank you for reading. 🙂
I need to cast a small drop earring that appears to gold filled. Its mate is missing ( I ordered brass casting grain for sand casting the mate). I looked into gold plating but it is expensive and complicated, and probably won’t use it again, anyway. How difficult is it to get the faux gold smooth after applying the adhesive? Will a burnisher work? I will certainly have to seal it/them several times as they would surely tarnish. Have you had problems with tarnishing after proper sealing? What is the cleaning procedure that should be told to the owner? Any help will be appreciated. I to have a gold sheet that could be used, it was used for KumBoo. Any suggestions there? I know that the gold would sink into the brass if not careful with the heating part of KumBoo. Thank you, Audie
Hi Audie!
Thanks for reaching out. I wished I had the experience in jewelry rehab to help you but I don’t. Most of what I do is furniture and home decor. Best wishes and god luck. 🙂
Thank you for this post. It gave me the confidence needed to get started.
Perfect! It’s easier than it looks. Good luck with your project. 🙂
Hi, DO! I have an old headboard & two framed mirrors I am considering refinishing in gold leaf. I believe it is some sort of wood but from the back side looks almost like a spray foam. It is very detailed. It is currently painted a glossy black. I am VERY nervous to try to strip the paint. Can this be applied over the paint? Any other prep work that should be done to ensure the adhesive & foil stick? Thanks for the tutorial and any advice you can provide. Love your work! Such inspiration!!
Hi Jennifer,
Thank you! I’m sorry it’s taken me so long to respond. I would not try stripping it either if you are unsure if it’s solid wood. I would clean it well first. Try applying the metal leaf it in a small area first. But it should adhere. Maybe scuff sand it first and make sure to remove any dust from the sanding. I hope this helps. 🙂 xo
Hi Do! Stunning!
Hey Cheryl! Thanks. It’s always good to hear from you. 😘 xo