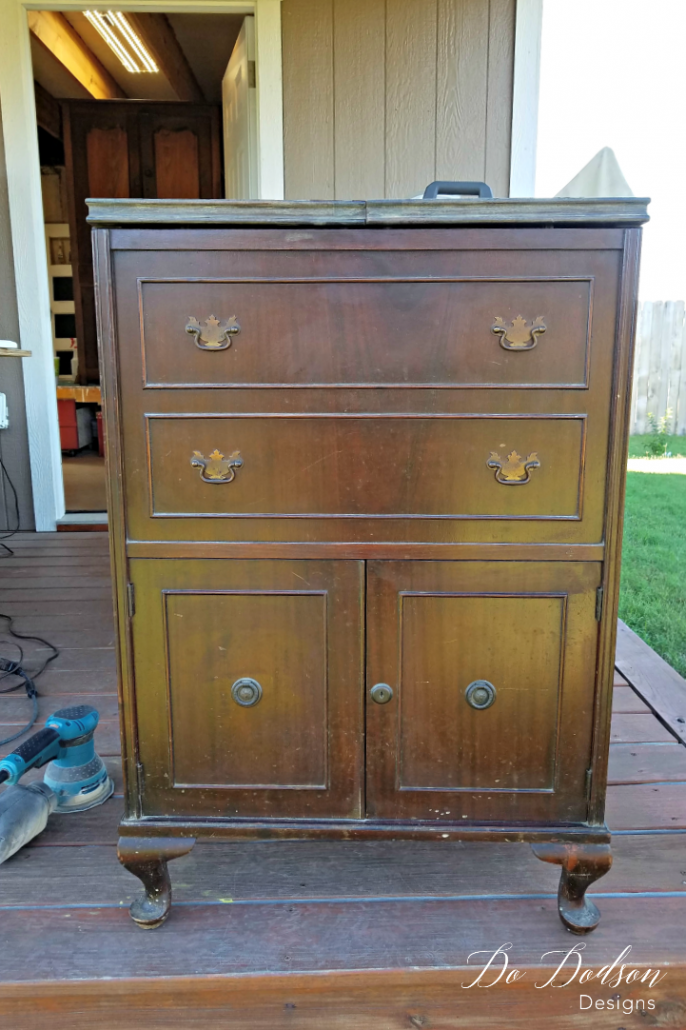
Look at this sweet little chest! I snagged it from a friend who wanted to clean out her stash of unfinished projects. Lucky me! The most amazing thing I discovered about this piece is that it’s a minibar and in perfect condition. Yep, the top opens to find a hidden bar. Cool, huh? I’m thinking maybe a little copper leaf design. I’ve always wanted to try gilding on painted furniture. Let’s DO this!
This post contains a few affiliate links to help you find the products I use. You are not charged extra to use any of the links, but any income I make from a purchase will be used for more fun projects! To see my full disclaimer, click here.
*This post is not sponsored, and my opinions on the products are mine.
Adding Copper Leaf Gilding To Painted Furniture
After looking at this unusual piece, I decided it needed something special. Every now and then, I just let my creative side flow; this time, it was in high gear.
It’s a blank canvas with clean lines, and I had just purchased some copper and imitation gold leaf. The real gold leaf isn’t in my budget, and this, in my honest opinion, looks equally great when applied over smooth surfaces. It’s the perfect-sized piece to add a design element over.
I typically notice that most furniture artists use leafing for decorative accents. You can always apply it to the best features of your favorite antique furniture—it has unlimited furniture design potential!
Perhaps an interior design on a wall or even wall decor. That would look very high-end.
Just a side note: metal leaf isn’t recommended for outdoor use. Use on interior projects only.
Additional Metal Leaf Inspiration
For more metal leaf inspiration, check out the links below.
Material List:
Here are the products that I used to create this finish.
- Mermaid Kiss & Anchor (Wise Owl Chalk Synthesis Paint)
- Spray Mist Bottle (for water)
- Minwax Polycrylic in a satin finish
- Purdy Cub 2-inch brush
- Paint scraper
- Metallic leaf
- Leaf glue
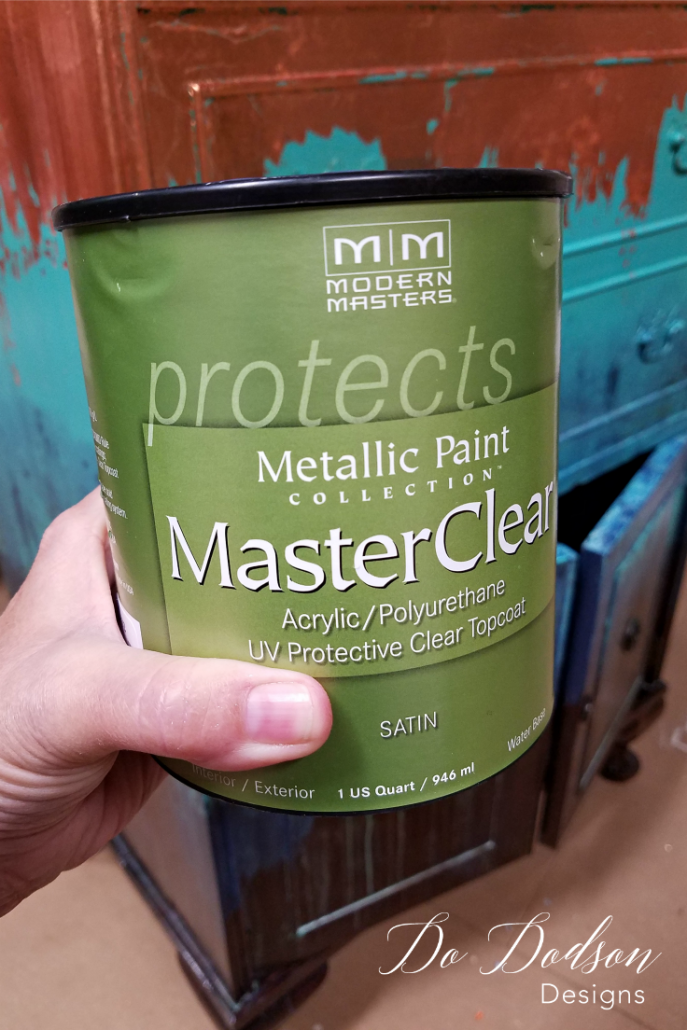
- Master Clear Sealer for Metallic Finishes
Always prep and clean a piece to ensure it is debris-free before painting. This type of paint doesn’t require aggressive sanding. Light scuff sanding should be done with 220-grit sandpaper. Clean away the remaining dust after sanding with a damp cotton cloth or tack cloth.
I normally would use a stain blocker/primer before painting, but I wanted the wood to be exposed on the lower part of the chest for this makeover, so I left that finish intact.
*I have used similar alternative paint colors, such as Dixie Belle’s Mermaid Tail and Bunker Hill Blue.
How To Add Copper Leaf – Tutorial
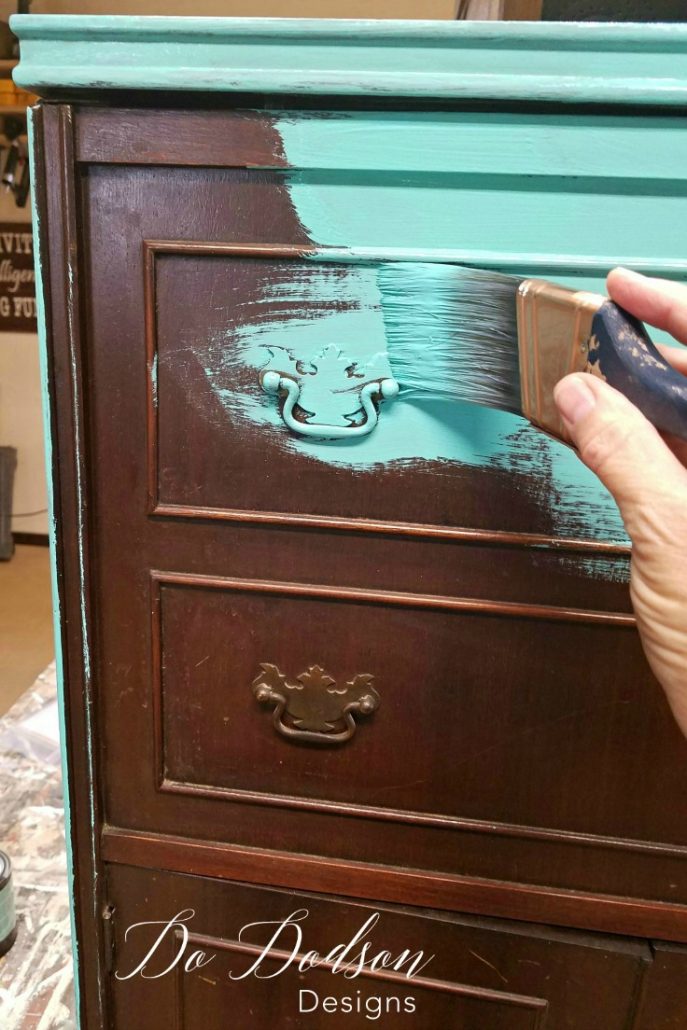
Who paints over hardware? Yes, I know—that’s sacrilegious. I don’t normally, but with this design, it worked! Here’s what I did to get this show-stopping copper and paint look.
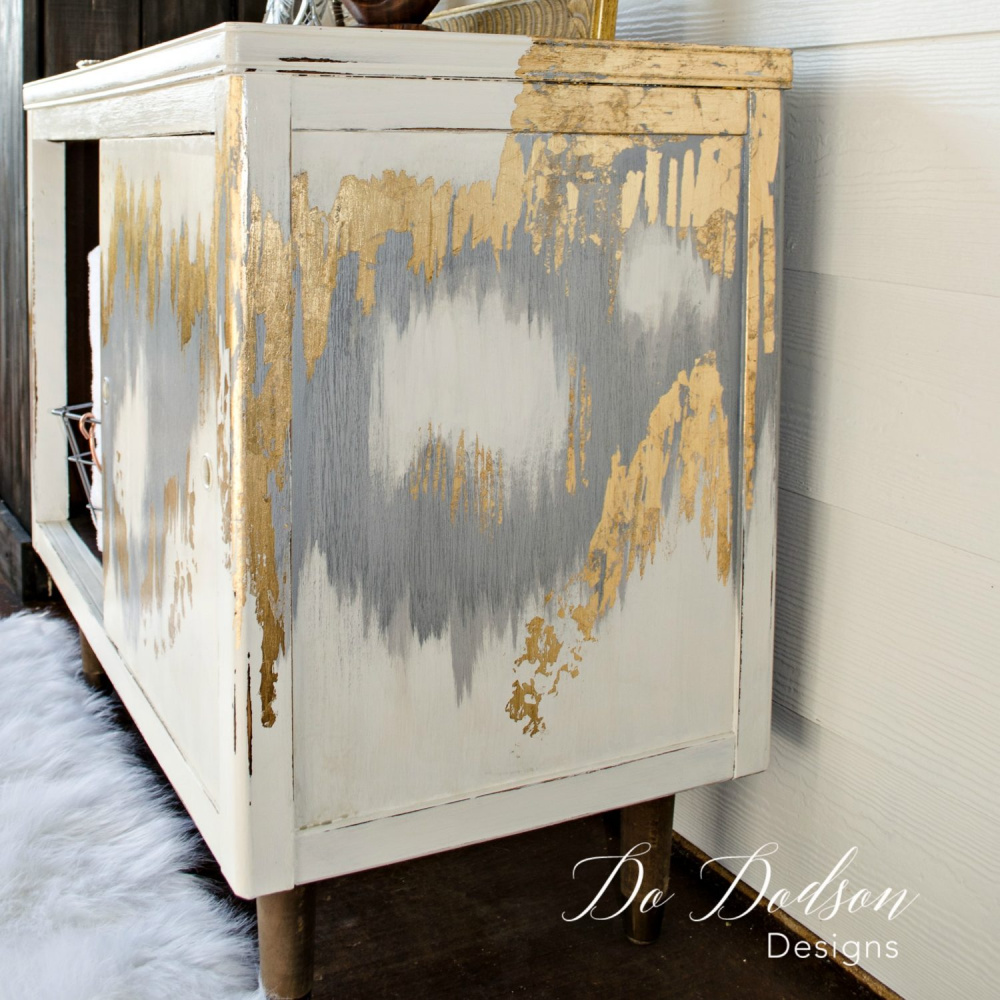
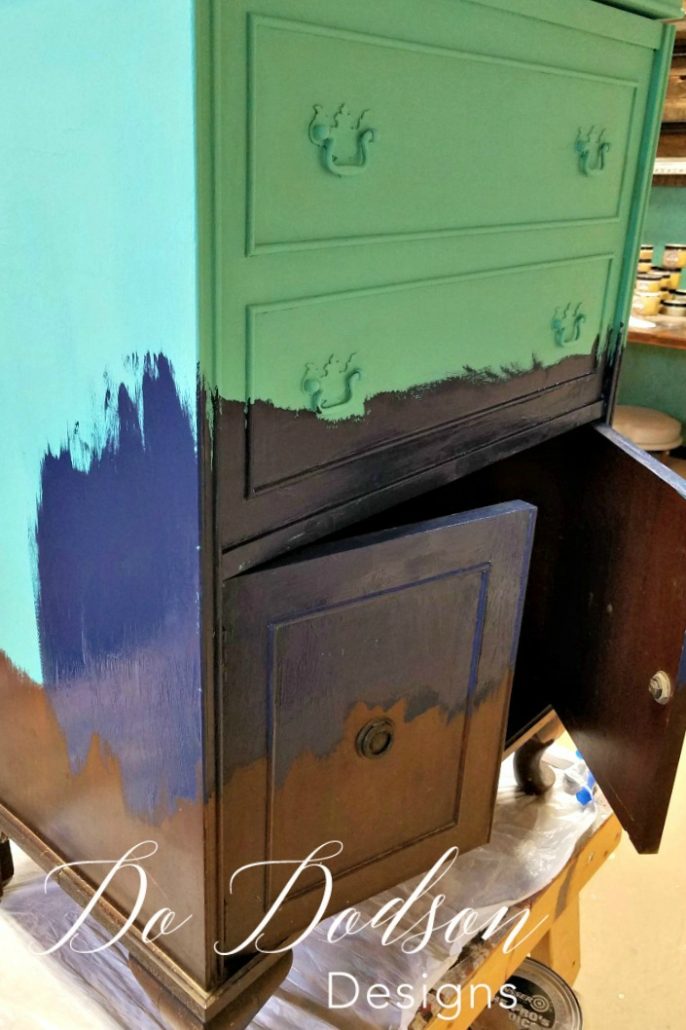
STEP 1: Apply one coat of Mermaid Kiss (turquoise) to the top 1/3 of the chest. This will be the base color for the top of the minibar.
STEP 2: While the paint (Mermaid Kiss) is still wet, overlap with the second paint color Anchor (blue). See the photo below.
Creating an Artistic Finish With Paint
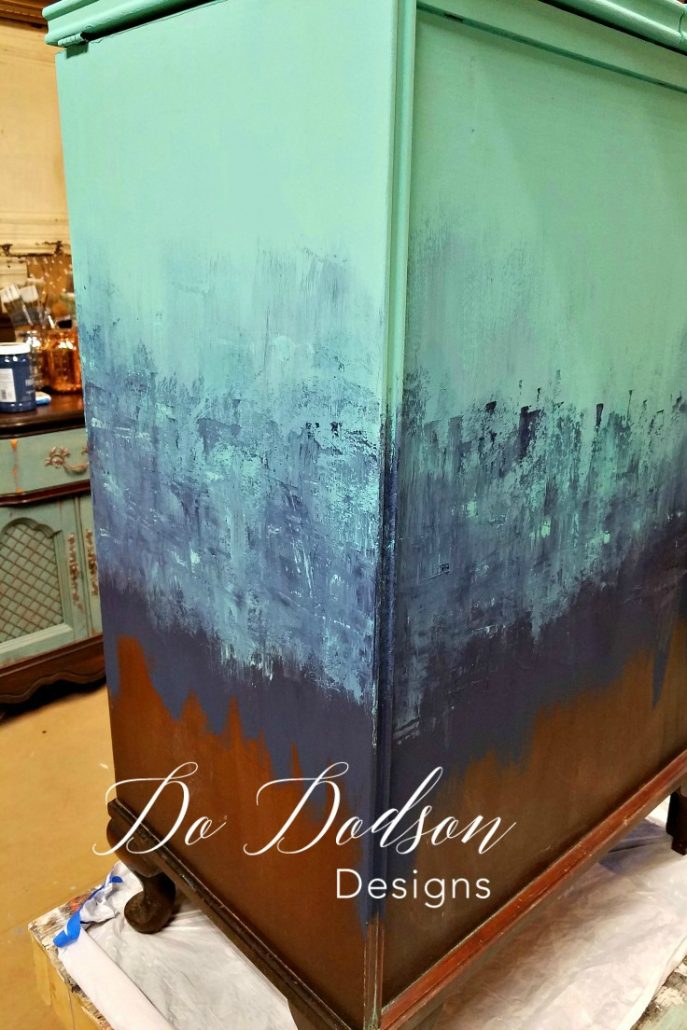
STEP 3: With a paint scraper, drag both colors together at the point where they meet (spraying with water to keep the paint movable) to create an artistic look. I came back in with the Mermaid Kiss to add some random brush strokes for extra interest and blended the colors even more. You can learn more about mixing and blending paint colors by CLICKING HERE.
The Drippy Texture Paint Finish
Here is where the fun begins! Yes, painting is fun and should never be considered work.
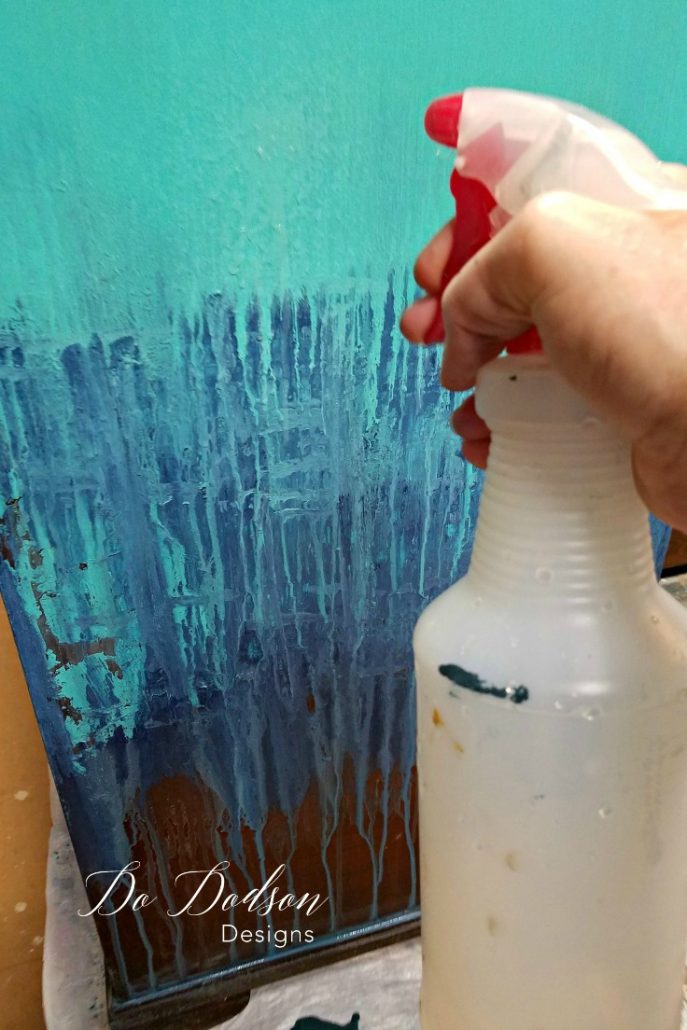
STEP 4: After the paint begins to dry, a scraper adds even more texture by dragging its beveled edge across the paint and creating vertical and horizontal lines. This may look like a hot mess, but it’s a work of art in progress.
STEP 5: Next, place a waterproof liner or anything that will catch what is about to happen. Using a large trash bag works well, too. Spray over the painted areas with water in your spray mister, and watch the magic begin. Next, take a paintbrush and gently blend the colors a bit more. Not too much. You’ll want all that texture to be somewhat visible. The results will blow you away!
I was already wondering how the copper leaf would look with this finish, and I even considered trying the imitation gold leaf.
Artistic Paint Finish
STEP 6: Allow your painted masterpiece to dry overnight or longer. It depends on the temperature and humidity of your working area. The thicker paint layers will take longer than usual to dry completely.
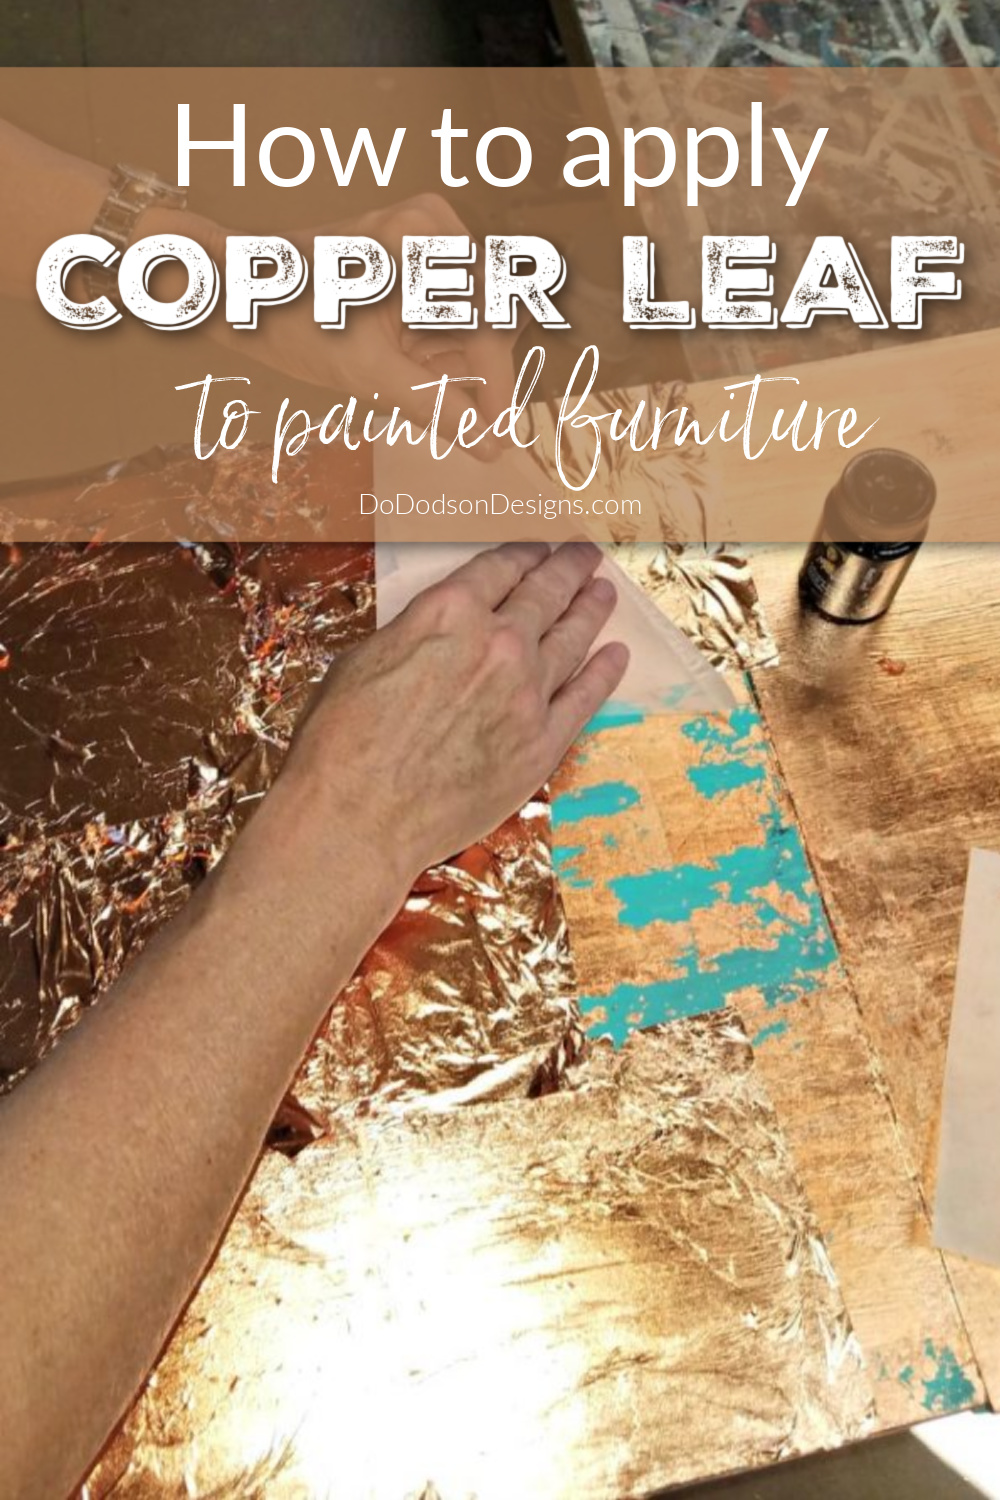
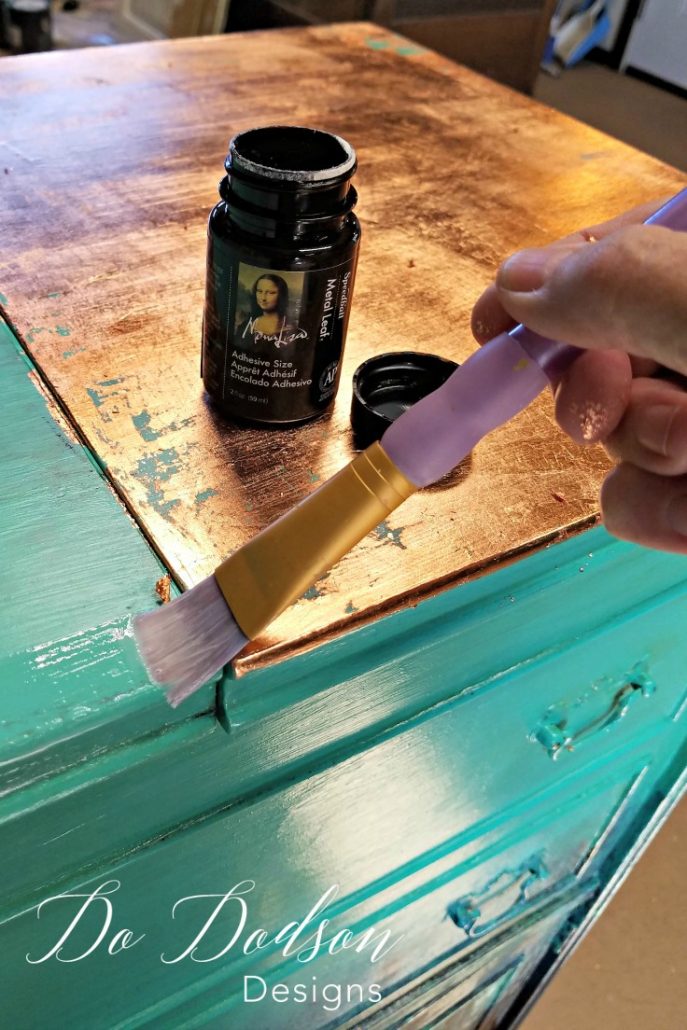
How To Get Copper Leaf Sheets To Stick
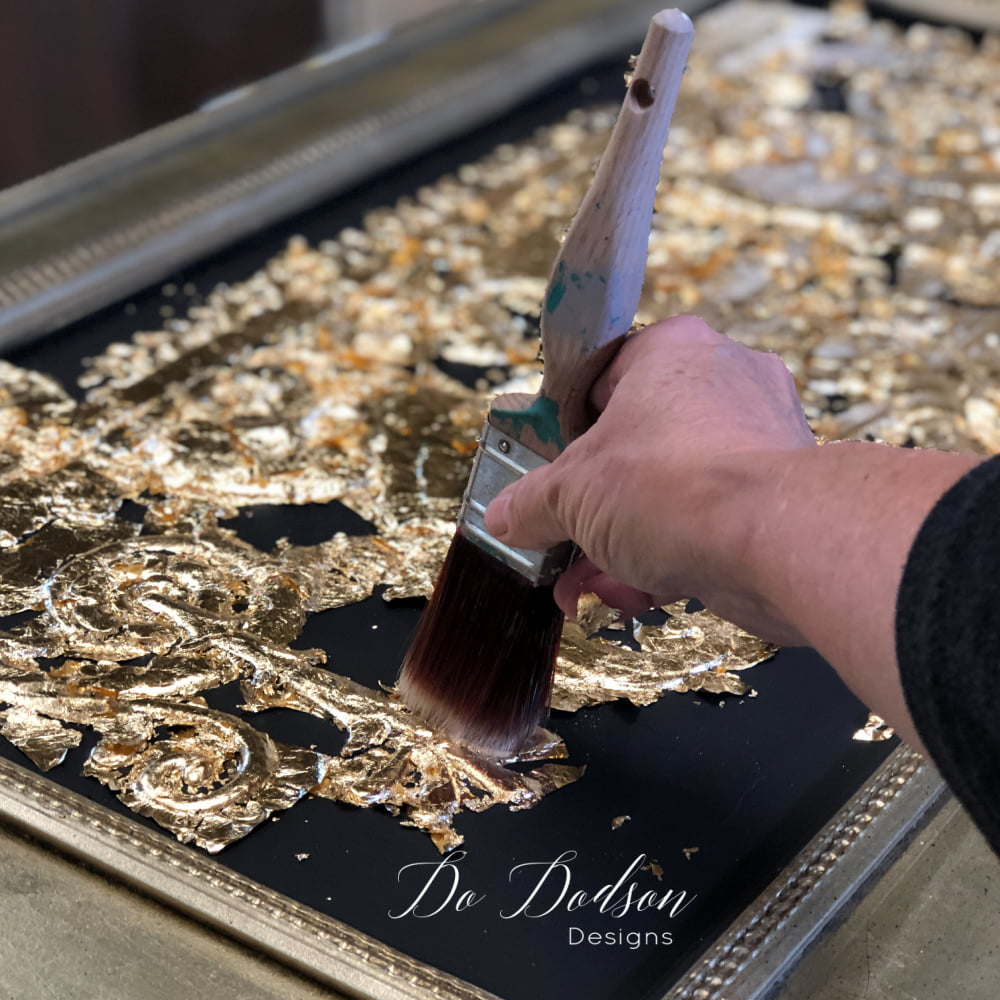
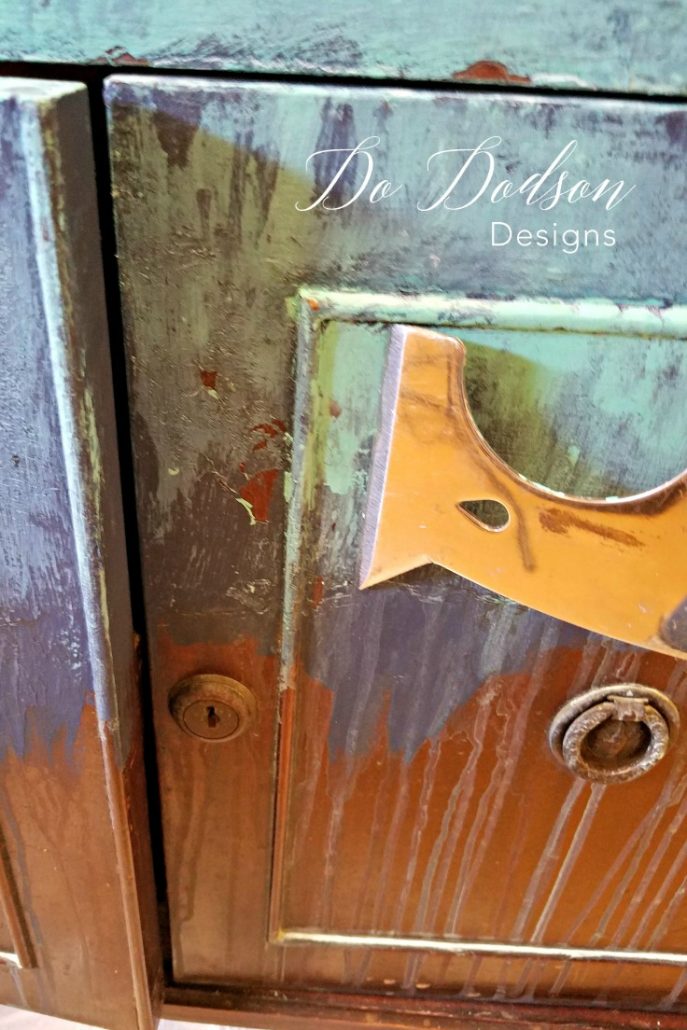
STEP 7: Apply a thin layer of the water-based adhesive with a soft brush where you want the copper leaf sheets placed. After applying the glue, give it a few minutes to become tacky before applying the copper leaf. This is necessary for proper adhesion. Always read the instructions on the product from the manufacturer beforehand.
This adhesive has a milky consistency and appears white when applied to the surface. If you use the copper leaf before the glue gets tacky, it will not adhere properly. Trust me! I learned the hard way. You might want to try it on small projects before jumping into large scale projects like this one.
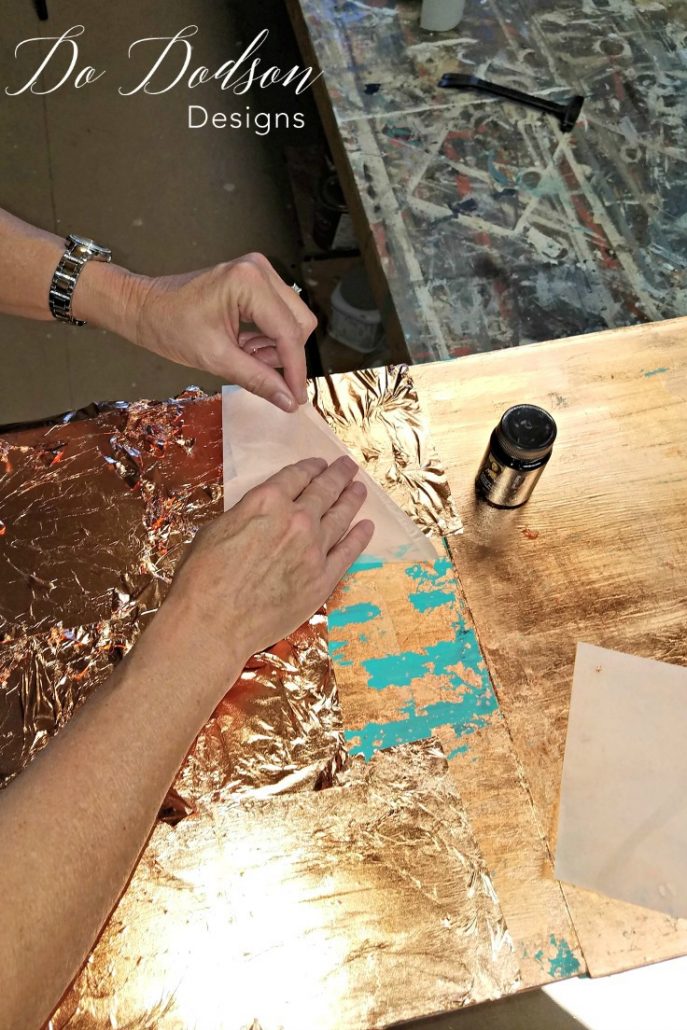
Take Your Time Applying Copper Leaf
If you miss a spot, you can always go back and patch it. It is very forgiving. Use a smooth, soft cloth or gilder’s brush to ensure that the copper leaf sheets and the adhesive come in direct contact. I used soft cheesecloth sheets to apply the copper leaf to this project, which worked well for me.
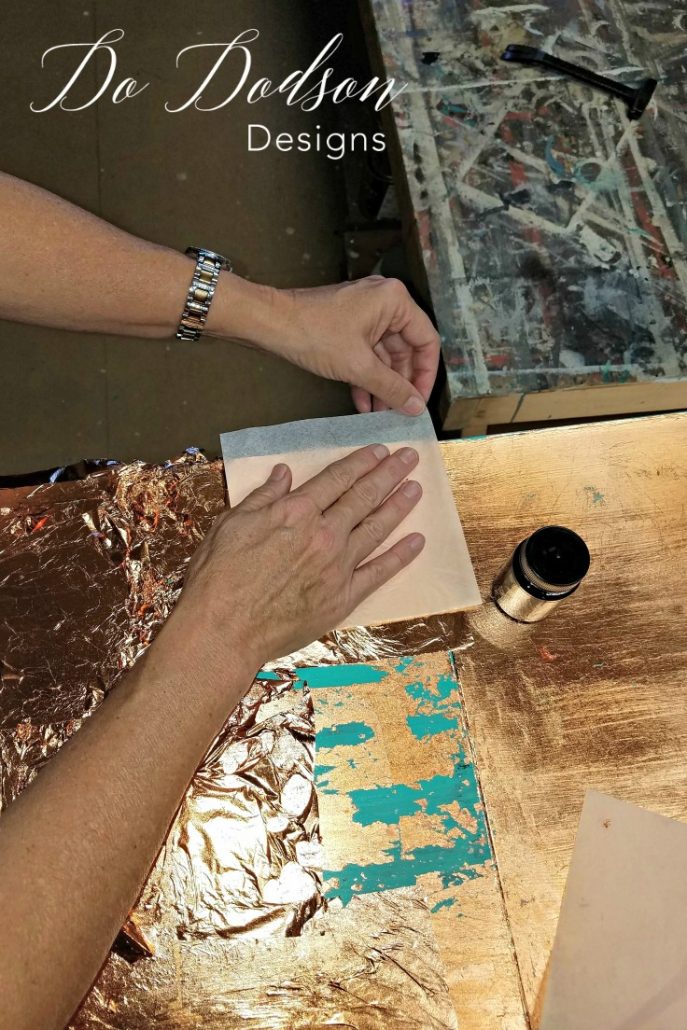
Go slow and take your time. Metal leafing can be time-consuming on large projects but worth the effort.
Applying Clear Sealer Over Copper Gilding
A reader asked if varnish or shellac needed to be applied to the copper leaf to preserve the shimmer and brilliance. The answer is no. But you will need a clear sealer to preserve the brilliance and shimmer of the gilding.
STEP 8: After applying the copper foil sheets in all the right places, seal your copper leaf with a clear sealer like MasterClear. MasterClear has been specially formulated for metallic finishes. You can use other products, but this one allows the metallic shine to show through the best. It’s worth the money, in my honest opinion.
*Sealing copper leaf is essential to preserve brilliance. If left unprotected, the air will eventually cause oxidation and discoloration of the copper leaf. Be sure you don’t miss this step. Most importantly, after all that work, you’ll want to keep that brilliant copper finish for a long time.
Excess Leaf Cleanup
Oh, and get ready to do a huge cleanup in your work area. These large-scale projects that involve metal sheets can get quite messy. They are super thin and weightless and tend to float around in the air and land wherever they please. Using a drop cloth will help with the cleanup of your workspace with the excess leaves.
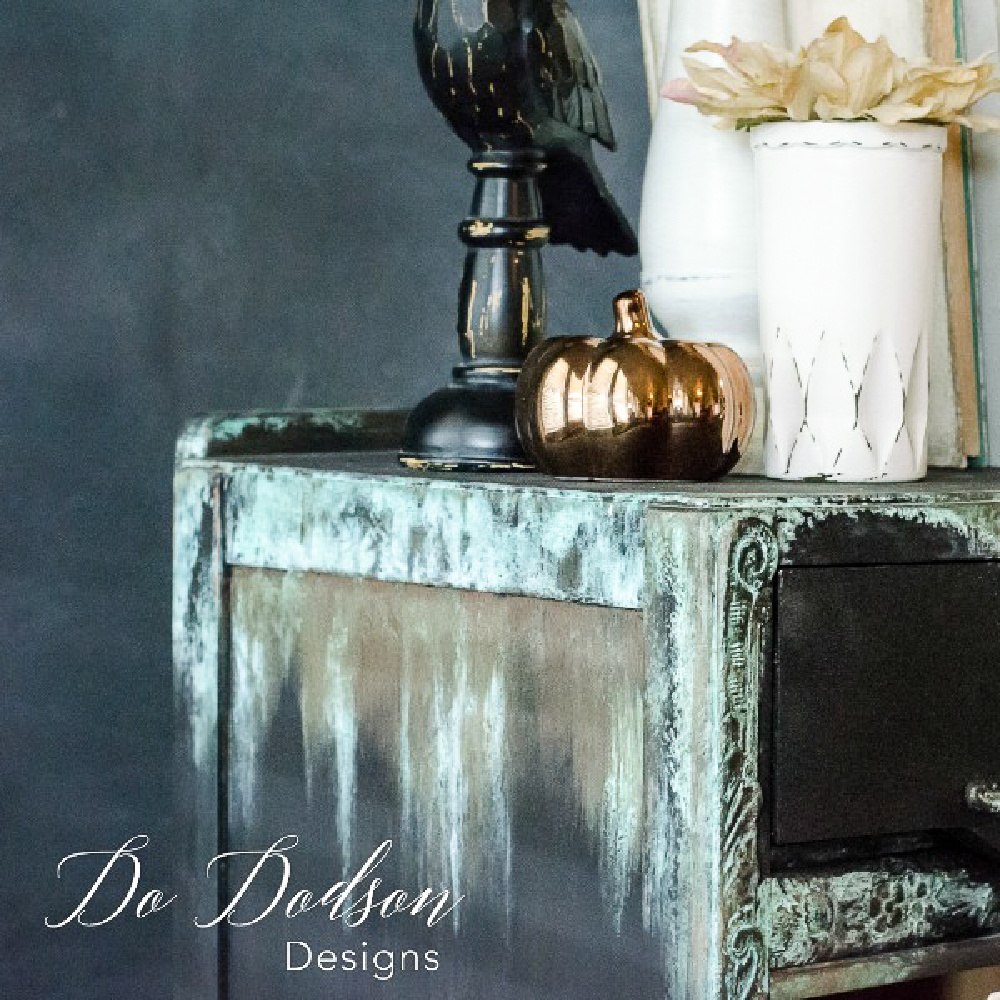
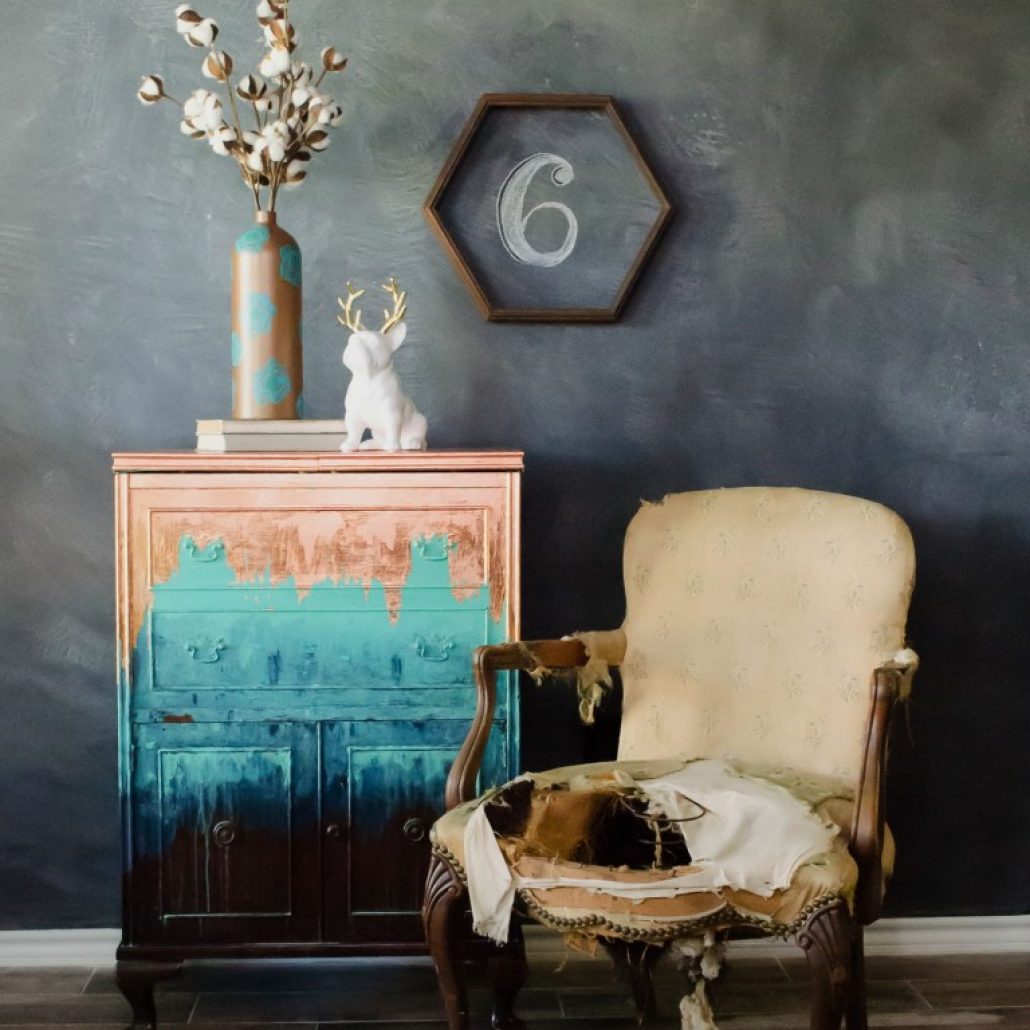
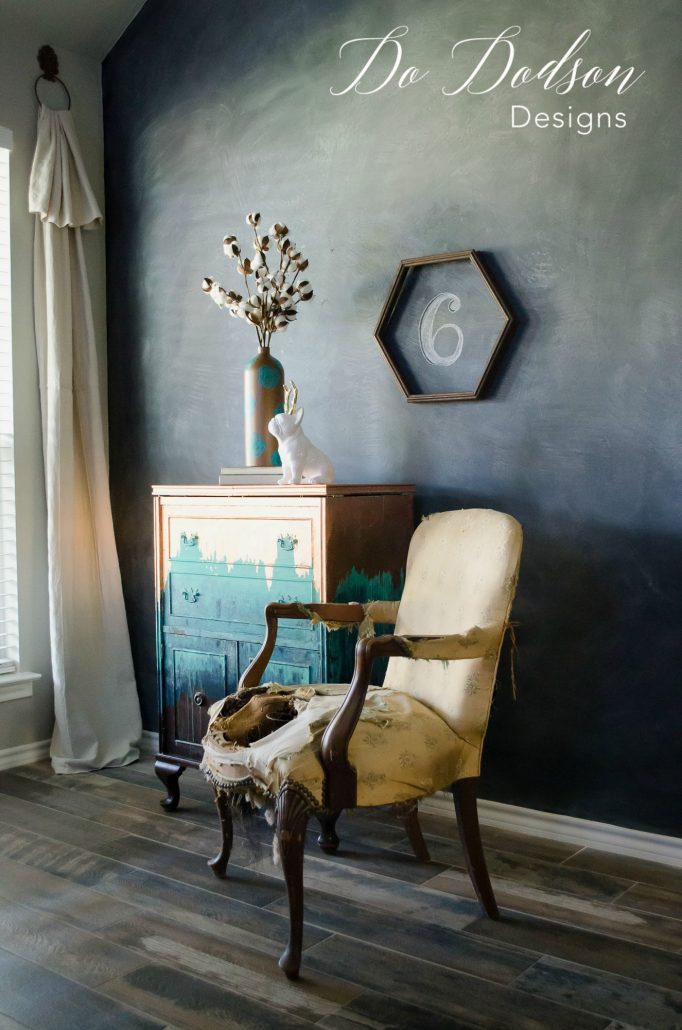
Final Look Of Copper Leaf On Furniture!
It turned out better than I could have ever imagined. To this date, this photo has been shared over 127k times on PINTEREST!
Hmm, I’ve always wondered if the attraction and sharing was the copper leaf design or the unusual staging.
When this was taken, the number 6 on my chalkboard wall represented my 6 amazing Grandchildren. The official count to date is lucky number 7!
I do miss that wall. 🙁
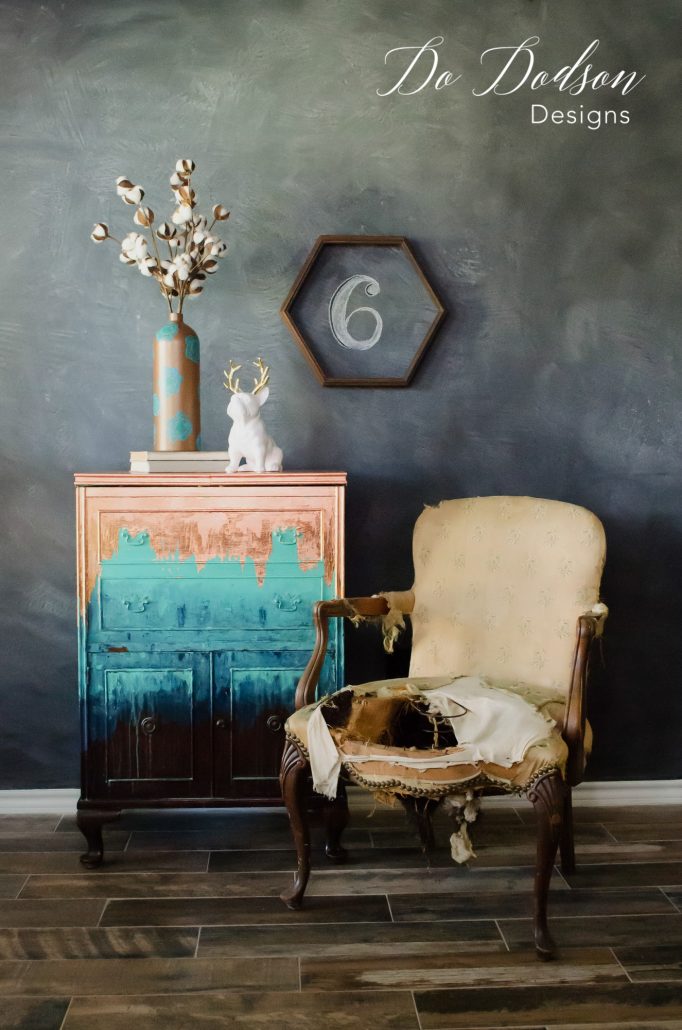
Thanks for joining me today for this unique painted furniture makeover. It was a great experience, and I learned a lot. This finish is a bit edgy and on the modern end of the spectrum, but boy, is she ever showy!
I hope this inspires you to try adding some copper leaf on your furniture project. Add your own creative design and just have fun with it. It’s a great way to add expression and character to an old piece. A real conversation starter!!!
Until the next project… xo, Do