
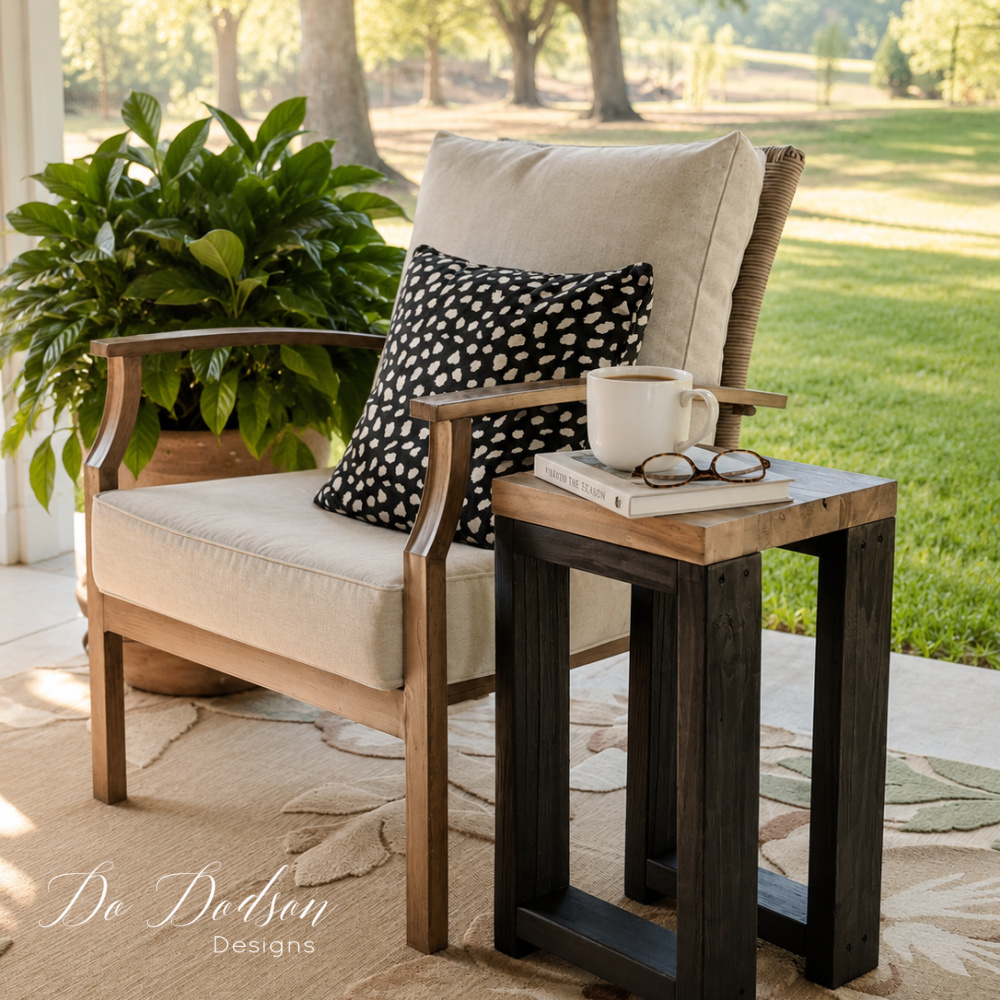


Have you ever looked around your patio and thought, “It just needs one more little table?” Me too! Whether it’s holding your morning coffee, an ice-cold glass of sweet tea, or a favorite potted plant, a simple DIY outdoor side table is one of those projects you’ll wonder why you didn’t build sooner.
The best part? This project is beginner-friendly, budget-conscious, and can easily be built in an afternoon. I used weathered (aged) pressure-treated lumber for the base and acacia wood (butcher block) for the tabletop, giving it a modern farmhouse look that’s perfect for the porch, patio, or garden.
If you’ve been wondering how to build an outdoor side table, this simple tutorial will walk you through every step with the exact measurements.
* As an Amazon Associate, I earn from qualifying purchases and through other companies as well. You will not be charged extra when you purchase through these affiliate links, but any income I make helps me create more amazing DIY projects to share with you! To see my full disclaimer, click here!
Supplies You’ll Need:
- Pressure-treated 2×4 lumber (aged and weathered is preferred)
- Acacia wood panel 12 x12 inch square (or your favorite hardwood panel)
- Exterior wood screws
- Drill/driver
- Miter saw
- Wood sander (my fave!)
- All-in-one paint – Badlands
- All-in-one paint – Black Anchor
- Outdoor weather-proof, water-resistant clear coat
- Measuring tape
- Pencil
Step 1: Cut Your Lumber
Start by measuring and cutting all your 2×4 wood pieces (scrap wood, if you have it) with a miter saw.
Since this project is made from straight cuts, it’s a great beginner woodworking project. Be sure to double-check your measurements before making each cut. Measure twice, cut once. Once everything is cut, lay the pieces out so you can easily identify each part during assembly.
This Diy wooden side table comes together much faster when everything is organized first.
Here are the measurements for this DIY outdoor side table.
- 8 20-inch 2×4 boards
- 8 9-inch 2×4 boards
- 1 – 12 x 12 inch square 1-inch-thick hardwood piece

I chose the Acacia butcher block because it was leftover from my kitchen reno (I save everything!), and I recently made our DIY outdoor coffee table from the same wood. Having the outdoor side tables matching is a sweet bonus. It also matches my DIY 2X4 wood bench I built to go with my new DIY outdoor furniture. It all looks so nice!
You could also easily use other scrap materials to make a tabletop to go with the wood base. Marble, granite, stone, or even a concrete paver. Concrete pavers would be the perfect tabletop for my garden sitting area, and you can buy the 12×12 pieces. Walmart has 12-inch square concrete stepping stones for $1.78. You can’t beat that! I’d simply use construction adhesive to attach it to the wood.
I think I just talked myself into making another set for the garden sitting area. 😊
Step 2: Organize the Wood Pieces
Before grabbing the drill, arrange all of your cut boards on a flat surface.
Laying everything out beforehand lets you make sure each piece fits exactly where it belongs and helps avoid simple mistakes once assembly begins.
Step 3: Build the Two Side Frames
Begin by creating two identical side frames.
Position the vertical legs between the upper and lower horizontal supports and secure everything with exterior screws. I always recommend pre-drilling pilot holes first, especially with pressure-treated lumber, to help prevent splitting.
These two side bases create a sturdy foundation for your side table.

When assembling the base pieces, leave a 1-inch space on the bottom cross-support boards.

Step 4: Double Check for Square
Before moving on, stand the table base upright and make sure it sits flat on the floor.
Measure diagonally from corner to corner if needed. If both measurements match, your frame is square and ready for finishing.
Step 5: Sand Everything Smooth
Give the entire frame a good sanding.
Round over any sharp edges and smooth all surfaces with medium grit sandpaper before finishing with a finer grit of 220. This helps paint or stain go on much more evenly while making the table more comfortable to use.

Step 6: Finish the Wood Side Table
Now comes my favorite part! The finish!
For the base, I painted it a rich satin black (all-in-one paint) to give it a modern farmhouse look.
The all-in-one paint works well because it includes a primer, a stain blocker, and a sealant top coat.

For the wooden tabletops, I chose to use a paint wash to tone down the wood’s yellow. I mixed a half-and-half mixture of paint and water and applied it with a paintbrush.
But before applying the paint wash to the wood, lightly mist it with water first. Wood, especially old wood, is porous and grabs any liquid quickly. Doing this one step prevents the paint wash from absorbing too quickly into the wood and from looking blotchy, resulting in a nice, transparent, even color.
I let the wash sit on the wood for a minute or so, then wipe away any excess wash from the surface. You can reapply if you want more color.

If you prefer a different style, you could stain the base instead or choose any paint color that matches your outdoor space.
This simple finish makes these DIY outdoor end tables look much more expensive than they really are.
Step 7: Attach the Tabletop
After the paint has fully dried, center the tabletop on the base.
Drive screws up through the top supports into the underside of the tabletop so no fasteners are visible from above.
Take your time lining everything up evenly on all four sides before securing it permanently.

This easy step transforms the project into a beautiful DIY porch side table you’ll enjoy for years. Add a clear, water-resistant top coat for extra protection. It’s always best to protect wood furniture on a covered porch or patio from rain and the brutal sun. Protective finishes should be reapplied every year for the best results.

A Few Helpful Tips
- Always use exterior-rated screws for outdoor projects.
- Seal the tabletop to help protect it from moisture and sun exposure.
- Build two tables at the same time—it only takes a little extra effort, and matching tables always look great on a porch or patio.
- Add adjustable furniture feet if your patio surface isn’t perfectly level.
For more simple woodworking projects, check out the list below.
The Finished Outdoor Side Tables!
That’s it!
In just a few hours, you’ve built a sturdy table that’s perfect beside a rocking chair, porch swing, outdoor sofa, or patio chairs.
I especially love using mine to hold flowers, lanterns, books, or my morning coffee while I enjoy a quiet moment outside.

Whether you’re decorating a deck, patio, or garden seating area, this DIY outdoor side table is both functional and beautiful.
If you’re looking for a DIY small patio table that doesn’t require complicated joinery or expensive tools, this project is a great place to start.

The simple design also makes an excellent DIY outdoor end table for entertaining guests or creating cozy conversation spaces outdoors.
And because you can customize the paint, stain, and tabletop to match your own style, this outdoor side table DIY project is one you’ll probably end up building more than once!

Thank you so much for stopping by Do Dodson Designs! I hope this project inspires you to grab a few 2×4 boards and build something beautiful for your outdoor space.
If you make one of these outdoor side tables, I’d love to see it!
Be sure to leave me your thoughts below, share this project with a friend, and don’t forget to Pin 📌this tutorial for later so it’s easy to find when you’re ready to build. Happy DIYing!
Until the next project… xo, Do
AWSOME! These tables are gorgeous. I’ve seen these types of tables selling for hundreds at home decor/patio stores. And yes, you’ve inspired me. Today I’m grabbing some scrap wood and going to make a trellis for my garden.🪴 Wish me luck and have a beautiful weekend, my friend! 🤗 Pinned XOXO
Thank you, Denise! Ohhh, a trellis! Sounds like fun. Enjoy your project and weekend. xo 😘
Very nice, loving the color combo. Do you ship 🤣
Perhaps I could snail drive them to you. 😆 Or you could just come to visit and we can sit beside them with a cup of coffee and pet dogs all day. 🙂 xo