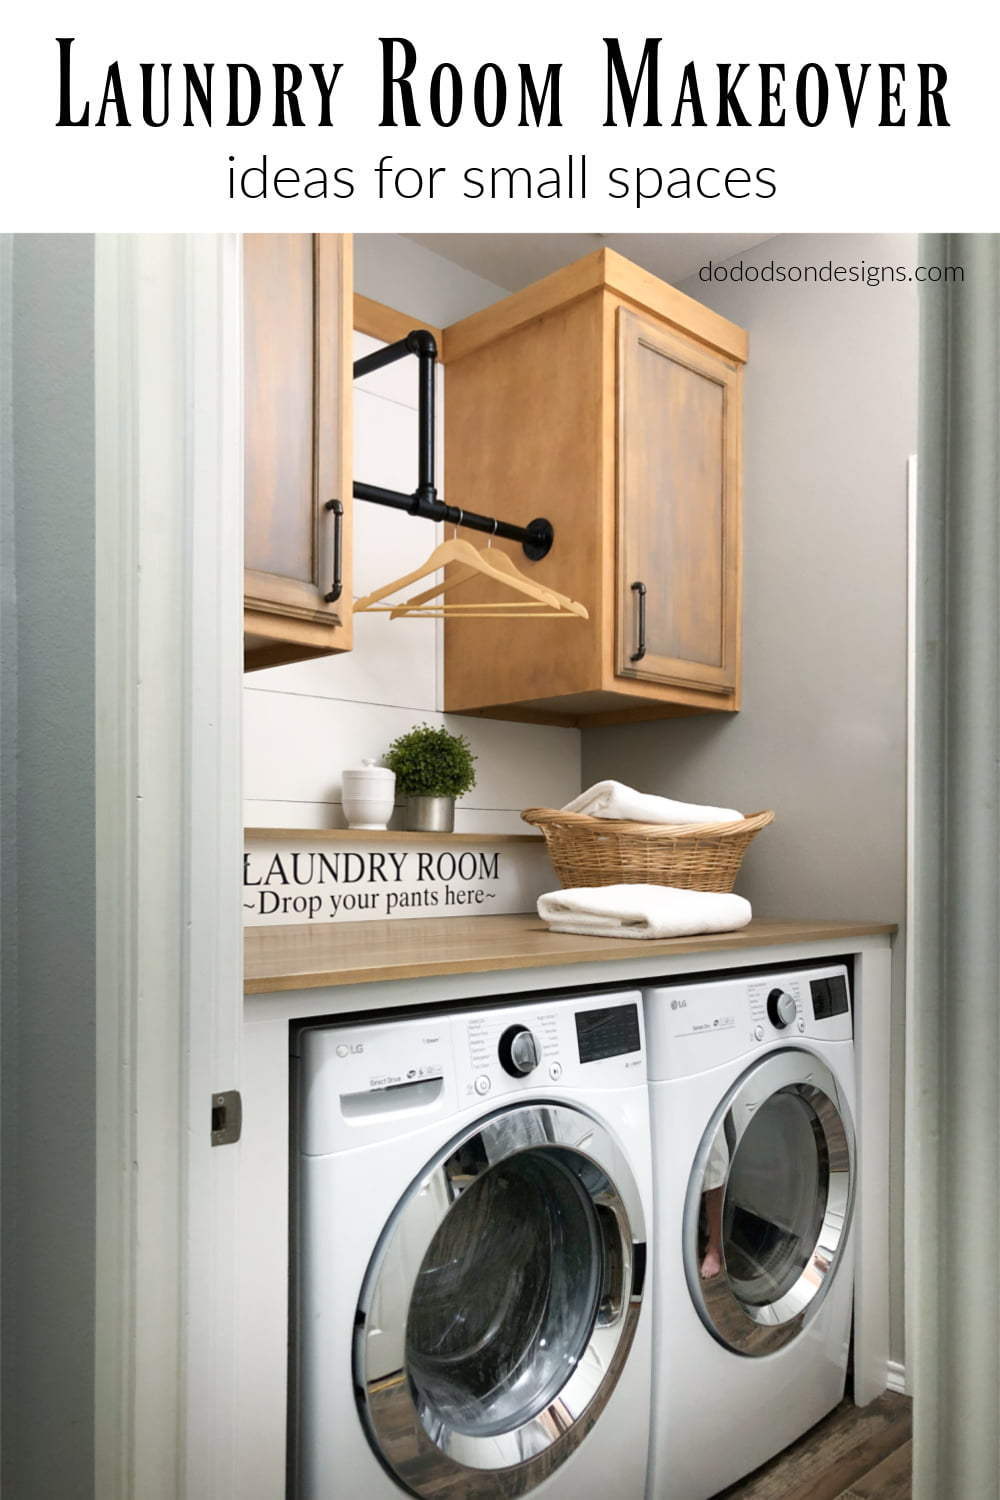
Today I’m sharing my small laundry room makeover reveal. And when I say small… I really mean itty-bitty and lacking storage space. I have always wanted a pretty place to put my dirties and have never really had the opportunity or help, should I say. It’s a big job, but with Mr. Honey Do (the best hubby in the world) on board, we were ready to tackle it. Besides, what else do we have to do in 2020?
❤ This post is dedicated to my hubby and all the hard-working, supportive men out there that go along willingly (knowing what they’re about to get into) with their wife’s crazy ideas. I LOVE you to the moon and back, sweetheart. We are better together.
*This post contains a few affiliate links to help you find the products I use. You are not charged extra to use any of the links, but any income I make will be used for more fun DIY projects that I can share with you! To see my full disclaimer, click here.
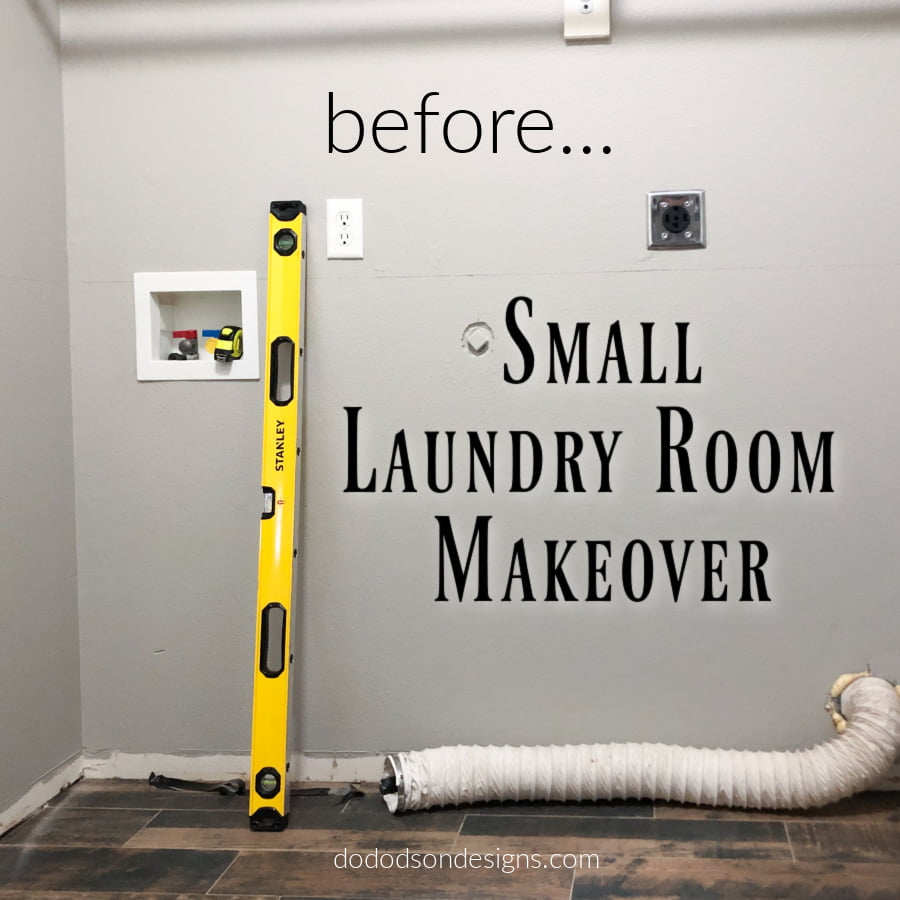
Small Laundry Room Makeover… the before!
Let me start by saying that our home is very modest, but it does have a designated laundry room. We purchased it new 13 years ago, and it’s elementary. Well, it was. 🙂 I wanted an old fixer-upper, but Mr. Honey Do probably thought this would be better and less work. LOL, silly man. Slowly we have made home improvements to make it our own. We started from scratch on this laundry room makeover with new paint for the walls, porcelain tile flooring (we have dogs), and a brand spanking new washer and dryer set (front load) before we tackled the bigger part of this project. Sorry, I didn’t take before pics because I got excited and forgot. For 2 months, I submerged myself in this makeover, and like most things in life, things went wrong, but a lot went right. So, we rolled with the punches.

Product List:
- Porcelain Tile Floors (weathered gray)
- Mindful Gray (Sherwin Williams) wall paint
- Poplar Wood (stainable and paintable) folding station countertop
- SurfPrep Sanding System
- Gloves
- Cotton (chalk mineral paint)
- BIN Shellac Based Primer (white)
- Gator Hide (topcoat) to seal the gel stain and paint
- Gel Stain (Dixie Belle Weathered Gray) & (Old Masters Fruitwood)
- Applicator Pad (for gel stain)
- Paintbrush
- Laundry Room Wall Decal
- Industrial Hardware
Our First Task – Laundry Room Makeover
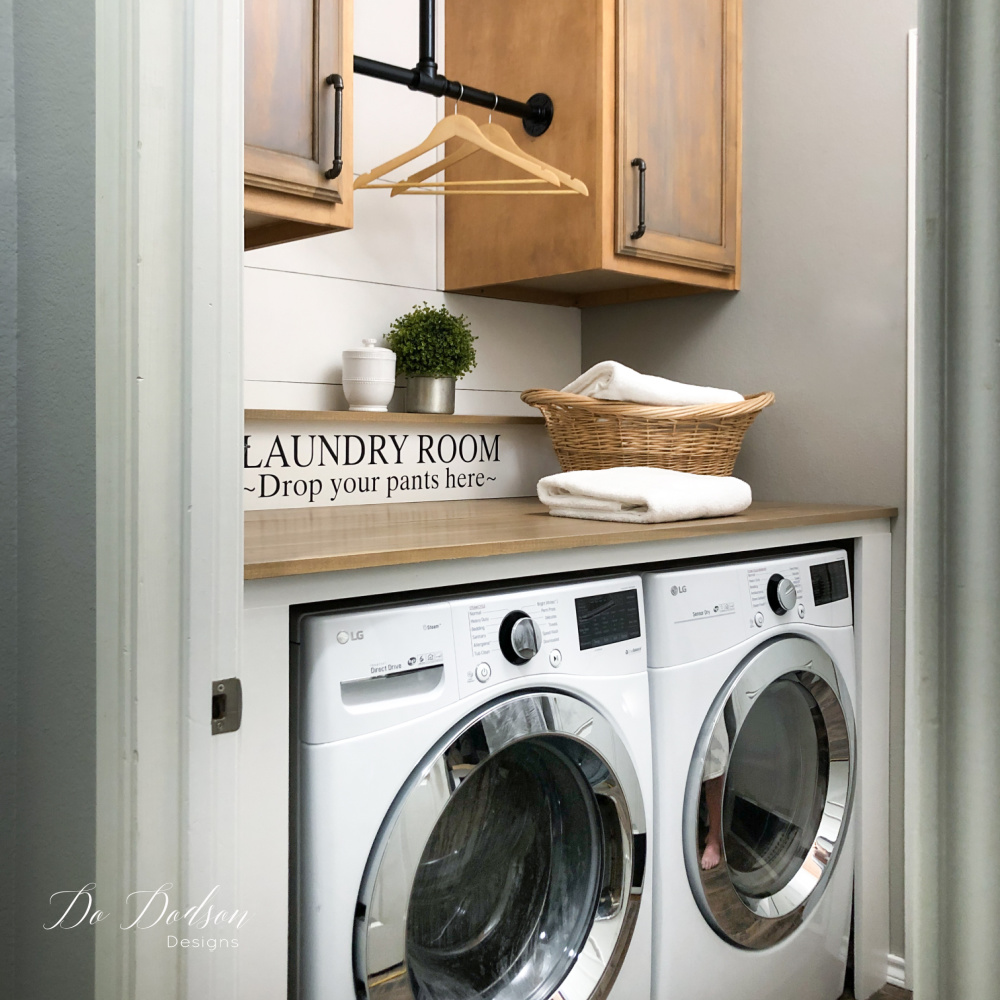
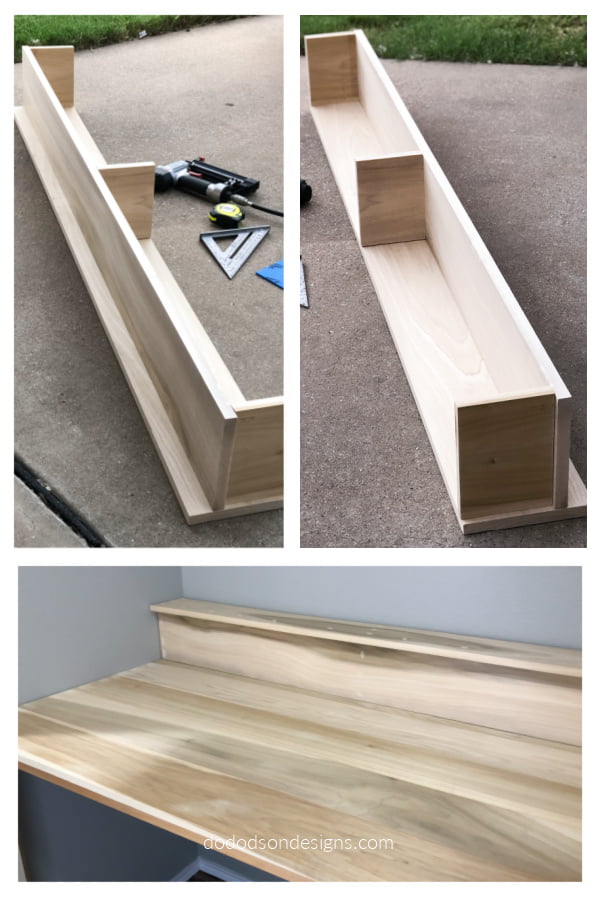
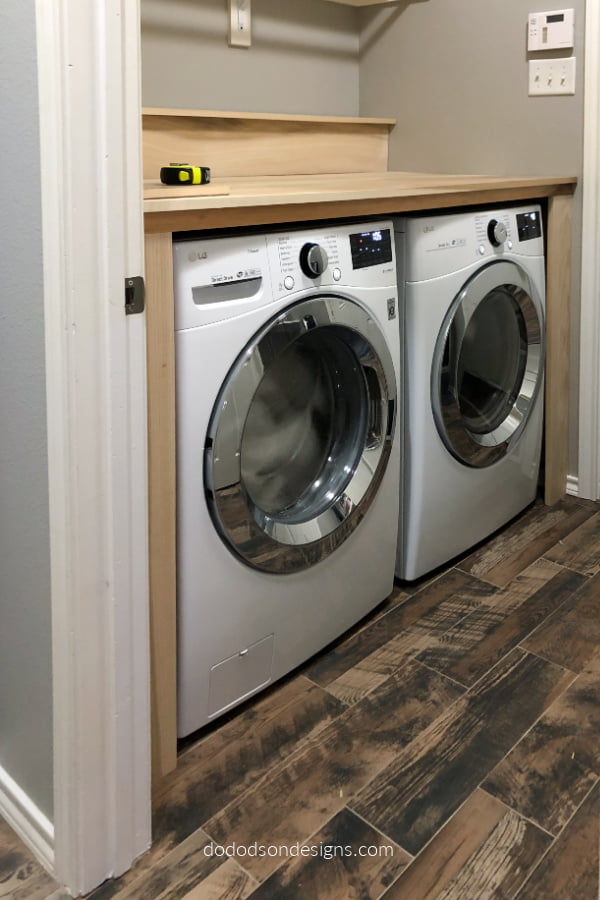
Our first task with the laundry room makeover was to figure out how to build a countertop that would sit above the washer and dryer. A folding station! This presented a problem as the electrical and the water hook-up was higher than the washer and dryer. We discussed this issue at length and came up with a plan. To make this look right, we would need to build a removable shelf to cover the unsightly but necessary utility hookups. Once we figured this out, we built the supports around the wall to hold up the counter.
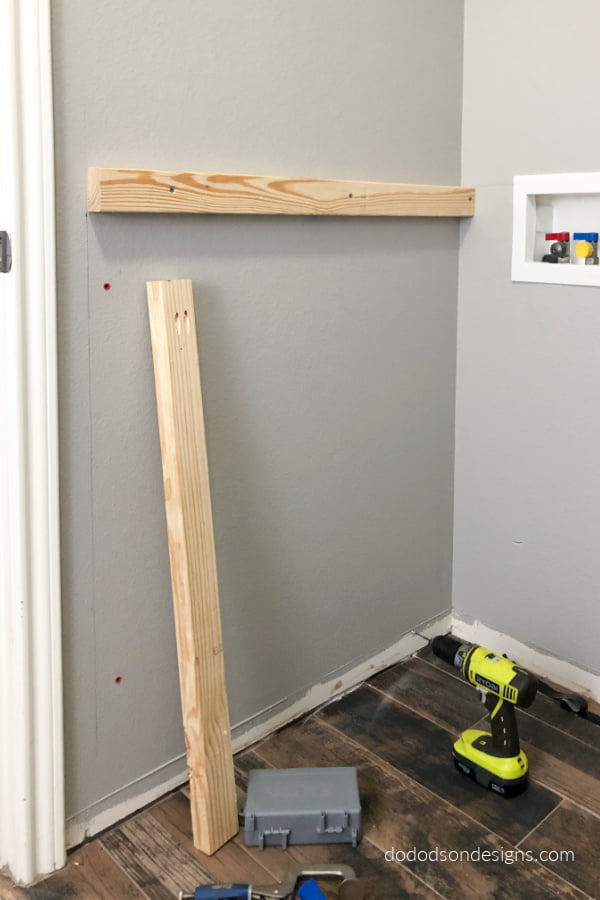
See what I mean? It was no Bueno for me. So here is what we did.
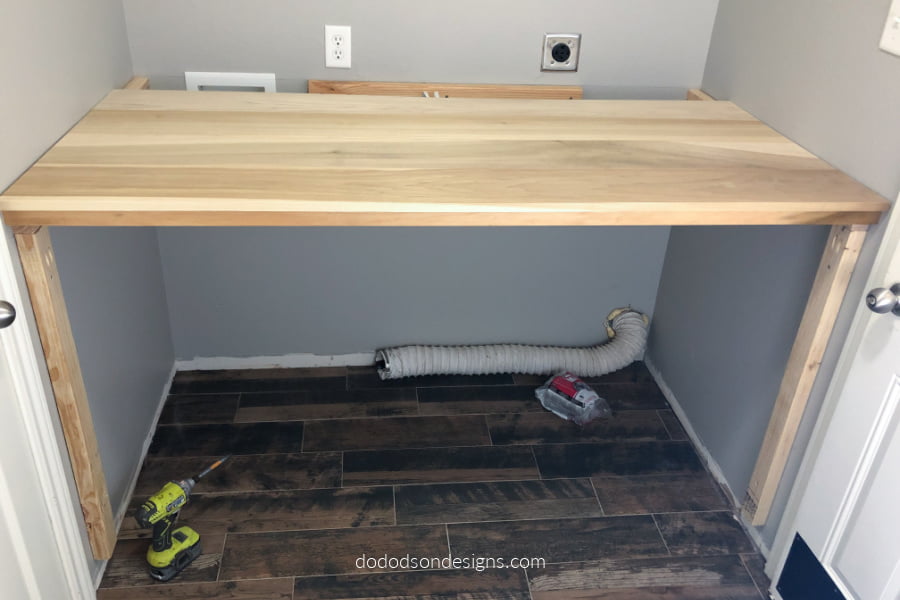
The Solution
I’m not sure what to call this removable shelf, but it works. It serves two purposes. The first is to cover the ugly utilities, obviously. The second is for me. A shelf that I can decorate. 🙂 No more ugly utilities! My itty-bitty small laundry room makeover is taking shape, and I couldn’t be happier with the new folding station. Now it’s time to add a little gel stain and paint for a clean, classic look.
Blending Gel Stain On Wood
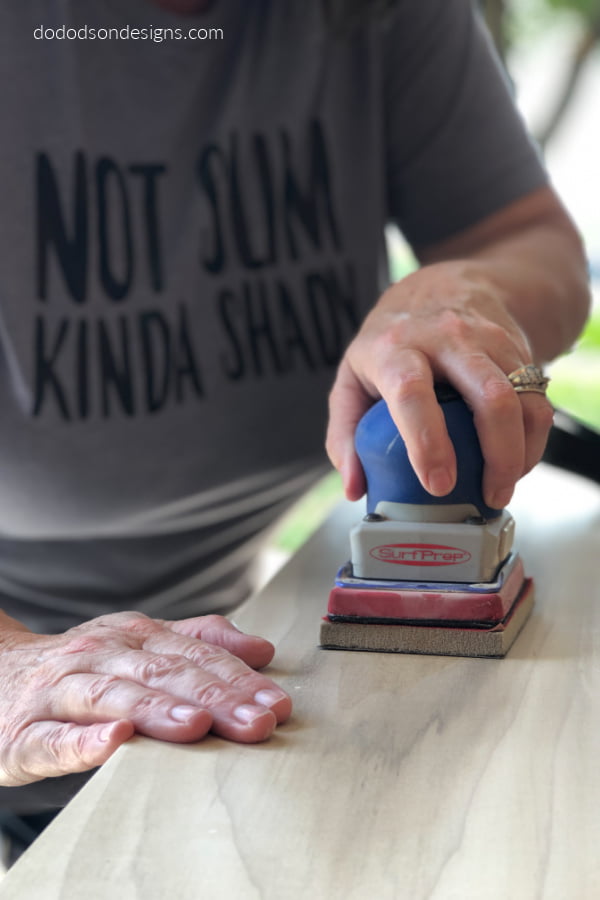
I used my SurfPrep Sander and a fine grit pad for a super smooth wood surface to smooth out any rough areas on the wood countertop and shelf before staining. Use a soft cotton cloth to remove any residual wood dust before applying the gel stain.
To achieve the weathered wood look I was wanting I used two colors of stains. Here’s how I did it.
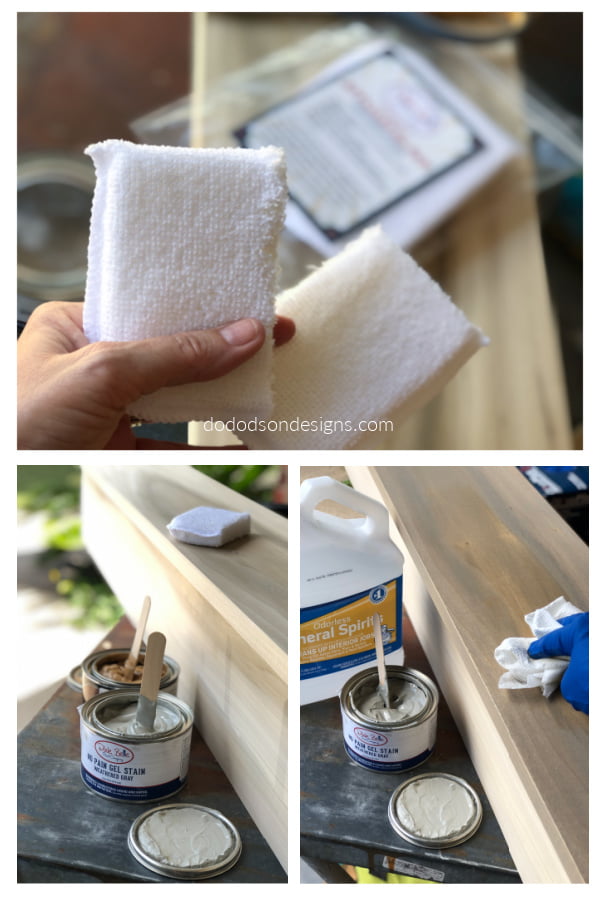
- First, apply a light color gel stain to the raw wood with a cotton applicator pad. I like to cut them in half. Remove any excess with the cotton applicator pad.
- While the light-colored stain (Fruitwood Gel Stain) is still wet, apply the Weathered Gray Gel Stain in random areas and blend it in the direction of the wood grain using long strokes.
- Next, with a dab of mineral spirits on a cotton or paper towel cloth, continue blending the two stain colors. The mineral spirits will act as an eraser and remove the stain, so you don’t want to overdo it. Basically, you’re thinning the gel stain to create a lighter color. You will want to practice this technique on a small piece of wood before tackling a big project.
- Seal the wood once it is fully cured with Gator Hide topcoat for an amazing durable finish.
*Since this laundry room has an entry from the garage, aka man cave, it was imperative that the countertop/folding station be durable. I’ve already found HIS tools on the top of my beautiful wood folding table. It’s a catch-all!
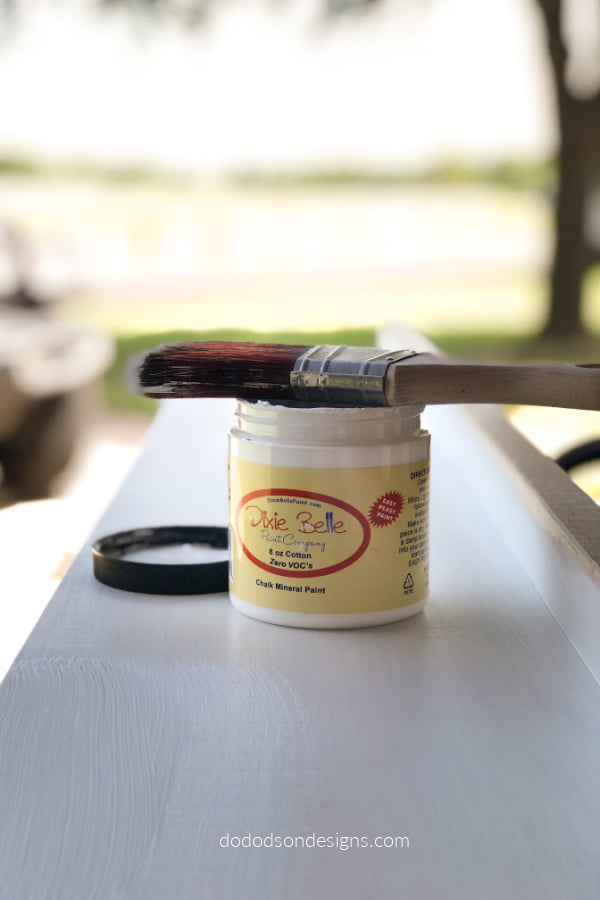
Painting Raw Wood Cabinetry- Laundry Room Makeover
I chose to paint the base of the cabinet with Dixie Belle chalk mineral paint in Cotton. I love the paint and stain combo, but the raw wood cabinet base will require a stain blocker to prevent the wood tannins from bleeding through the paint before painting. Paint two coats of BIN shellac-based primer on the wood surface and allow it to dry before painting. It dries pretty quickly… usually within the hour. After the gel stain and paint surfaces are fully cured (always check manufactures suggestions), apply two coats of Gator Hide to create a durable finish. Especially if your man will be folding laundry. 🙂
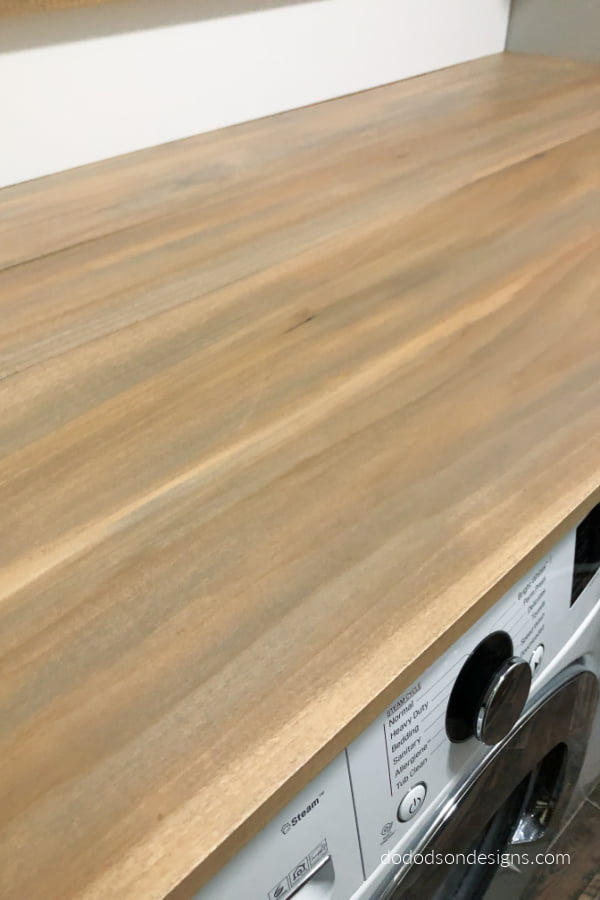
The Results of Blending Gel Stain On Wood
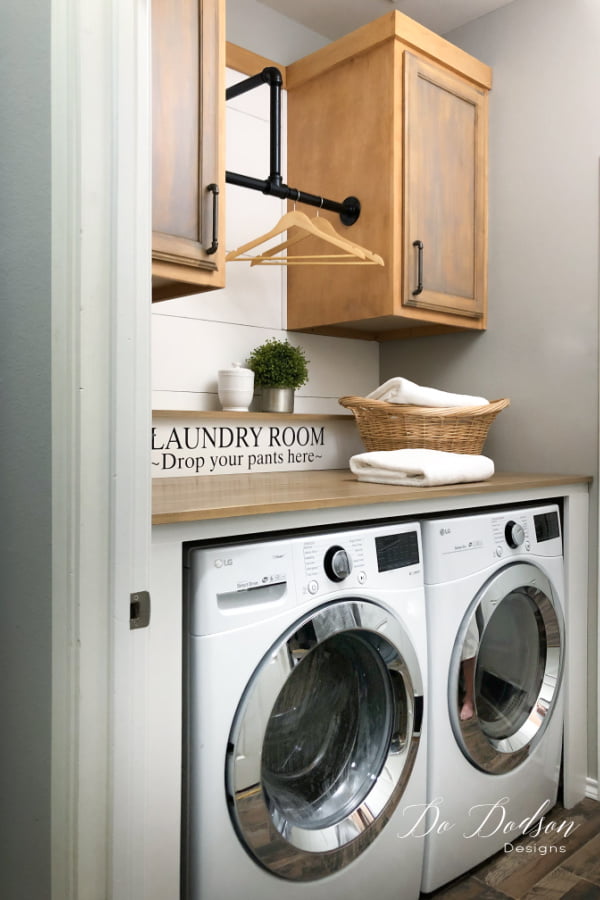
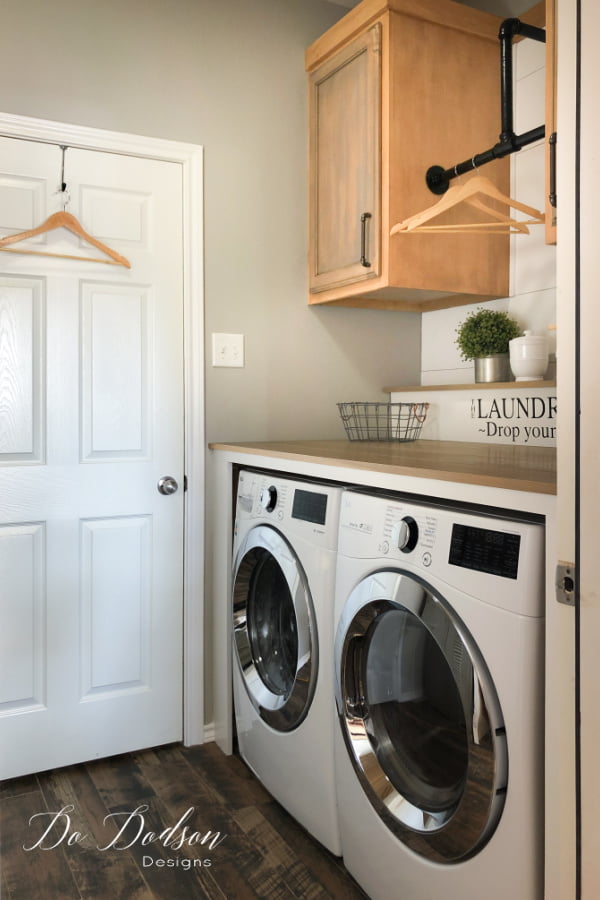
And here are the result of blending gel stains on raw wood. I loved it so much that I decided to use a similar finish on the new cabinets too. Yep! I even splurged with custom cabinets made from the same wood (Poplar) to give us that extra storage space we needed. Our ceilings are 10 ft, and I wanted to utilize every inch in that small room. No, we didn’t build them. Let’s say we love each other too much, and a laundry room makeover is a kind of like building a house but on a much smaller scale.
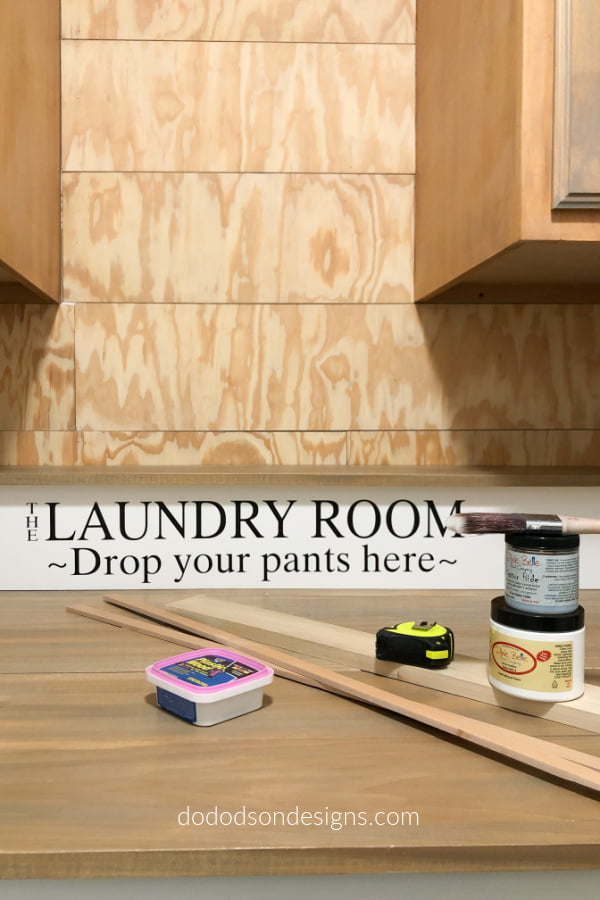
Adding Faux Shiplap Accent Wall
With the custom cabinets installed (that was an ordeal that took 6 weeks), we began building a faux shiplap accent wall over the folding station and between the two cabinets. Oh ya, I also found this fun wall decal, and I couldn’t resist. Folding laundry needs to be fun, and who would laugh when they were standing in front of a laundry room sign that says “drop your pants here.” The faux shiplap accent wall was made from 1/4 inch plywood we had leftover from another shiplap wall project.
The Laundry Room Makeover Reveal!!!

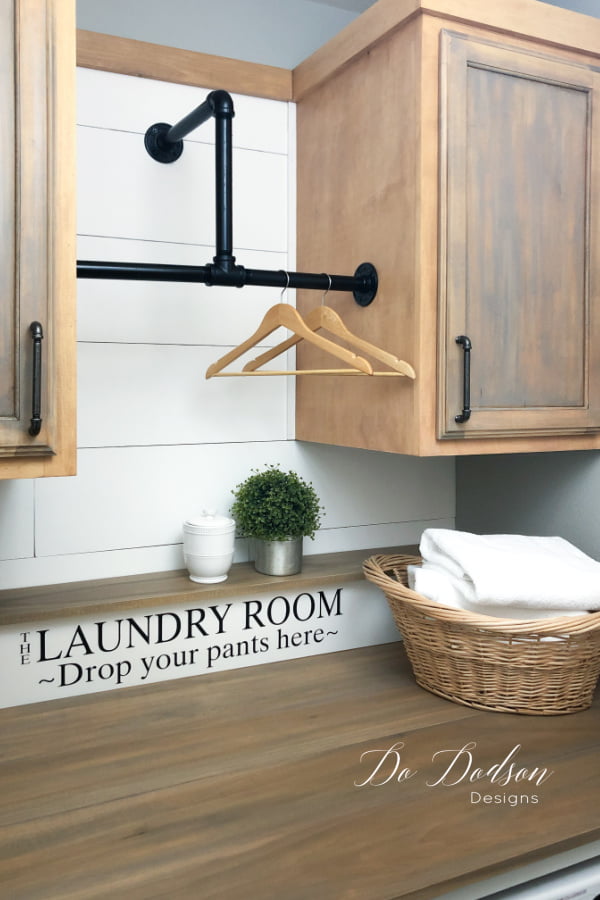
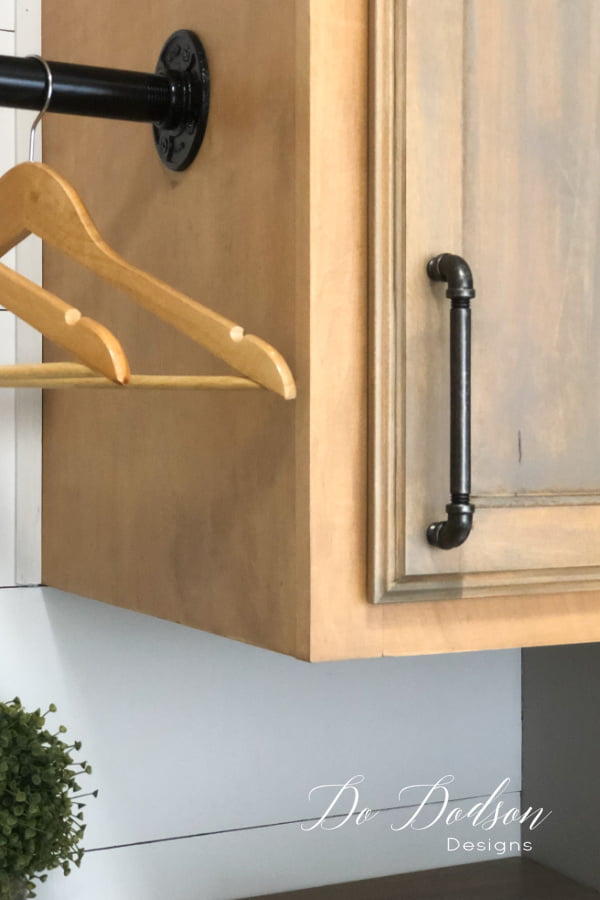
Check out the cool industrial hardware on the cabinets.. and that metal pipe clothes hanger!!! Well, that was all Mr. Honey Do right there. I think it adds so much to this small room and a touch of manliness that will make HIM happy when he’s folding clothes.
Extra Work Space And Storage
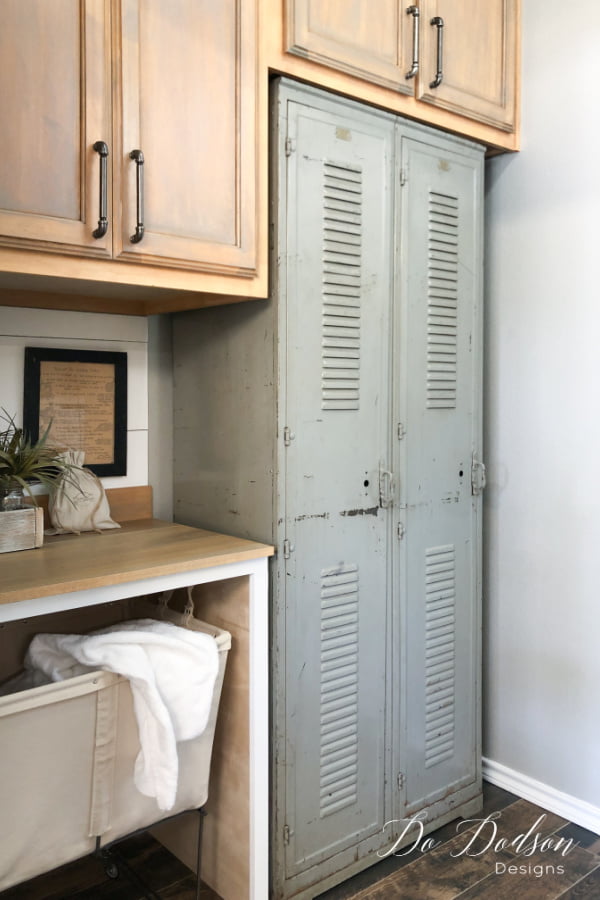
And directly across from the laundry room makeover folding station is another small work area that includes a set of vintage lockers. We made sure when we ordered the cabinets that there would be enough room for these gray rusty beauties (broom and cleaning supplies closet) and if we ever decided to use the space for something else (not happening), a full-size freezer would fit into the spot. This room also doubles as a mudroom without a sink.
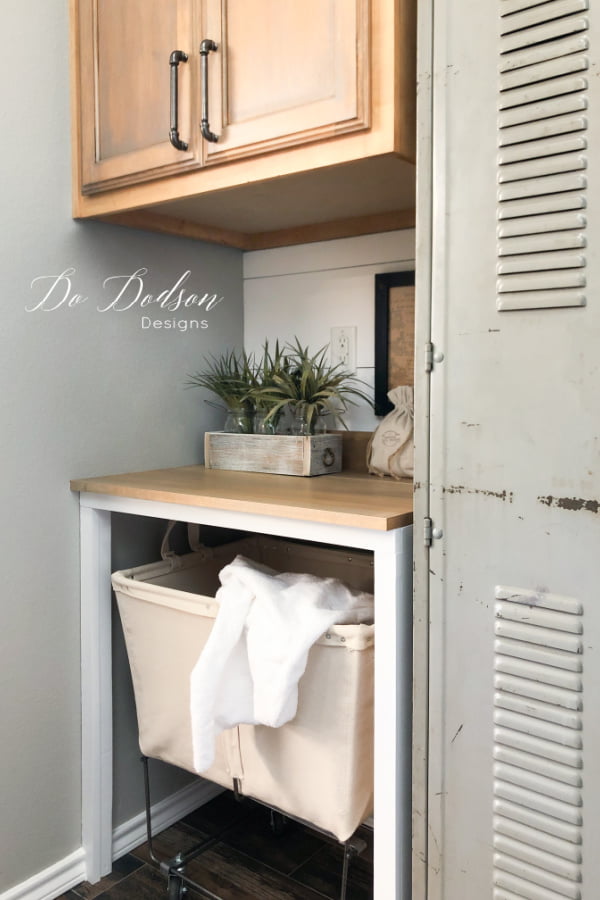
And I found this amazing rolling laundry cart and built the cabinet around it. HA! Who does that? It really comes in handy! Especially when your washing machine goes out during your laundry room makeover, and hubby decides to take your most coveted possession, aka the laundry basket, to the local laundry mat. I’m sure he was the envy of every woman there. I should be grateful. I am! He’s getting an amazing laundry room! 🙂 With everything said and done, it was a fun project, and now my hubby has the perfect spot to fold clothes. Yes, my man does laundry. Can you say that?
Thanks for stopping by today and taking the time to allow us to share our DIY home project. We do hope you have enjoyed it and welcome any feedback you may have for us.
A couple that DIYs together, stays together. ♡
Blessings from the Dodson’s… xo
You have an awesome husband and an awesome laundry room.. Bravo!!!
Thank ya, Barbara! I’ll keep them both. 🙂
OMGosh…love it Do! Can you and your hubby come do mine?! hehe 😉🤣🤗
Depends… do you cook? 🙂
Fantastic makeover! I will share this with my daughter, as her laundry is small -a closet really, but adding in the folding table and the upper cabinets and hanging rod would really be an upgrade! Nice. Thank you for this one!
Great, Jan! It makes laundry a little less mundane… if that’s possible. 🙂
LOVE your laundry room makeover! Your “industrial” broom closet is awesome!!
Thanks, Jackie! I’ve had it for a few years now and didn’t know what to do with it. I think I found the perfect home for it.:)
Love it! I’m in the exact situation with the utility and electric above my washer. Can you explain how you built the “removable shelf” that hides the eye sore? Thanks so much!!
Hi Kelly,
I have pictures and descriptions of how we built it in this blog. Our laundry room is small, and the washer and dryer go from one wall to wall. The folding table and shelf are also wall-to-wall. I hope this helps. 🙂 xo
Phenomenally amazing work ! Three questions
1. How did you attach the poplar wood to make it a folding station? Just glue & clamps, or did you also use any kreg-screws on the bottom side of panel?
2. Folding station or removable shelf edges / ends (where folding station or shelf meets the wall) – Did you use any caulk to cover any tiny gaps?
3. What if the distance between the two walls is not symmetric. Such as the length of front edge of folding station needs to bigger by 1/5 of an inch than that in middle or the back. Any suggestions
Hello!
1. The poplar wood was stabilized underneath with a cross board in the center. The end pieces were secured to a shelf ledge underneath around the walls. We added a shelf support in the center of the table that attached to the wall for extra support. I hope that makes sense.
2. The folding station shelf is removable to access water lines. It just buts up to the wall. It doesn’t look bad.
3. We were fortunate that our walls were square. If not, you would need to make adjustments.
Best of luck with your project.