Hey friends! Today I’m venturing out to my yard per se, to gather some natural materials to make an adorable twiggy little house. It reminds me of a fairy house I made as a kid. I’m sure you could also use it in a fairy garden, but I’ll use my DIY twig houses as a cute addition to my rustic home decor.
Thanks to Dixie Belle Paint Co for sponsoring this post. While I was compensated to write this post, all opinions are my own.
* As an Amazon Associate, I earn from qualifying purchases and through other companies as well. You will not be charged extra when you purchase through these affiliate links, but any income I make helps me create more amazing DIY projects to share with you! To see my full disclaimer, click here!
Memories Of A Tree House
I have fond memories as a child of making a tree house (well, kind of) existing of one board, a few nails, and a hammer. I would sit perched up there for hours. It’s always been my childhood dream to build a home in the trees someday, but it hasn’t happened yet.
Since moving back to the country, we now have big trees that would make magnificent tree forts. Maybe someday, I’ll get around to this monumental task.

SUPPLY LIST: What You’ll Need To Make These
How To Make DIY Twig Houses
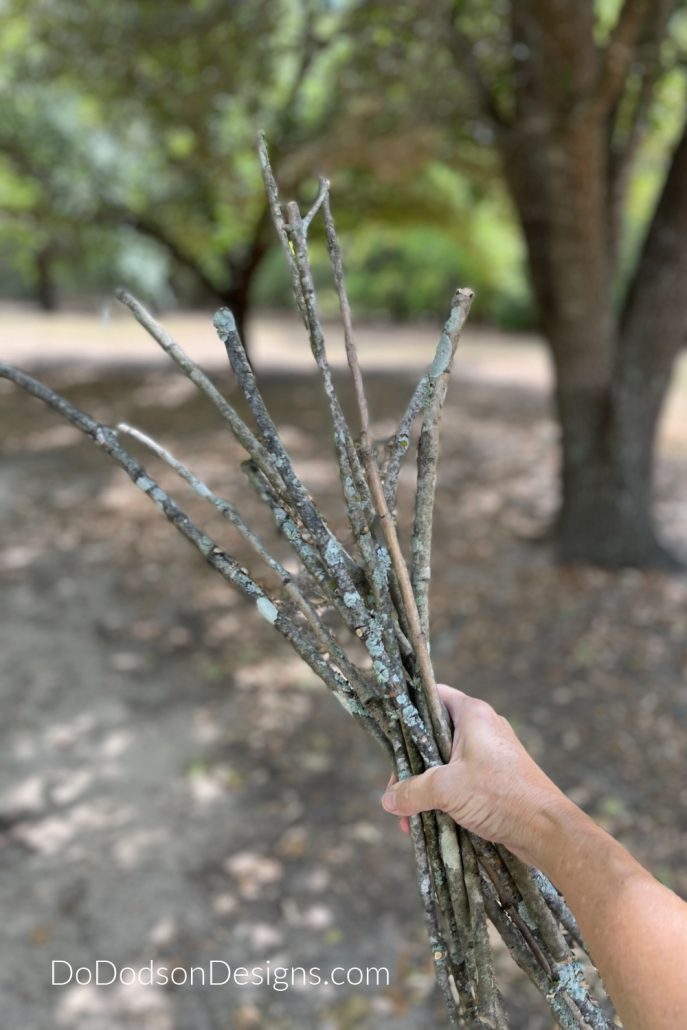
Step 1: Gather your twigs. If you have a large tree with dead branches, it’s best to use those, or you can pick up the twigs on the ground that have already fallen off. Be mindful that if you use twigs that have fallen from the tree, check them to ensure they are not decaying. You’ll need them to be strong and not brittle.
I prefer using branches and twigs that have dried out. The reason for this is simple. I’ll be painting mine; green branches are holding moisture that may affect how the paint adheres. You can use green (live before cutting) tree branches to build your twig houses if you don’t plan on painting them. They will dry out eventually.
Suppose you don’t have a large tree. You can always head to your nearest neighbor. I’m almost sure they would love for you to pick up twigs.
Cut Your Twigs To The Right Size
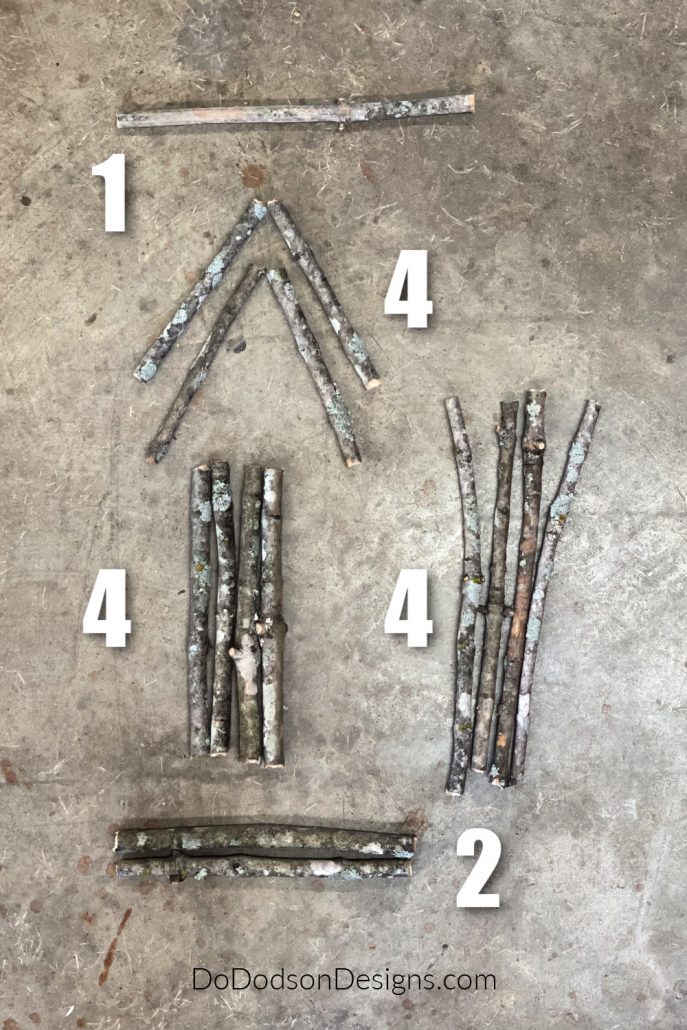
Step 2: The fun thing about these tiny twig houses is that they can be customized. You can make custom home decor any size you want. Just follow these simple steps.
- First, cut one (1) piece the length you want your home to be. This one will be the roof line.
- Cut four (4) pieces for the roof ends —all the same size.
- Cut four (4) pieces underneath the roof and bottom structure —all the same size.
- Cut four (4) pieces for the walls —all the same size.
- Cut two (2) pieces for the front and back bottom of the house.
* All twigs need to be similar in size and as straight as you can possibly get them. It’s okay to have some irregular ones. I call that character.
Annie Get Your Hot Glue Gun
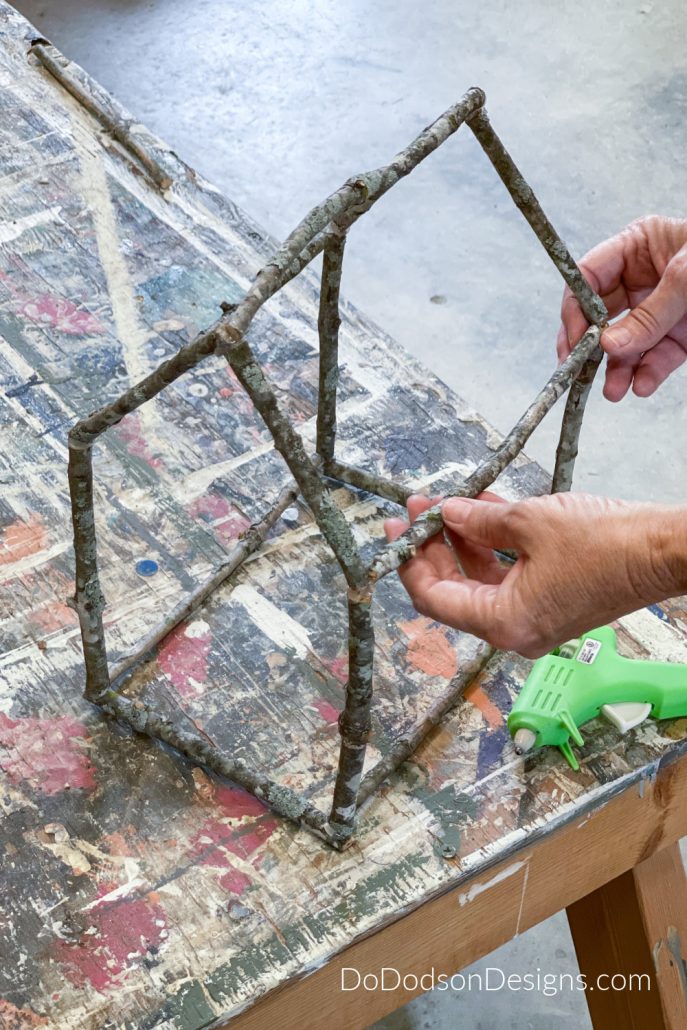
Step 3: Start assembling the twigs and securing them with hot glue. I found that constructing the front and back sections of the house is the easiest way to go about this DIY twiggy project. It can be a challenge. Be sure to wait for the glue to dry completely before attaching the next section. And if you have those finger protectors from the hot glue, now is the time to pull out those bad boys.
They say slow and steady wins the race. Assembling twig houses takes time and patience.

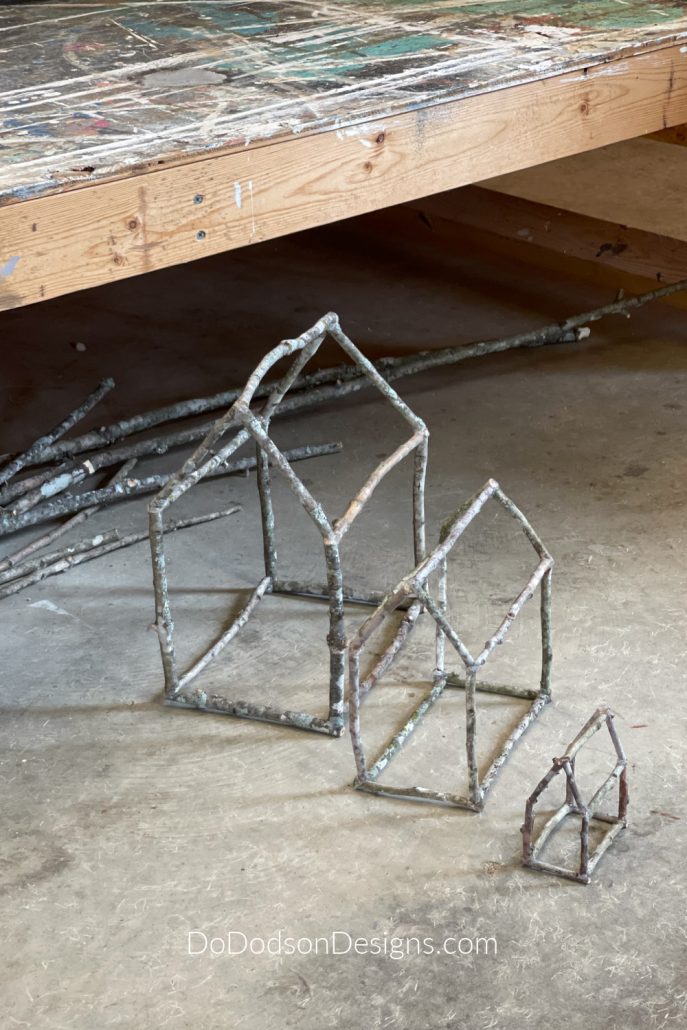
What Size Should I Make The Twig Houses?
Here’s the fun part about these tiny twig houses, you can make them any size you want. Make big twig homes or make them tiny.
This was a total accident (happy accidents are the best), and I ain’t afraid to tell you. I winged this DIY project without measuring anything.
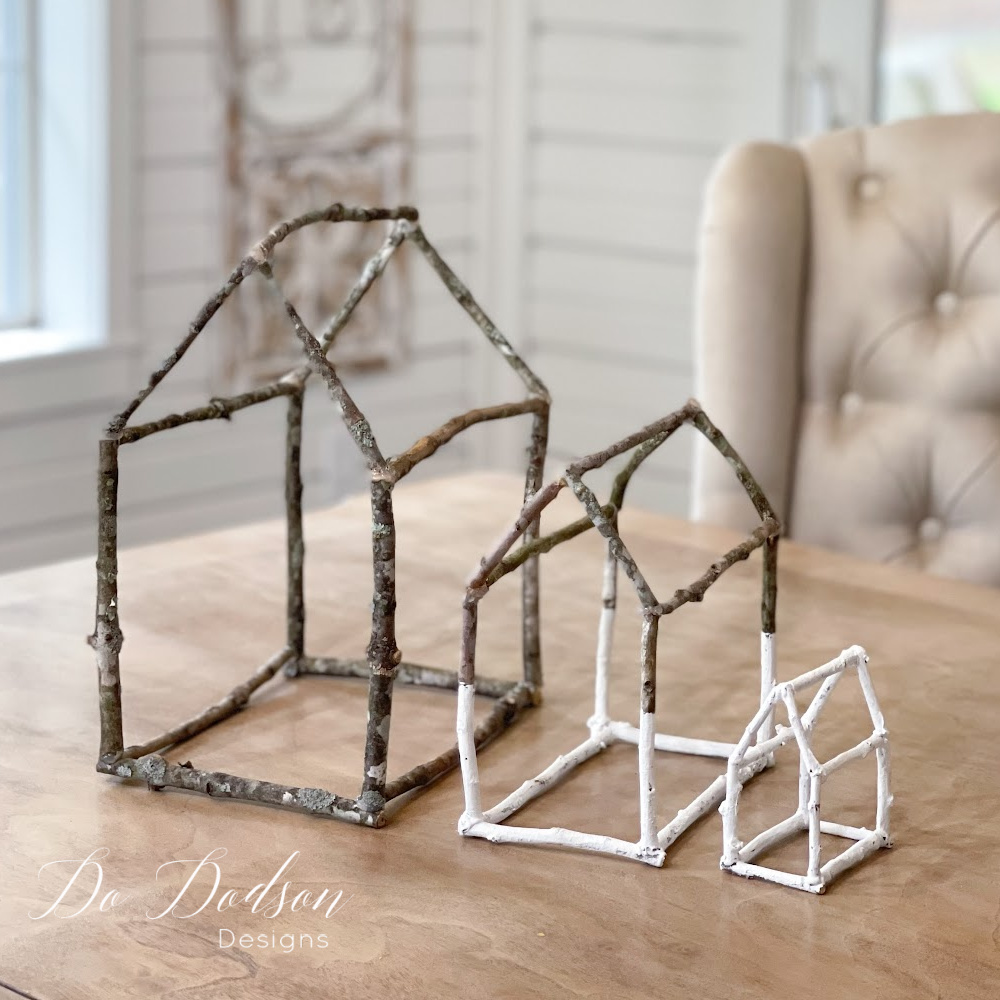
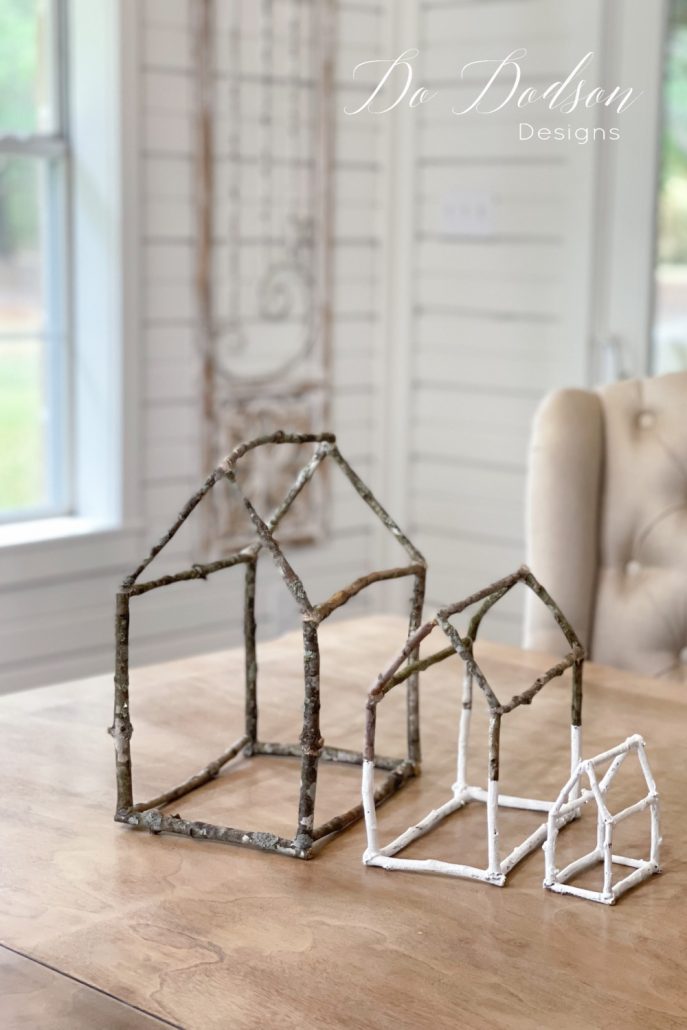
I made three twig houses (all different sizes) and somehow managed to make them the perfect size that they fit inside each other creating a twig house trio! But before I show you that, let’s paint these cute little twiggy trios.
To Paint Or Not To Paint
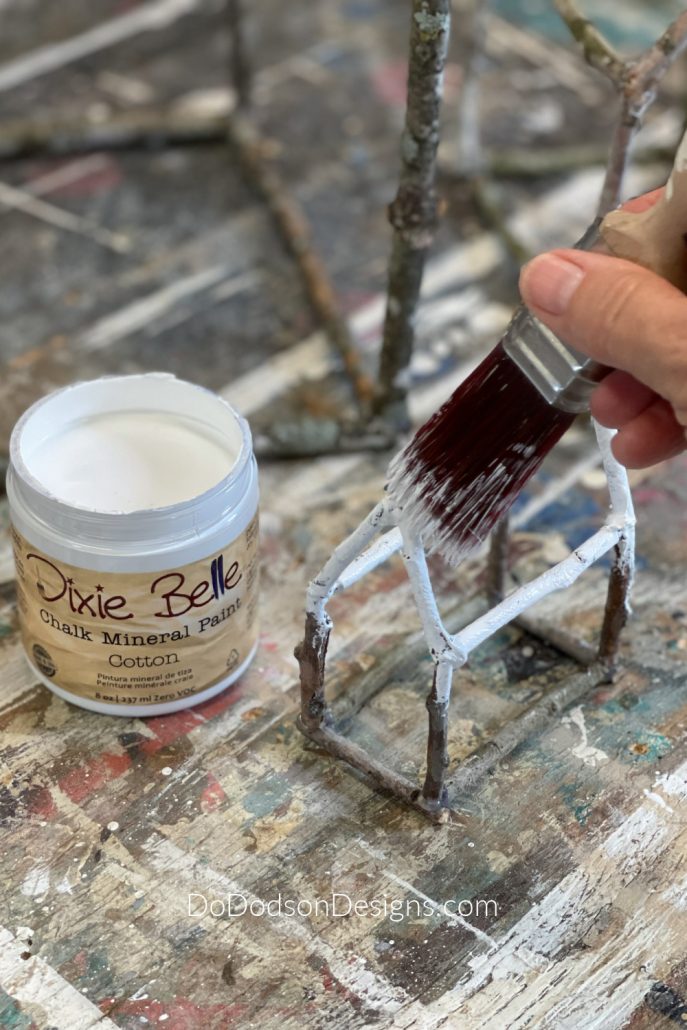
Step 4: I liked the look of the natural twigs, but decided to add some paint (optional) to give them a little more character. Besides, I LOVE to paint. Using Dixie Belle’s chalk mineral paint is easy, and it’s what I have on hand. I use it for almost all my DIY painting projects.
Remove any leftover hot glue strings (there will be a lot) and give any rough areas on the twig houses a light sanding with fine grit paper. This can be done before assembly, but I didn’t. I got in a hurry. Either way is fine.
Paint directly over the twigs and hot glue. Paint the whole surface or get creative and use your imagination.
The smallest house got a quick all-over painting, and I wasn’t particularly trying the get full coverage. I allowed a little bark to show through, giving it a chippy painted look!
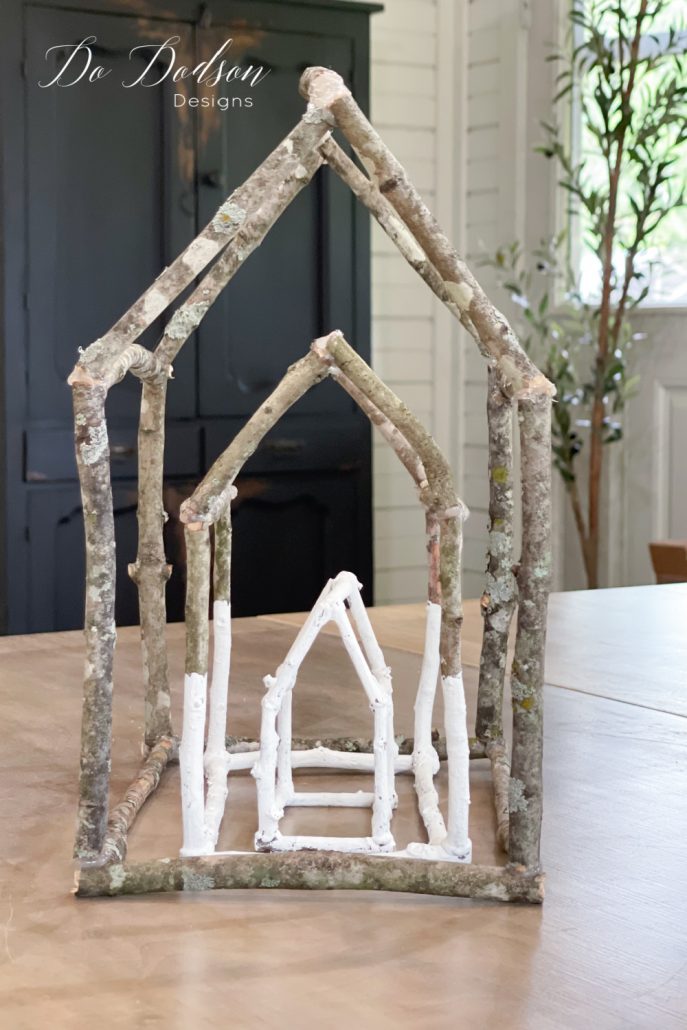
The medium-sized house got the bottom third painted only. I like this look. It’s a trendy look in today’s decor.
Lastly, the larger of the three houses had amazing green and gray areas of moss and mold on the “bark” skin and I couldn’t help but want to leave it as is.
DIY Twig House Trio
Can you believe I did this? I’m still in awe of how this happened. Maybe it was a sprinkle of dust from the queen of the fairy gardens. Whatever the reason, I am totally in LOVE with this twiggy decor.
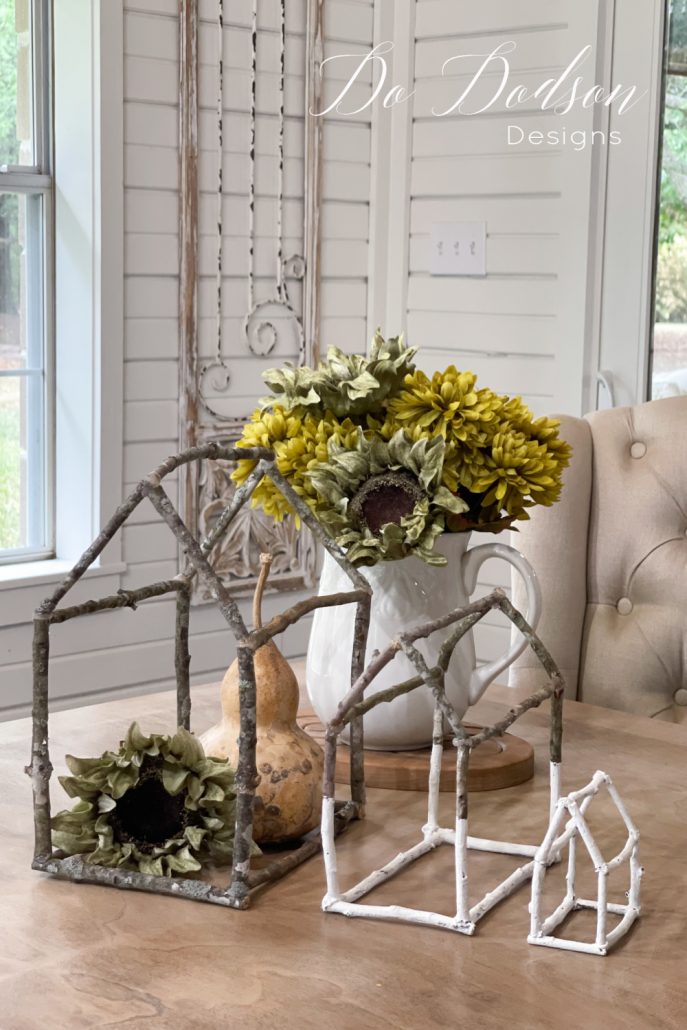
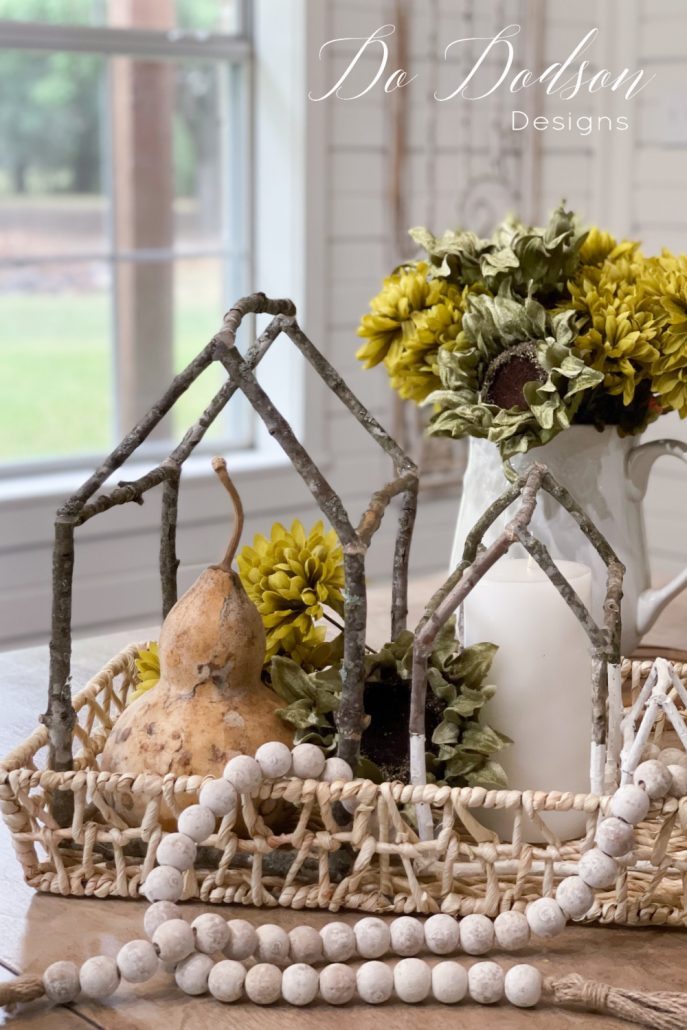
Thanks for joining me today while I twig away at having fun. LOL, It’s always a joy when I get the chance to bring a little nature inside our home, and the good thing is that it can be re-used through all seasons. Add a candle, flowers, or pinecones. The ideas can be endless, and you’ll have something you created that is unique and special because it came from a tree. Yep, I’m a tree hugger.
Let me know what you think. Drop a comment below or just say hi, so I’ll know you were here. Don’t forget to PIN this idea for later.
Until the next project… xo, Do

Very cute!
Thanks, Jill! They would make a fun project for kids too. Have a fantastic weekend. 🙂 xo
Those are just the cutest!
Thank you, Donna! Aren’t they sweet? 🙂 xo
Do! These are the cutest. 😍 I love them. You’re so creative! You know I have a lot of trees in my yard to make these. It’s a must have. Thanks for sharing.
Thank you, Wendy! I added your pine cone inside one of them. They’re perfect for year-round decor. Have a great day my friend. 🙂 xo
So cute! Nesting houses 🤩
Thanks, Cletia! You’re right! This does qualify them as nesting houses. LOL 🙂 xo
Oh my gosh, these “twiggy trios” are too cute and so very easy to make and that’s one reason I love them!! I love EASY!! Thanks for sharing, Do, such a great idea and using them year round is even better!! Have a great day!
Thanks, Carolyn! I LOVE easy and it’s how I role. I’m so glad you enjoyed them. 🙂 xo
These little houses look so organic and adorable!
Thank you, Denise. As organic as it gets back here in the woods. LOL Thanks for stopping by. 🙂 xo
Thank you so much for the inspiration. Beyond grateful to you for sharing your ideas. Wondering about what size the littlest house dimensions are?
Also, I keep trying to sign up for a weekly emails but keep getting an error. Wondering if you could double check that I’m added to your list?
Hi Cristen,
Thank you! It’s so fun to share with other like minded creatives. The smallest stick house is 2in X 4in. I’ve made a lot of these tiny houses. My granddaughters loved playing house with them. Have fun making your tiny houses. 🏠
xo 😘
Colle chaude n’est pas bonne pour l’extérieur – le froid fait décoller. Il vaut mieux une colle plus permanente comme E6000 / Hot glue not good outside, the cold unglues everything. Better glue E 6000 or other that is permanent.
Hi Suzanne,
Thank you for the great glue tips. I use my twig houses as indoor decor, but I can see how this would be a better option for outdoors. 🙂
So simple and fun to make, what a fantastic idea! Today I’ve featured your project on Crafts on Display, I hope you enjoy it – https://craftsondisplay.com/home-decor/cute-tiny-twig-homes-178870/
Oh, how wonderful. I’m so glad you enjoyed this twiggy project. Thanks for sharing. Have a beautiful week.