Are you crushing over those drop-dead gorgeous natural wood finishes but cringing at the thought of using those harsh, toxic chemical strippers? This may be the answer you’re looking for.
* As an Amazon Associate, I earn from qualifying purchases and through other companies as well. You will not be charged extra when you purchase through these links, but any income I make helps me create more amazing DIY projects to share with you! To see my full disclaimer, click here!
Natural Wood Finish – Sanding vs. Stripping
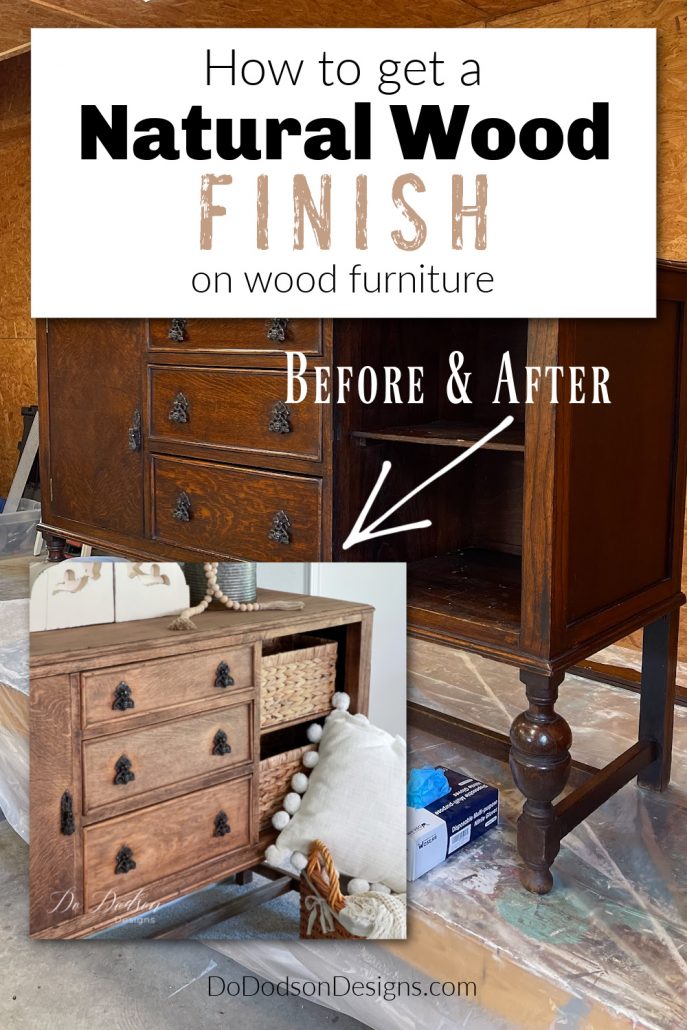
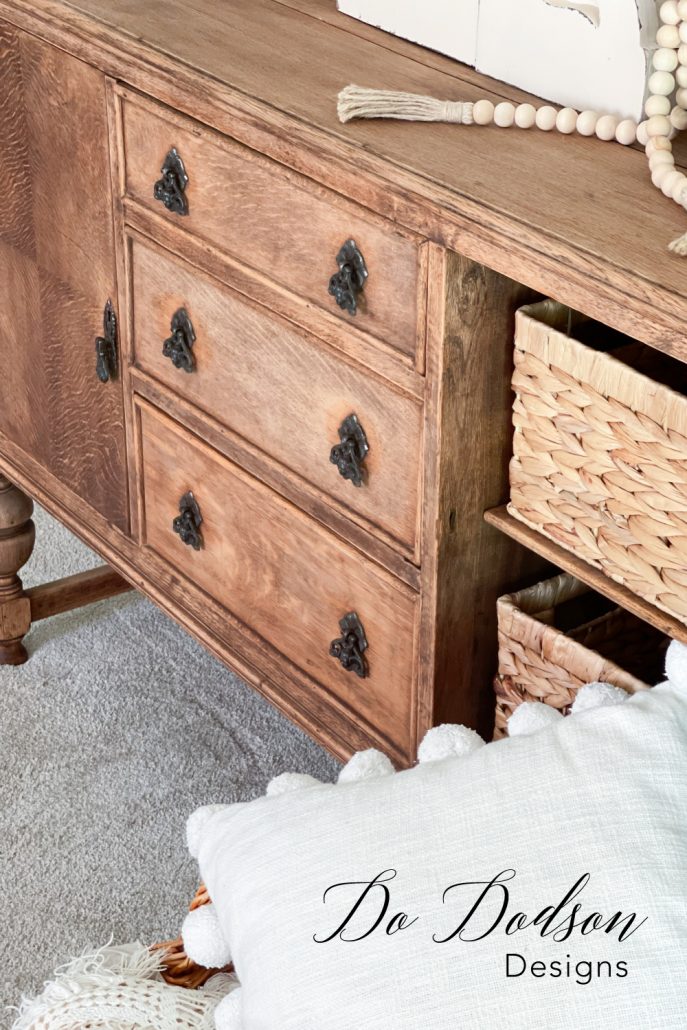
I’ve had this sideboard for a while now and have used it as my dresser. I wanted to strip the varnish down to a natural wood finish for a bit now, but as life would have it, things kept getting in the way—typical excuse.
Also, I wanted to test out an all-natural finish to see if leaving the wood bare would work in my bedroom. When I say bare, I mean naked. No sealer or topcoat. I wanted the natural wood and nothing else. I’ll update you on my findings at the end of this post.
Usually, I’d have used my SurfPrep sander and sanded away the old varnish down to the raw wood, but I thought I’d try something different. Plus, it’s good to try new things. You never know why; you might find what you didn’t know you needed.
But before I do, let’s review a few differences between sanding and stripping.
- Sanding works best on large, flat wood surfaces.
- Strippers work best with delicate detail areas that sanding can’t get to
- Strippers take less effort
- Sanding with an electric sander is loud and messy if you don’t have a vacuum attachment.
- Strippers can be toxic and hazardous to your health
- Strippers typically take more than one application and are very messy
- Sanding away an old finish can clog sandpaper and make it challenging to finish your project
SUPPLY LIST:
- wood furniture
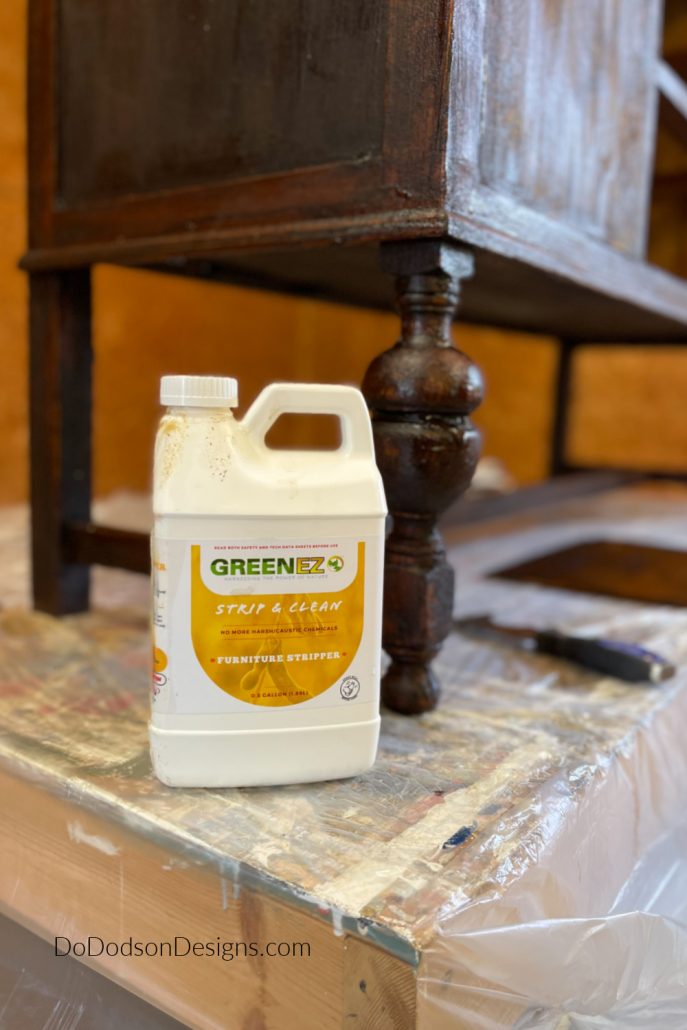
- GREENEZ strip & clean furniture stripper
- paint scraper
- scouring pads
- paper towels
- gloves
- disposable chip brush
- protective eyewear
- electric sander
How To Get A Natural Wood Finish On Furniture
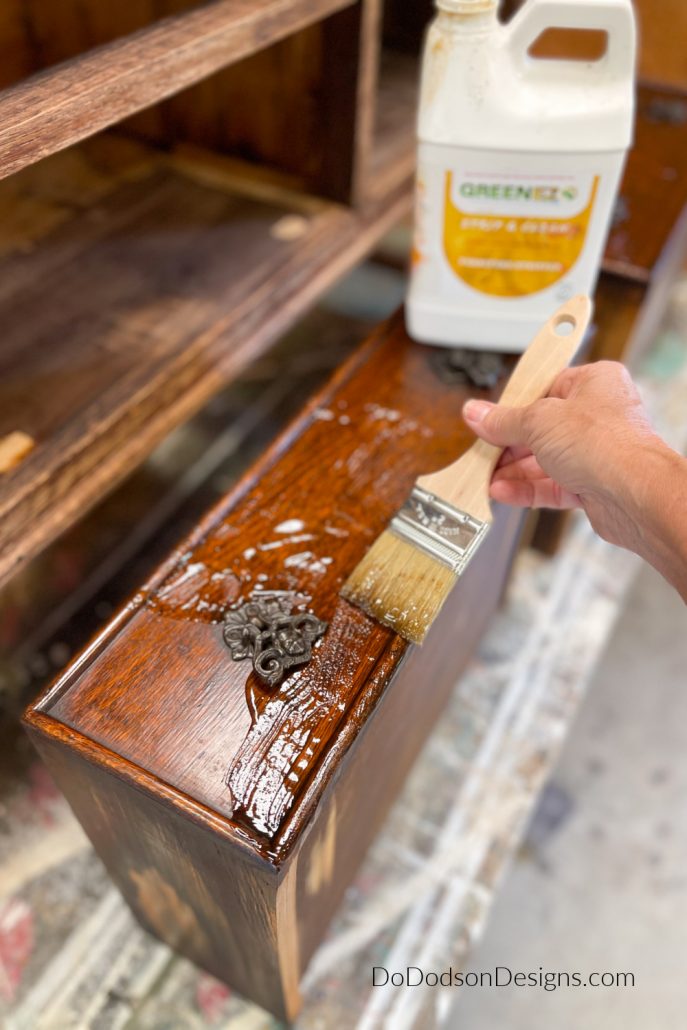
This product claims to be environmentally friendly and non-toxic. However, it would help if you always took precautions when working with strippers. Always wear gloves, protective eyewear, and a gown (or other protective clothing) before applying.
Clean your wood furniture with the products of your choice and make any necessary repairs before starting this process.
The wood should be in good condition and able to withstand some vigorous scrubbing. Yes, I said, scrubbing. I’ll explain this later in the post.
How To Apply The Stripper
STEP 2: APPLICATION
Read the directions on the bottle, just in case I missed something. Not intentionally, but it does happen.
Shake the stripper well before applying. Use a disposable chip brush and apply a liberal amount to the wood. I used a good amount because other strippers I’ve used tend to dry out quickly in the past. The directions read to leave the stripper on anywhere from 2 to 4 hours.
The hardware on this piece wasn’t removable without damage, so I took a chance and left it in place. I was a little nervous, but felt that it would be okay.
Next, I waited for the magic to begin. I daydreamed about natural wood finishes while I waited.
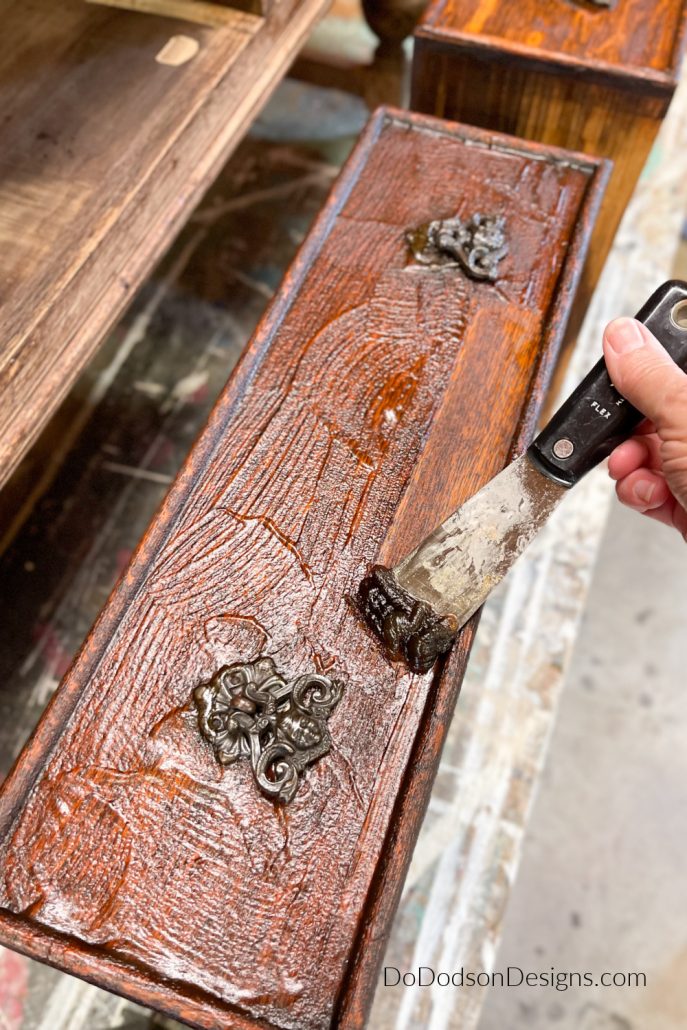
STEP 3: STRIPPER REMOVAL
After about 2 hours, I couldn’t stand the wait any longer. I was all daydreamed out!
It was evident that the stripper was eating away at the old varnish, and since this piece was old and had a thin layer of varnish, I opted to proceed and see how it was working.
So, I grabbed my paint scraping tool and started removing the gooey leftover mess. This is the part I HATE and why I don’t particularly appreciate using chemical strippers. But so far, it wasn’t so bad. There was no smell, and it was reasonably easy to remove.
Get ready to have an oopy goopy mess on your hands. I used a plastic-lined trash can and disposed of the old varnish on top of paper towels to absorb the liquid.
As you can see in the photo, the stripper was still very wet on the surface. The dry time is a lot longer than most strippers. Strippers are only active when damp, so this is a good thing in my book.
TAKE IT OUTSIDE!
STEP 4:
After removing as much varnish as possible with the paint scraper, I took a drastic step. If you have used strippers before, you know that the leftover stripper must be removed from the surface before you can finish your project piece. It needs to be as clean as a whistle.
Since the stripper is water-based, I decided to take it outside and GAVE IT A BATH! OMG, and it was 100 degrees when I did it! What was I thinking? That’s why I have no photos to show you.
I used the water hose and a spray nozzle with a scouring pad and went to town scrubbing. This method enabled me to access all the hard-to-reach areas. A toothbrush works well with fine details.
As I scrubbed (with a scouring pad), I rinsed with water and saw all that wet leftover varnish melt away.
The wood was still very dark, saturated with water, but the varnish was gone.
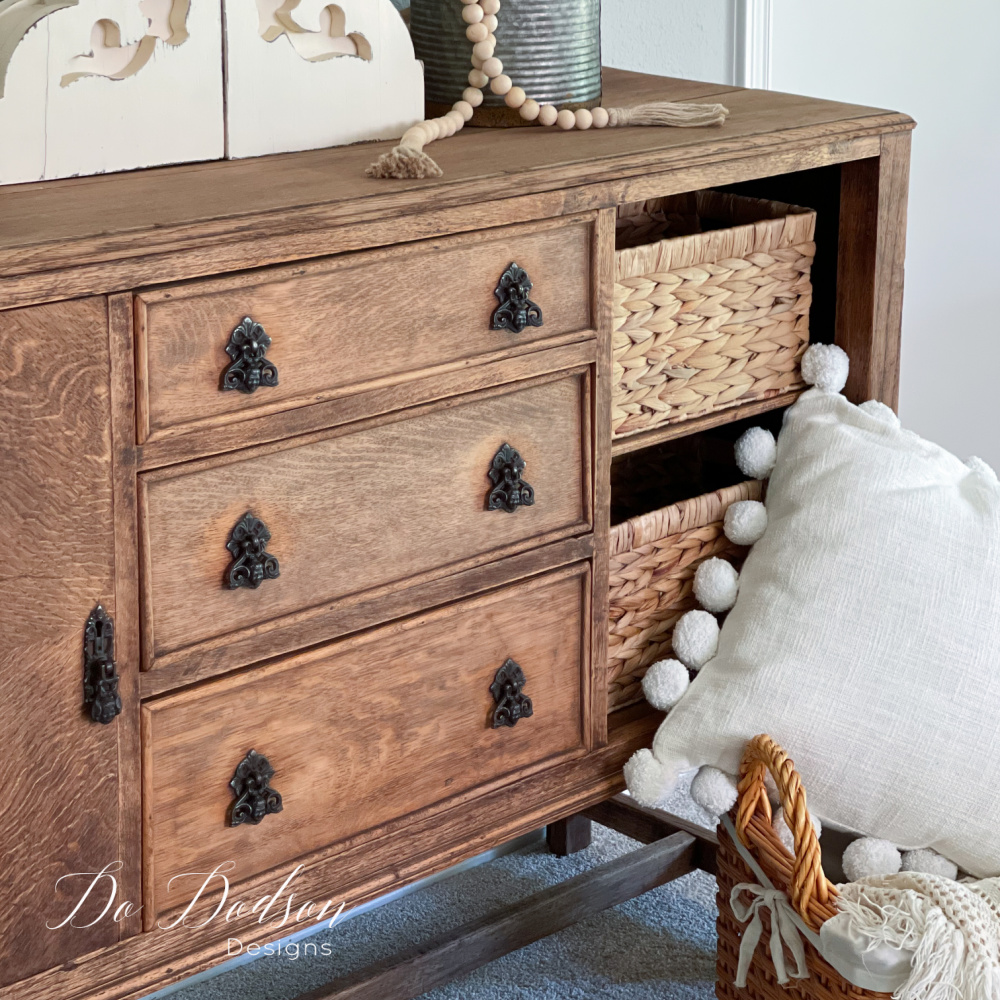
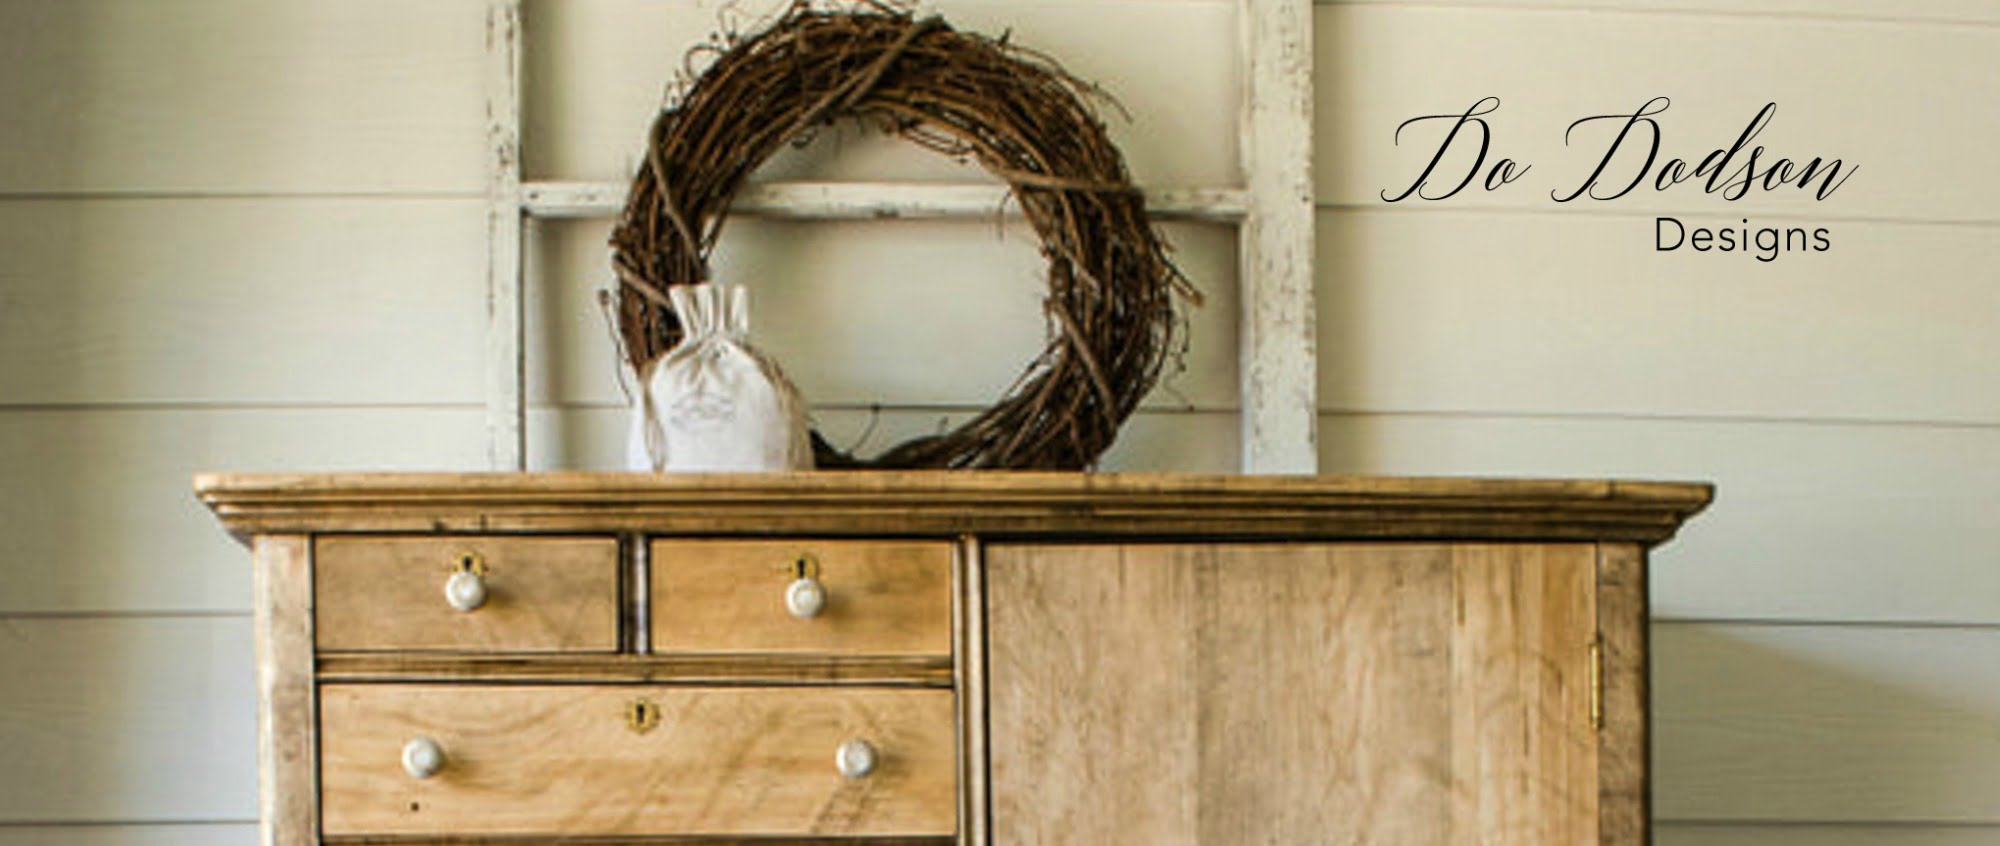
After allowing it to dry completely overnight, I was pleasantly surprised at the beautiful natural wood finish I had achieved.
Is this method unconventional? Yes, but it works. At least it works with this product.
Finishing Off The Natural Wood Finish
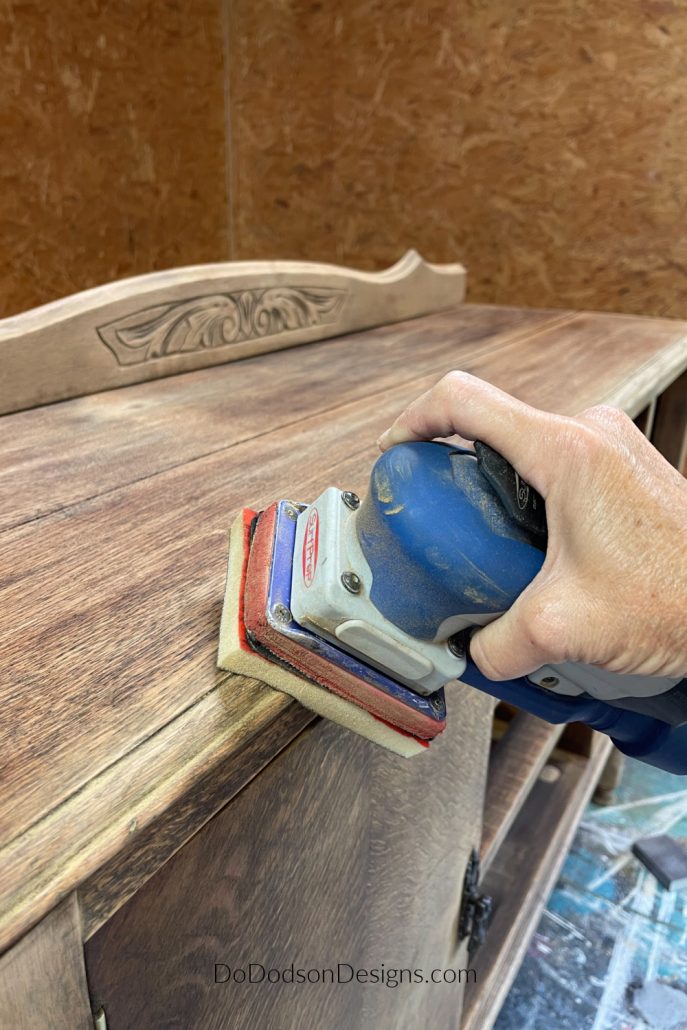
The wood will and did swell after getting wet for a prolonged period. You can expect the wood grain to be raised and rough to the touch after drying.
And the hardware was not damaged in any way. That’s a huge win for me! Sa-weet!
STEP 5: SMOOTHING THE WOOD GRAIN
Use 220-grit sandpaper to smooth the wood grain. You can do this by hand or with an electric sander. That’s totally up to you.
Wipe any remaining wood dust from sanding with a water-damp cloth.
To Seal Or Not To Seal The Natural Wood Finish?
STEP 6:
That is the question! This step is optional in my book. Let me explain why.
I wanted a natural wood finish, meaning I wanted it to look like it did after stripping and cleaning. Raw wood!
I have not found a product that will not darken or alter the color of the wood. Hold on; I know what you’re thinking. The wood needs to be protected from wear, spills, and grime. I agree.
But it’s okay if you want to leave it all-natural. No rule says you must complete this step. Just be careful and use it in a room where it won’t be touched frequently.
This sideboard is going in my bedroom and will get very little traffic. I LOVE it!
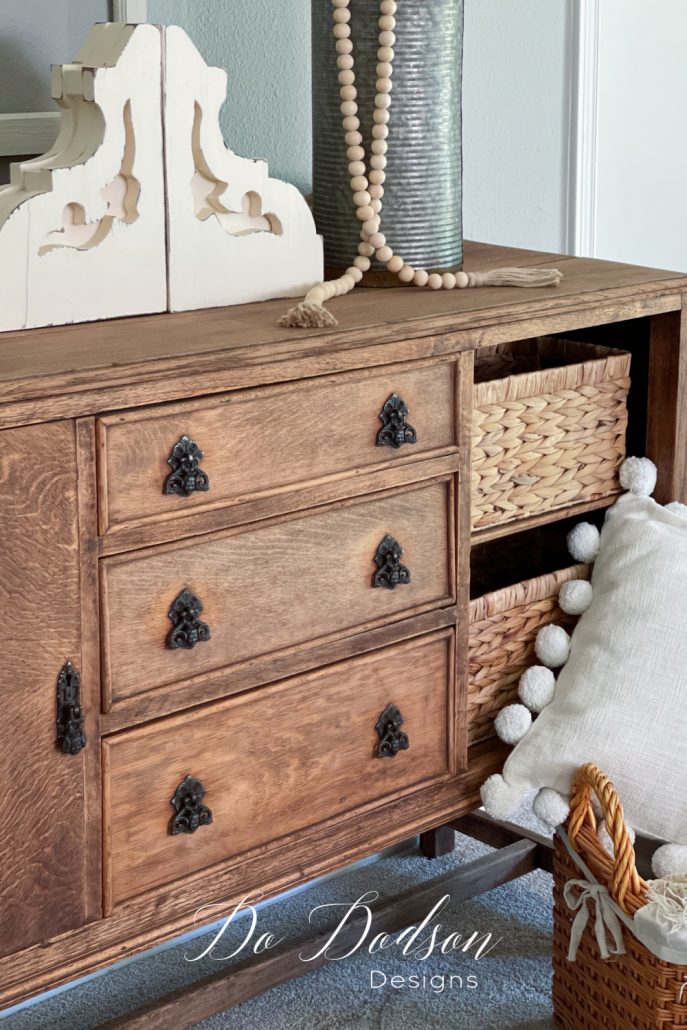
* Update on this dresser… fast forward three years, and the natural bare wood still looks beautiful. While I understand it’s not for everyone, I want to encourage you to create what you love. There are no rules in furniture flipping.
I’m sure this old gal never had a bath. LOL, but she now has a beautiful natural wood finish. Naked wood!
What about you? Would you leave the wood unsealed? I’d love to hear your thoughts on this makeover. Or say hi and let me know you stopped by. I LOVE hearing from you.
Thanks for sharing!
Until the next project… xo, Do

Wow! I love it just the way it is, and certainly wouldn’t risk putting a protective coat on it. In fact I’m very tempted to try this on a piece I have that is quite similar, but as we’re about to move house I think that particular project had better wait for a while. Thanks for sharing all your projects Do, I love seeing what you get up to.
Judi in the UK
Hi Judi! I totally understand about moving. That’s the reason this project took me so long to complete. You can always revisit later. Wishing you all the best in your move. Take care 🙂 xo
Looks very nice ,well done!
I started to do a mixture out off old white furniture and old natural wood items like little tables, chairs and sewing cases ect.
Greetings from a Dutch girl/woman living in Germany Veronika
Hello there Veronika! So good to hear from you. I think the mixture sounds dreamy! Enjoy your weekend. 🙂 xo
Gorgeous! Now I’ve got to try out that Greenez Stripper! I’ll use your link to get some!
Thanks for sharing Do! As always, you are an inspiration!
Abbey
Hi Abbey! I think you’ll love this new product. Easy to use, and it’s not smelly. Thank you as always for stopping by. Have a beautiful weekend, my friend. 🙂 xo
Absolutely beautiful!! Love it so much! I would leave it as is, no sealer…👍🏻.
Thanks, Lori! It’s perfect to me as is. Thanks for reading. Have a great weekend! 🙂 xo
As always you nailed it!! I love the look for a low traffic area! Well done! Next time go naked😂
LOL, I don’t think there will be a next time. Too hot for me. Thanks for reading. 🙂 xo
So awesome! Love that you left it as is. Personally, I’d likely want to add a flat topcoat. But I’d test it on an inconspicuous spot first to make sure I’m still happy with it first.
Hi Sara!
I did just that, and it darkened it slightly even after drying. So, for now, I’ll love it as is. Thanks for reading. 🙂 xo
I love how that turned out!
Thank you, Virginia! It’s always good to hear from you. 🙂 xo
Why not clear wax, soft patina and protection – should not change the color, a good rubbing to finish the application and give it that soft and natural appeal while preserving the raw wood look.
Hi JoAnne,
I have used clear wax on raw wood, which darkens the wood slightly and I agree that it does give a lot of protection. I prefer using white wax to keep the wood light, but even that can bring out the wood undertones and change the color. For now, I’ll just love it as is. Thanks for stopping by. It’s always good to hear from you. 🙂 xo
This is so pretty, my friend. Hugs to you.
Thank you, Renea. It’s always good to hear from you. Hope to see you next month. 🙂 xo
I love the look of raw wood! I prefer using hemp oil to seal— it soaks in to protect snd polymerizes for long lasting Protection. I did this to my bathroom cabinets a few years ago and I LOVE it!! Your piece is Beautiful!. I’ll give that stripper a try next time!
Yes, I love hemp oil too and have used it on many projects. Thanks for reading, and have a great weekend. 🙂 xo
She’s gorgeous! Well done!
Thank you, Angie! 🙂 x0
I love the raw wood. It is gorgeous. I have a piece from when I was 10 years old and I’m going to use this technique.
Do you like the Greenz better than the Citris type?
Thanks for sharing. I love seeing your work!
Hi Lori, I would have to say yes due to the long wet time with the GREENEZ. That’s an awesome idea. What a great story this will tell.
Love it! What about sanding sealer?
Hmmmm, I’ve never heard of sanding sealer. Can you share more?
Hey Donna! I’m glad you did this piece (and yes – you’re crazy for doing this in 100 degree temps! ). But thank you anyway.
I have a furniture piece similar to this sideboard, that I rescued from the curb; but your piece clearly has better looking hardware.
I’m saving this for our bathroom rennovation, so mine MUST be sealed somehow. What about a wax sealer? A nice dull, flat finish, showing off beautiful wood?
Hi Diana, This would make a gorgeous vanity for a bathroom. You’re correct. It will need to be sealed in a wet area for sure. Wax works well, but you’ll still have a slight color difference in the wood. White wax works well and keeps the wood light and bright.
How about using a wood conditioner after?
Of course, that’s always an option, but it will cause a color change in the wood.
Hi Donna!! I have been wondering about this brand of stripper. Now I know. How do you think it compares to Citrix srip? I don’t know,.I would probably deal it with clear wax or hemp oil. Just so it doesn’t dry out.
Hi Cheryl! The difference I saw was that it had a long wet time which is excellent!
I love the ‘naked’ look and would leave as-is. Wood is a lot more durable than we give it credit for IMO! 🙂 I have to check if we have GreenEZ here in Toronto. Looking forward to trying it! Enjoy your weekend my friend. XOXO
You got that right, Denise! Wood is durable. Enjoy your week. 🙂 xo
Yep, it looks puryt good! Pretty color, too!
Thank you, Linda! 🙂
I would leave it natural. Love the look!! Think i will do this to an old dresser in my bedroom and haven’t been sure what to do ,and now i know. Thank for your inspiration!!
You’re welcome, Patricia! 🙂 xo
Thanks for this Do – I just had a custom piece dropped off and she wants it in natural wood and then white waxed. I’ll give this stripper a try on the old varnish finish. I just bought it through your link and pinned this post! Your piece looks amazing!
Hey Cindy! Let me know how it turns out. Thanks for stopping by. 🙂 xo
It’s beautiful just as it is.
One question. I’m assuming there might have been a door on the side where there now are baskets, which I love. So if there was a door there that was removed and you stay with raw wood do you fill the holes where the hardware was or leave the holes.
Thanks for the info on the stripper product.
Hi Joanne! It depends on the piece. The holes in this cabinet door were very small, so I opted not to fill them. But I would consider filling them if they were more significant and visible. Thanks for stopping by. 🙂 xo
Hi Do! This piece is a stunner! I would love to have a naked wood cabinet in my bedroom. Maybe one of these days, I will find one to strip it like you did here. Just love it!
I’ve wanted to try this for a while now, and I’m so glad I did. Thanks for stopping by. See you soon!
Do
It turned out beautiful. You have been my inspiration for many pieces. When you rinsed it off was there a mess. I only have my driveway And there are plants and grass where the water will run off
Hi Amy! Thank you. There was no residual left on the wood. However, I can’t say whether it is safe or not to use it on your driveway. I did it on the grass using 5-gallon buckets under each leg to protect it from the dirt. So far, the grass hasn’t been affected by the runoff. I removed as much of the varnish remover as possible before rinsing and scrubbing it with water. I hope this helps.
Best wishes. 🙂 xo
Hi Do. I love natural wood too and thought I’d pass on a wax that doesn’t change the color of that beautiful pale wood. It’s by Trewax…Clear Paste Wax. I hear it up in the microwave just enough to soften, as it’s really hard right out of the can. It goes on easily and soaks into the wood to protect it. The finish stays as it was before waxing. LOVE!!
Hey, thanks for sharing this paste wax, Susan! I’ve used Minwax paste with good results too. I’ll for sure give this a try. 🙂 xo
Thanks for the update on this gorgeous piece, Do! It’s absolutely stunning. PINNED! XOXO
1. I love your work
2. As suggested by others, I wonder if a wax finish would enhance it further
3. I note you were unable to remove the hardware which probably illustrates why it is important to do so whenever possible for ease of working. The slight ‘irregularities’ round the hardware areas draw my eye immediately.
4. I’m someone who, sadly, has yet to start on her own project!
Good eye, Audrey.
Yes, I was unable to remove the hardware without damaging it. In order to keep it in its original state I opted to go around them. The stripper was gentle enough that they still look good. Old, but good. At some point I may try to add a sealer but for now, it’s holding up beautifully. Oh and by the way, the pictures for some reason made it look a bit orange and it’s not at all. Photography can be tricky catching what the eye sees. Thanks for your observations. 🙂
I realize this is an older post so I hope you can still respond. I am wondering what type of dust collection system you use. I am revamping my 1 C garage/workshop and am very confused about the many choices. Any advice would be greatly appreciated!
Hi Janet!
Yes, I’m always happy to help. I purchased mine from Home Depot. The brand is Rigid. It’s portable so easy to carry around. I’ve used the same vac for over 15 years now. I did have to purchase an adapter to for my sander. I also got it from Home Depot. It’s been so helpful. When we remodeled our home, it was a game changer for sanding inside our home. Wood cabinets and wood work.