
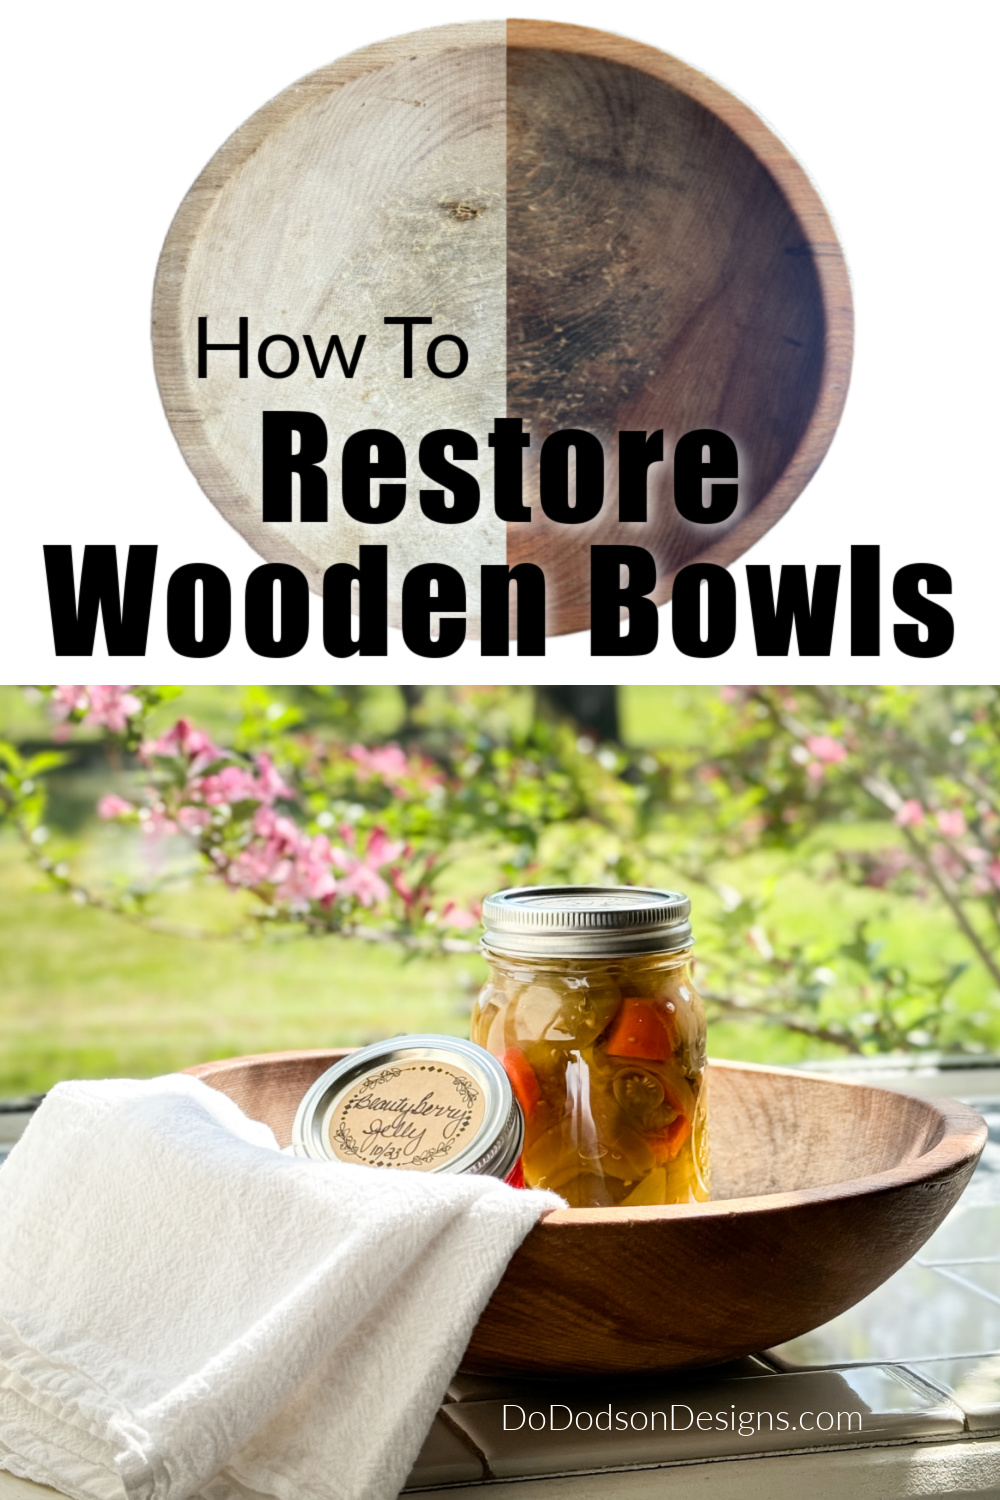
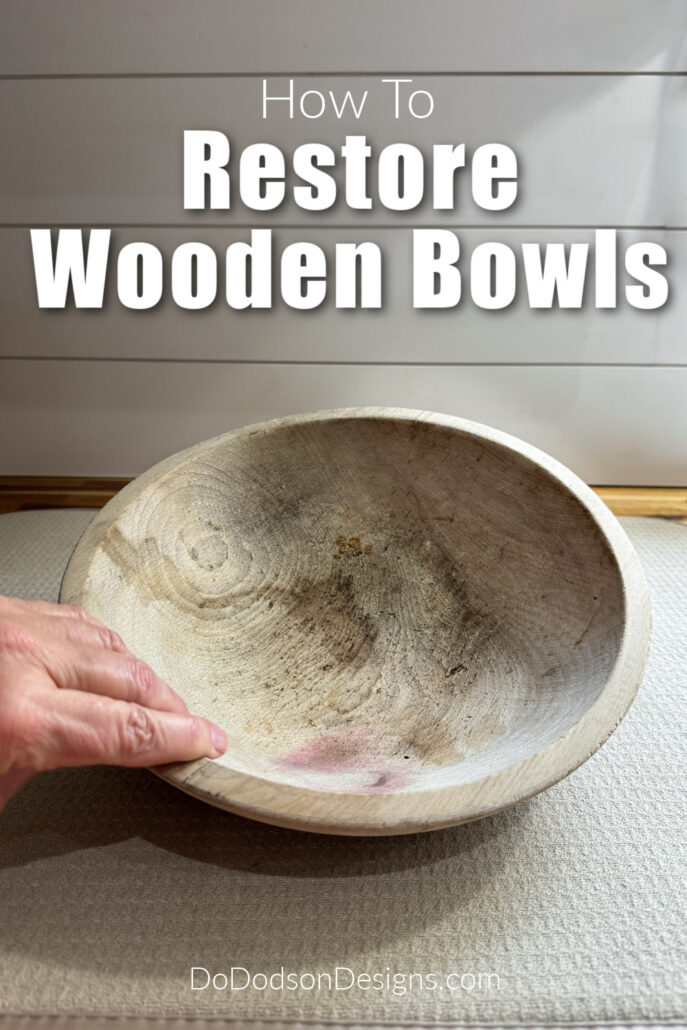
Hey, Triple-D friends! Are your treasured wooden bowls beginning to show signs of wear and tear? I believe these beloved kitchen bowls deserve the best care to maintain their beauty and functionality. But this wooden bowl had seen better days. Of course, I grabbed it because no one can use a wooden bowl, right? Today, I’ll show you how to clean and restore old wooden bowls and bring them back to life so you can enjoy them for years to come.
Thanks to Dixie Belle Paint Co. for sponsoring this post. While I was compensated to write this post, all opinions are my own.
* As an Amazon Associate, I earn from qualifying purchases and through other companies as well. You will not be charged extra when you purchase through these affiliate links, but any income I make helps me create more amazing DIY projects to share with you! To see my full disclaimer, click here!
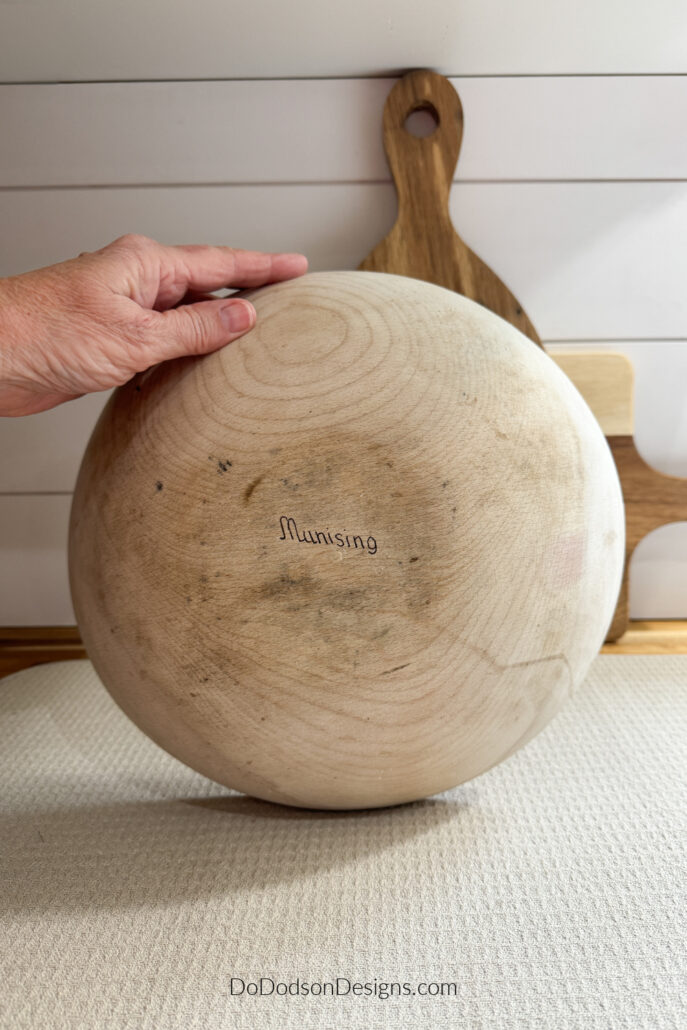
Let’s Restore This Old Wooden MUNISING Bowl!
I know what you must be thinking. Why would I bother with an old wooden bowl when you can simply buy a beautiful new one?
That’s just it! Have you priced a wooden bowl recently? Besides, have you ever known me to give up on a challenge? Besides, it was $1. Almost FREE.
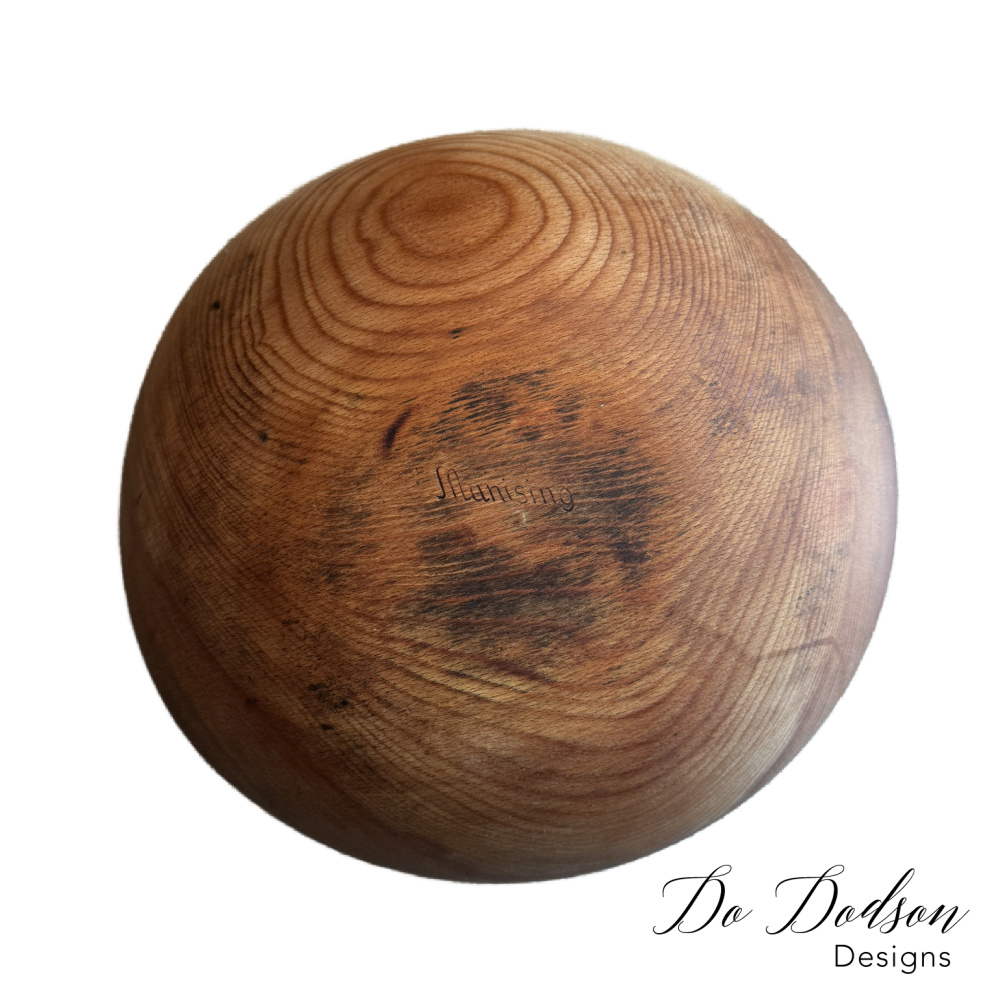
After I got home, I noticed some letters burned on the bottom of the bowl. After some research, I discovered this was quite a rare find—a primitive antique MUNISING signed wood bowl. From what I read, this wood bowl was made with maple wood in the early 1900s, circa 1930-1940. I matched the signature to the date.
SCORE another one for Do!

SUPPLY LIST:
Before you clean and restore your old wooden bowls, you will need to gather a few supplies before starting.
- old wooden bowl
- mild dish detergent
- nylon scrubber sponge
- fine grit sandpaper (Electric Sander)
- bleach for hard-to-remove food stains
- Howdy-Do Hemp Oil
- soft cotton T-shirt or applicator pads (for help oil)
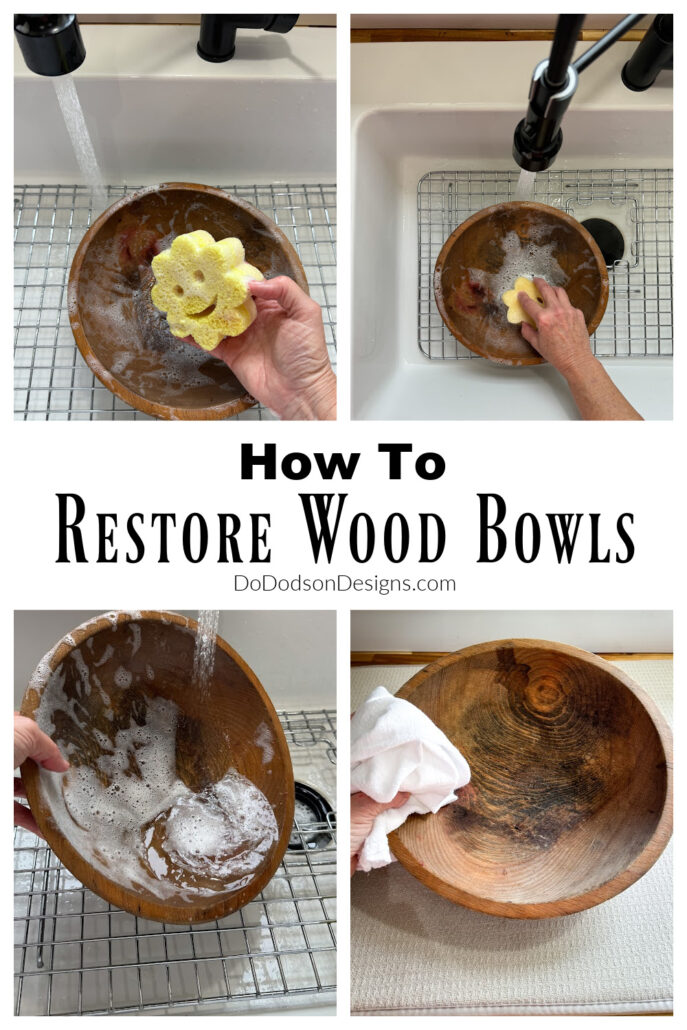
STEP 1: How To Clean Old Wooden Bowls
To begin, you’ll want to use a scrubby sponge to remove debris or dirt from the bowl’s surface. I find that mild dish soap is sufficient to cleanse the wood. This bowl was more than a little dirty.
Be careful not to soak your wooden bowl to the point of saturation—a little water and dish detergent on a sponge and a quick rinse with clean, warm water.
These old bowls are usually dry and brittle from use and neglect, or they sat around in a barn for lord knows how long.
Lastly, make sure to have a dry cloth or paper towel available to dry off the bowls immediately after cleaning them. It’s best to leave water on the wood to air dry. Dry the water on the wood immediately after rinsing.
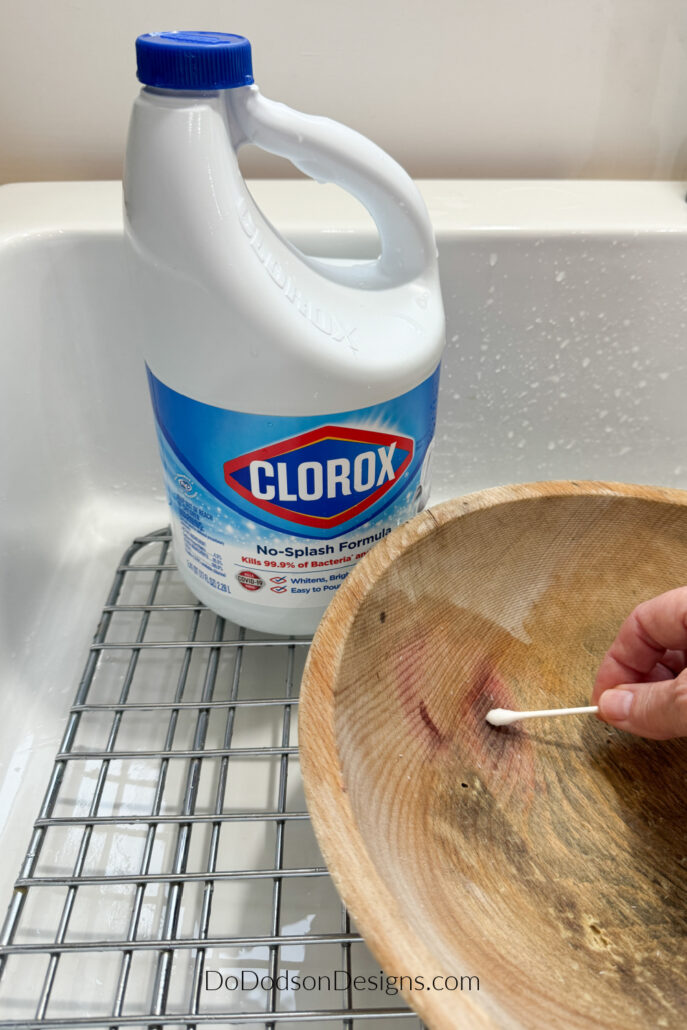
STEP 2: Removing Stains
It’s important to address any stains and residues that may have accumulated over time to restore the beauty of your wooden bowls. Try cutting a lemon and using a tsp of salt to scrub the stained areas. Gently scrub away any stubborn spots or residue on the bowl’s surface. Wipe away the salt and allow it to dry on a sunny window sill. Rinse with water when the stain has lifted. Here’s another article you may find helpful on how to restore wood bowls.
Because this stain looked particularly tough, I dab it with household bleach and a Q-tip for a few minutes, allowing it to dry before rinsing it with water and wiping it away with a soft, clean cloth. Rinse with water and towel dry.
It seemed to help lift the red stain (a possible food stain), which mostly faded from the wood. It still had a little pink stain in one spot, but it was as noticeable from where it started.
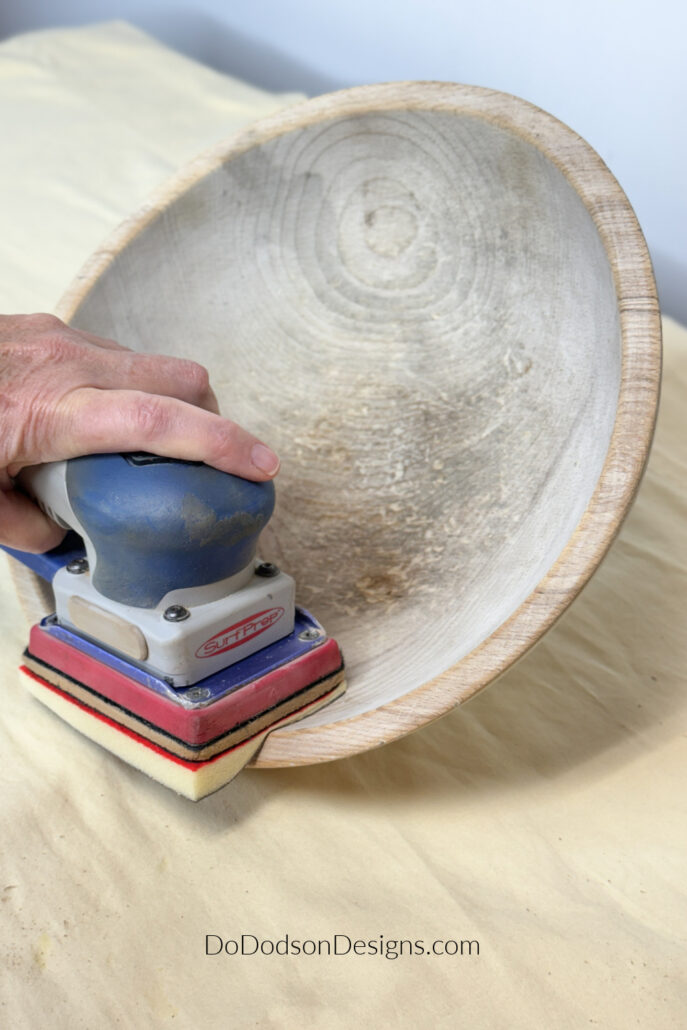
Sanding Wood Bowels
After removing food stains or splotchy discolored areas from your wooden bowls, the next step in the restoration process is sanding and refinishing.
Sanding the bowls’ surfaces (inside and out) will help smooth out any rough patches or imperfections, giving them a fresh look and smooth finish.
If you’re sanding by hand, remember to work toward the wood grain with medium to fine-grit paper to avoid damaging the wood bowl.
If you want quick and easy sanding, you can use an electric sander if you have these foam abrasive pads. To learn more about this sander, CLICK HERE.
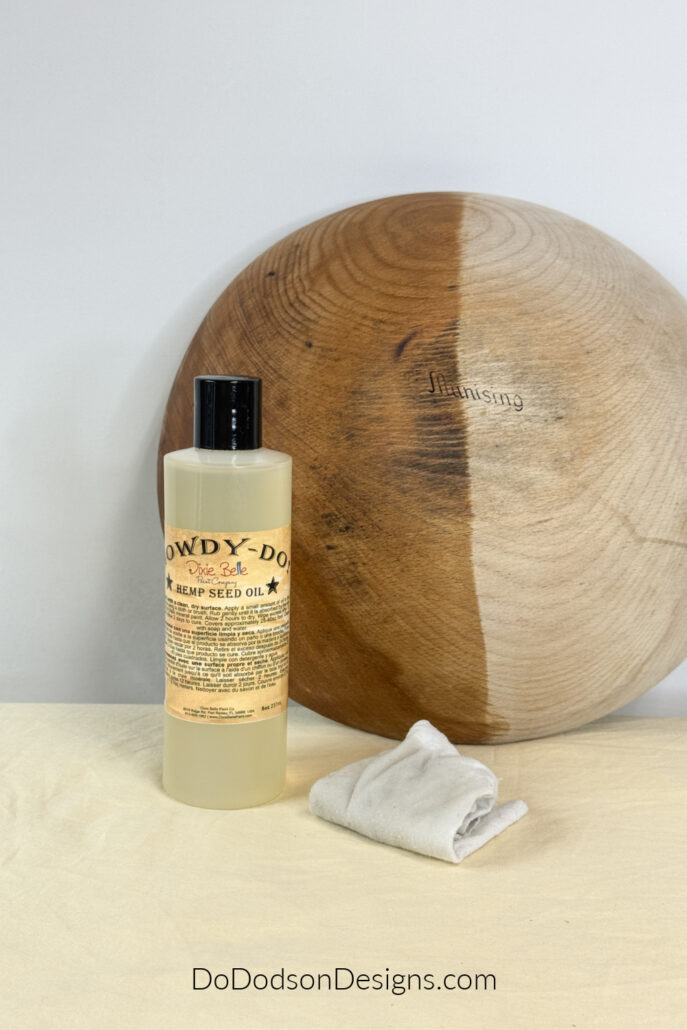
Sealing And Polishing Wooden Bowls
Once you have finished sanding, you have two options. The best way to treat natural wood is with mineral or hemp oil.
I chose to use Dixie Belle’s food-safe Howdy-Do Hemp Oil instead of mineral oil. It’s all-natural and non-toxic and protects against moisture and UV damage.
The hemp oil penetrates deep into the wood to protect it from the inside and out and leaves a matte finish.
- Hemp Seed Oil: Apply Hemp Oil with a lint-free cloth. The first layer will usually dry quickly within an hour or so. Repeat this process until the mineral oil no longer permeates the wood. Wipe off the excess with a dry, clean cloth. I did three layers on my bowl. It was super thirsty! Allow it to dry thoroughly before use.
- Mineral Oil: Apply a liberal coat of mineral oil with a lint-free cloth and allow it to absorb into the wood. Repeat this step several times until the wood no longer absorbs the oil. Buff with a soft, clean cloth to bring a soft shine to the wood. Allow to dry thoroughly before use.
Isn’t she a beauty? Oh, can you imagine the stories she could tell? I wonder if the bowl was used as a bread-proofing bowl. Sourdough?
Dixie Belle’s Howdt-Do Hemp Oil is also great for conditioning wooden kitchen utensils, cutting and chopping boards, and used as a finish on chalk-painted furniture. CLICK HERE to see how I used it on my vintage kitchen prep station.
Maintaining Your Newly Restored Wooden Bowls
Follow some simple maintenance tips to maintain the beauty and quality of your newly restored wooden bowls. After cleaning and restoring your wooden bowls, be sure to regularly wipe them clean with a soft, damp cloth after each use. Avoid soaking the bowls in water or putting them in the dishwasher, as this can cause the wood to warp or crack over time. Instead, gently hand wash them with mild soap and warm water, then promptly dry them thoroughly with a clean towel.
You can ensure their longevity by retreating the wood as needed to keep it well nourished. Don’t allow your bowl to sit in direct sunlight or allow exposure to extreme heat or cold.
This will help maintain the wood’s natural beauty and prevent it from becoming brittle, cracking, or damaged.
By practicing these simple maintenance tips, you can ensure that your restored wooden bowls remain in good condition for years.
My Antique Wooden Bowl Today
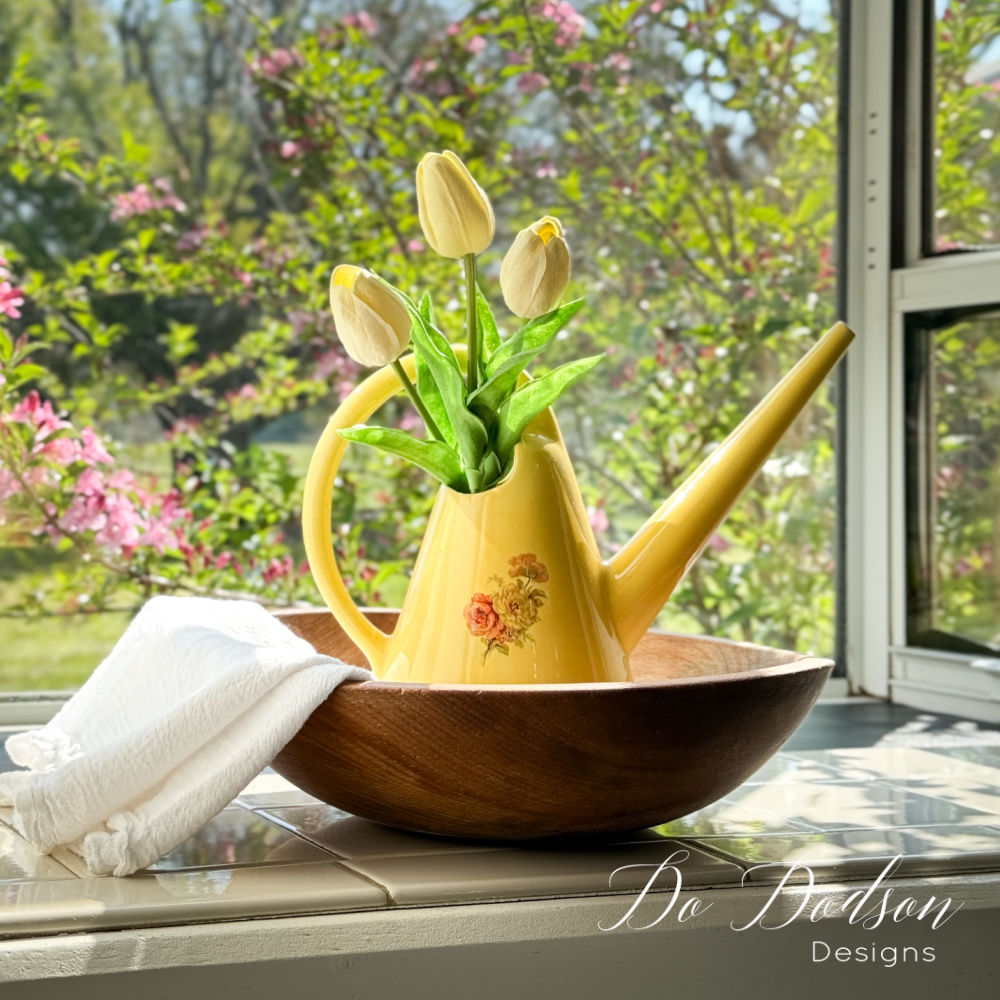
I decided it would be best to use my bowl as decor instead of using it. It’s definitely a bit worn, but it’s beautiful, has character, and tells a story of time.
My sweet friend Tammy at Rustic Orchard Home sent me some of her amazing canned goods to try, and they’re just too pretty not to display. They won’t last long here because they are delicious, but aren’t they pretty in my antique minising wood bowl? Spring has sprung, and I feel the need to dig in the dirt.
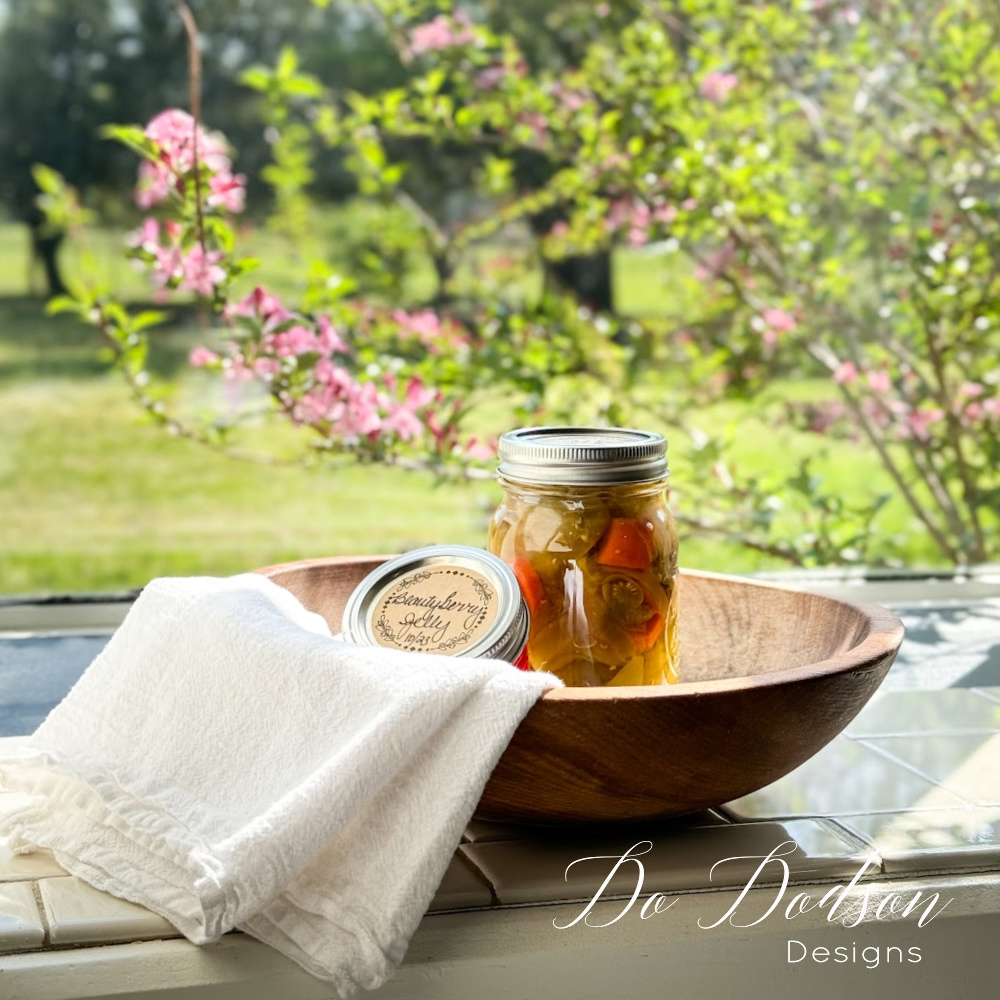
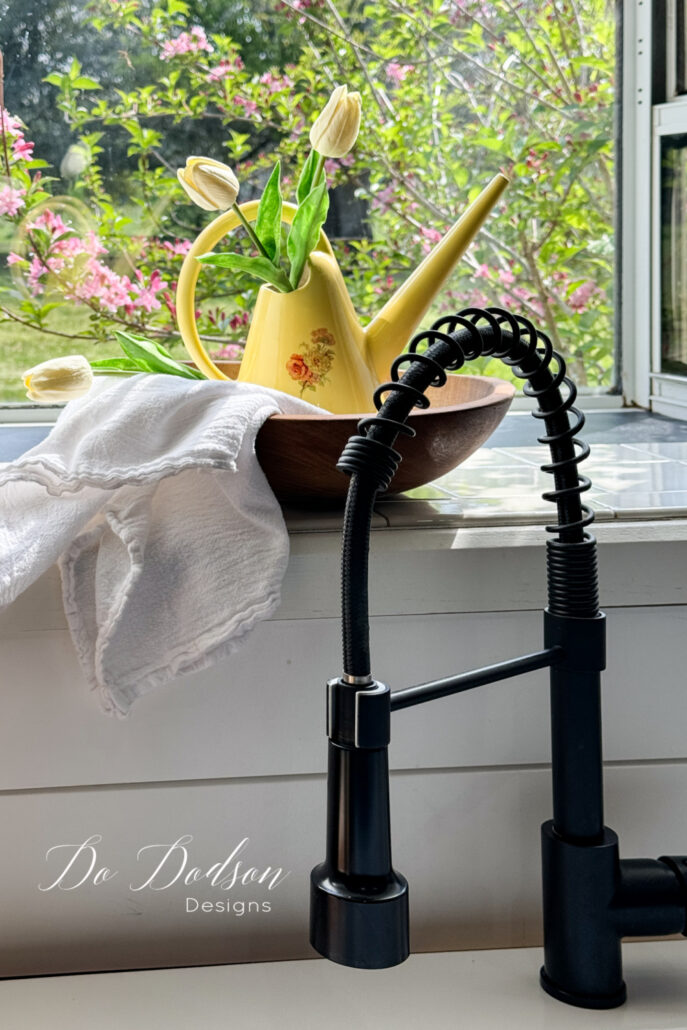
I spend a lot of time in my kitchen, and the view from this garden window is amazing this time of year. It is beauty in its simplest form. Nature.
Thanks for allowing me to share my rare find, and I hope you learned some helpful information about restoring your cherished wooden bowls.
In the words of William Morris: “Have nothing in your house that you do not know to be useful or believe to be beautiful.” Take the time to care for your beloved wooden bowls, and they will continue to bring joy and functionality to your home for years to come.
Please feel free to ask questions that I may not have covered or missed. I’m always happy to hear from you. Or just say in the comment section below so I know you stopped by. 🙂
Don’t forget to share and PIN this to your favorite DIY board.
Until the next project… xo, Do
I did the same thing in 2019. Here in NJ, I scored a huge Munising bowl (large like yours) and 2 smaller ones (not Munising) at a garage sale. They were stored in the garage. The Munising did have a crack on the outside. I scoured them, hand sanded them, & washed them again. They soaked up so much food grade mineral oil! The large one & the small one has a dark, almost walnut, patina. The middle one shined with a yellow tint. This year they held pine cones during the fall & winter season.
Hi Robin!
We are two lucky girls! I’ll never part with mine. I love the idea of the pinecones in the bowl. Did you know they were made in Munising, Michigan. I’m not sure if I added that detail in the post. That’s a long way from Texas. 🙂
xo, Do
Hi Do!! I love wooden bowls!! I had one of these bowls one time that I thrifted from Goodwill bins. I cleaned it up and sold it in my booth. Sellers remorse big time. I don’t have my booth anymore so now I shop for me!! Do did real good.
Hi Cheryl!
Big time sellers remorse, but I’m sure you’re like me. I can’t keep everything but I try to keep those special pieces that I can use in my everyday life. Thanks for reading as always and have a great week.
xo, Do 😘
I love the bowl, will now be on the lookout for some. But I really love the yellow pitcher/watering can in the bowl. Is that vintage or something I can buy now?
Hi Sherry,
I’m so over the top happy with that bowl. The yellow watering pitcher was my Moms. I think it dates back to the 50s when she married my Dad. It’s definitely a cherished item so I thought it was perfect with minising wooden bowl. Keep your eyes open! Thanks for stopping by and I hope you have fun searching. 🙂
This was a SCORE! It turned out beautiful and I love the view from your kitchen window. I can’t wait for spring here but we still have a good few months to go. Thanks for sharing my friend! XOXO
Hey Denise! You’re welcome. I’m pretty sure there are more bowls out there waiting for me to find them. This is my favorite time to view from my kitchen window. I saw my first hummingbird today. 🙂
These instructions only apply if the bowl’s issues are surface level and cosmetic. If the bowl you thrift has any tackiness, as most of the ones I find do, then it likely has absorbed vegetable oil which any amount of soap and water will not release. The wood has absorbed the oil, oil which facilitates bacteria growth, and even the surface level grime will not come off with soap and water. These are bowls that are not food safe until dealt with.
I deoil the bowls I find by covering a sheet pan with tin foil. Stick the bowl upside down on the pan. I’ve been amazed at how much gross oil can be released and you don’t want it dripping into your oven. I set my oven to 325 but bowls and ovens can differ so you may need to tweak a bit, but don’t leave unattended. Once preheat finishes I turn off the oven and let it sit for 30 min. Get a bunch of paper towels and, using oven mitts, take out your bowl and wipe off the gross oil that has bubbled to the surface. Repeat until no more oil bubbles to the top.
THEN seal it with mineral oil. If you seal your bowl and leave any residue in the bowl from the previous owner, you are sealing in rancid oil. You will know you have a bowl that needs this because you just won’t get it clean and not sticky from soap and water.
Wow! Thank you for sharing these tips. I can see how taking these steps with wooden bowls that have been oiled is necessary. All the bowls I’ve found were dry. Probably because they had been used as decor. Thanks again for sharing these tips. 🙂
I find putting the bowl in the dishwasher works. Low temp, usual dishwasher tab, then let it dry very SLOWLY away from heat sources.
When absolutely dry after a week or so, gently de-nib the raised (furry) grain with 180 grit abrasive paper by hand (or use fine wore wool). Don’t go anywhere near it with a power sander ! which would round off any edges and destroy any patina. Avoid bleach (chloro?) or any powerful stain removers which will change the timber’s colour.
It’s important to keep any blemishes, wine-stain, discolouration, cracks etc. These are part of the bowl’s age, history and character.
Re-finishing depends on how it will be used. A couple of coats of mineral oil is all you need generally. If it’s going to be used as a fruit bowl or any hard practical use then Osmo Polyx Oil would be my choice, it’s a penetrating drying oil which leaves the surface grain clean.
Thank you so much for the detailed info, Tim. I’ll definitely take this into consideration if I ever come across another antique bowl. I hope you have a wonderful day.