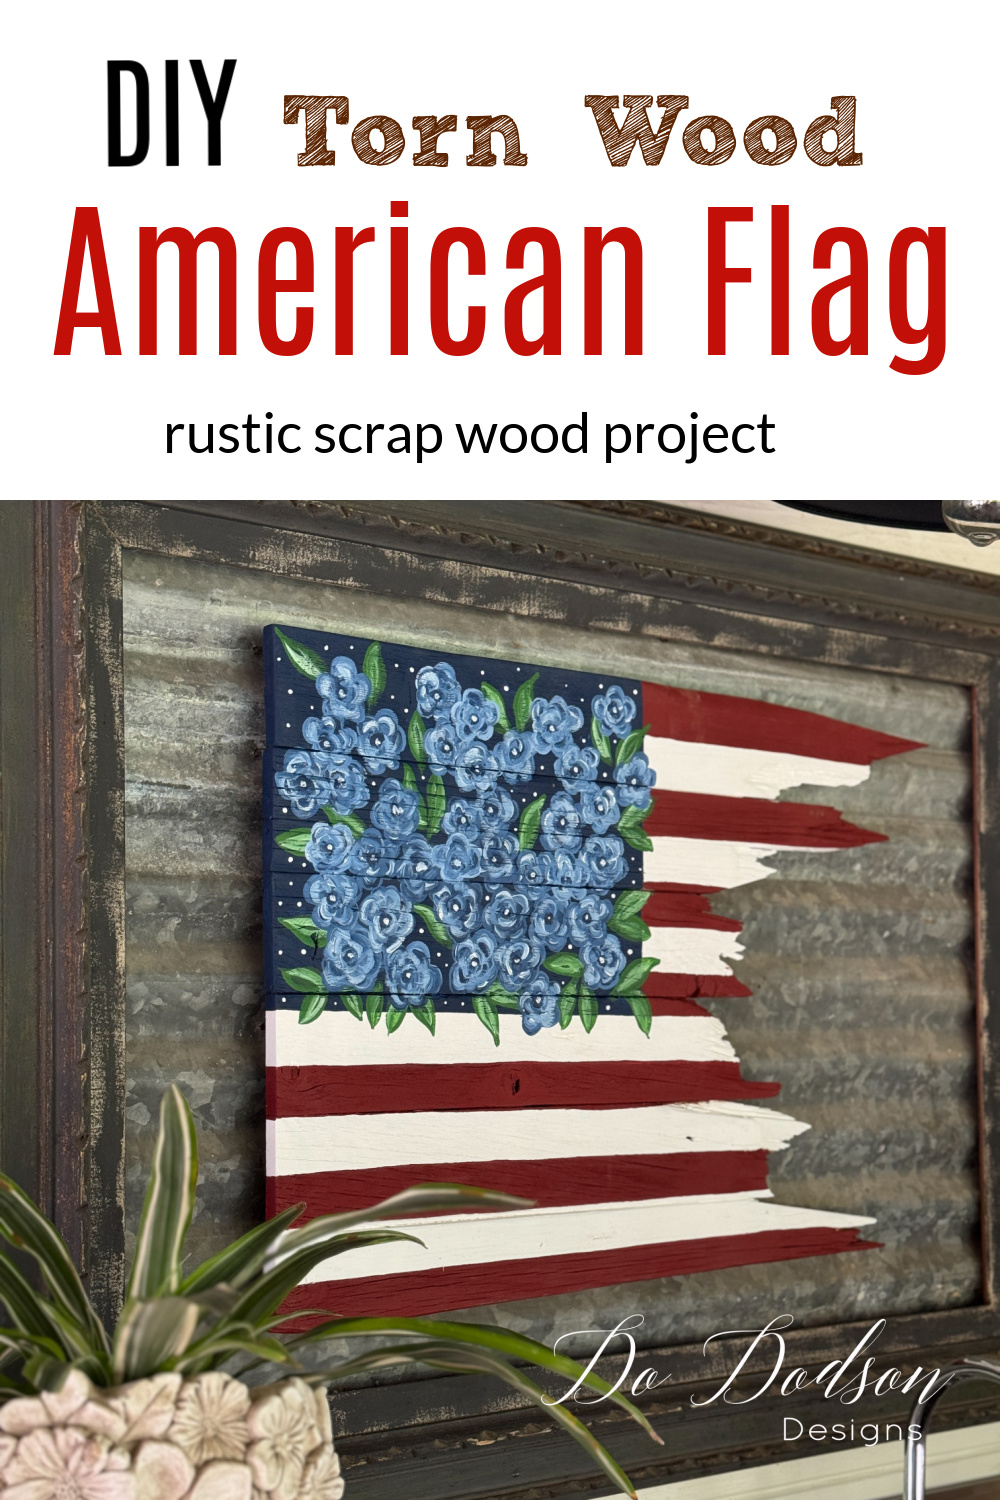
Looking for a unique and patriotic home decor piece with personality? You’re going to LOVE this! In just a few simple steps, this tutorial will teach you how to make a rustic, DIY wood American flag wall decor with reclaimed broken pieces of scrap wood.
Thanks to Dixie Belle Paint Co. for sponsoring this post. While I was compensated to write this post, all opinions are my own.
* As an Amazon Associate, I earn from qualifying purchases and through other companies as well. You will not be charged extra when you purchase through these affiliate links, but any income I make helps me create more amazing DIY projects to share with you! To see my full disclaimer, click here!
The Torn Wooden American Flag
Before we get started on today’s project, I’d like to share a little history of the torn American Flag and what it represents. With Memorial Day right around the corner, I thought it would be appropriate to mention for those who may not know.
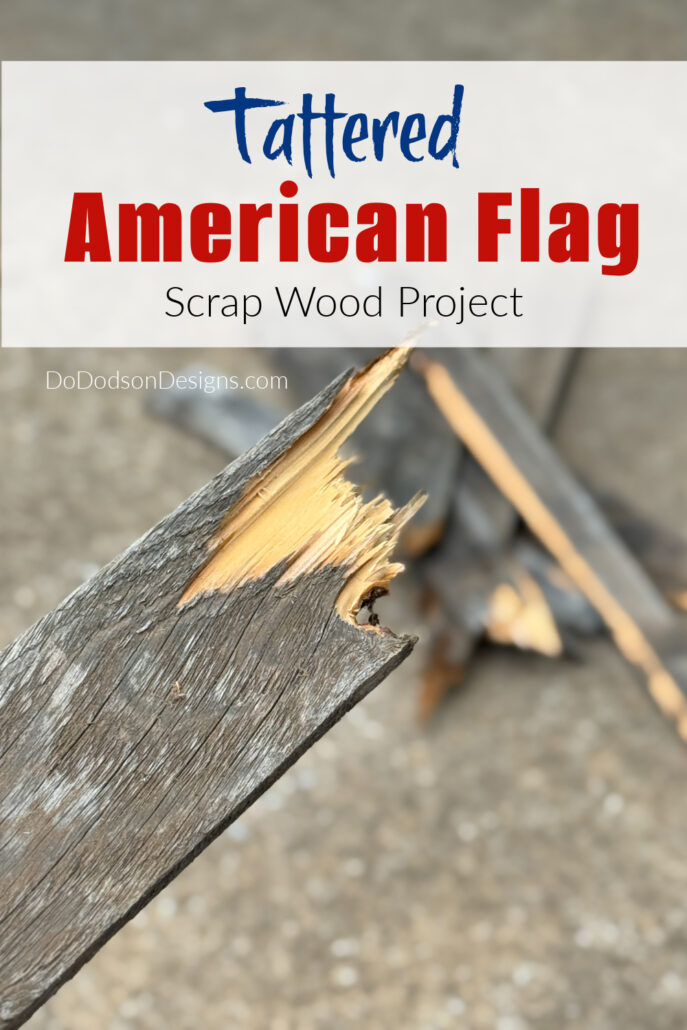
A torn American flag can often represent distress, damage, and a nation struggling or facing a conflict. But it can also represent the sacrifices and experiences of those who have served or fought for our country.
Flying a torn or tattered flag is considered disrespectful and is against the US flag code. It’s recommended that the US flag at this point be disposed of in a dignified manner (e.g., burning) when the flag is no longer suitable.
I will always love the torn and tattered flags because of the representation. That is why I decided to create my version of a torn DIY wooden American Flag that can be displayed respectfully.
For more creative DIY projects, check out the links below.

Materials Needed To Make a DIY Scrap Wood American Flag
- scrap wood (fence pickets)
- hammer
- drill
- wood screws
- wood glue (exterior)
- wood sander (my preferred sander)
- 220 grit sandpaper
- Bonding BOSS (bonding with stain blocker)
- painters tape
- Cotton (white) Chalk Mineral Paint
- Rustic Red Chalk Mineral Paint
- Bunker Hill Blue Chalk Mineral Paint
- Evergreen Chalk Mineral Paint
- Artist Brushes
- Synthetic Chip Brush
Tattered Wooden American Flag Tutorial
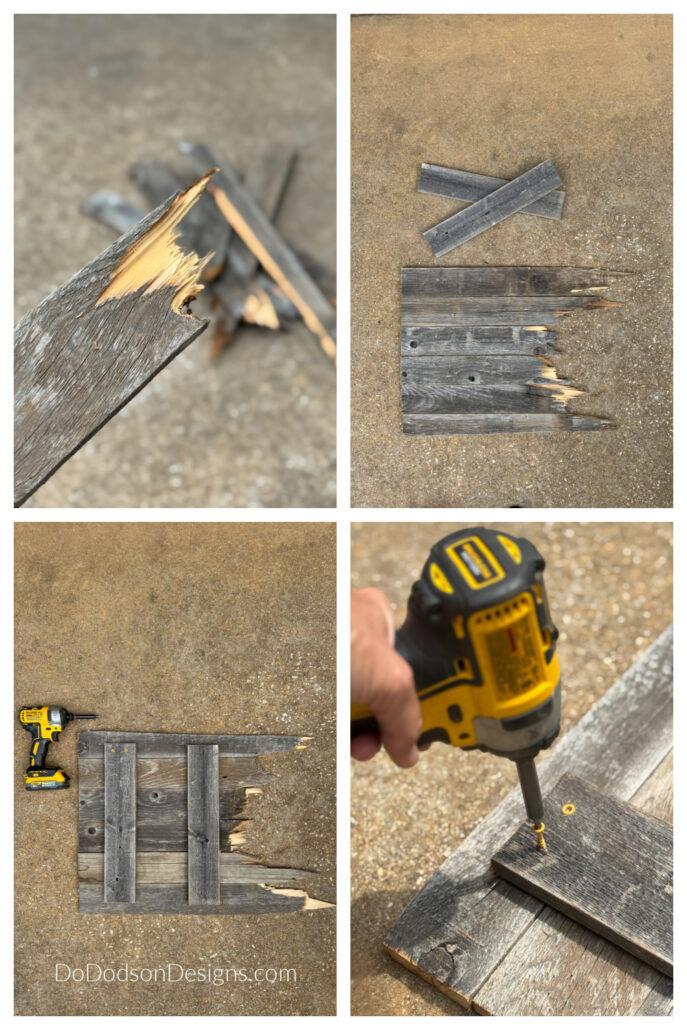
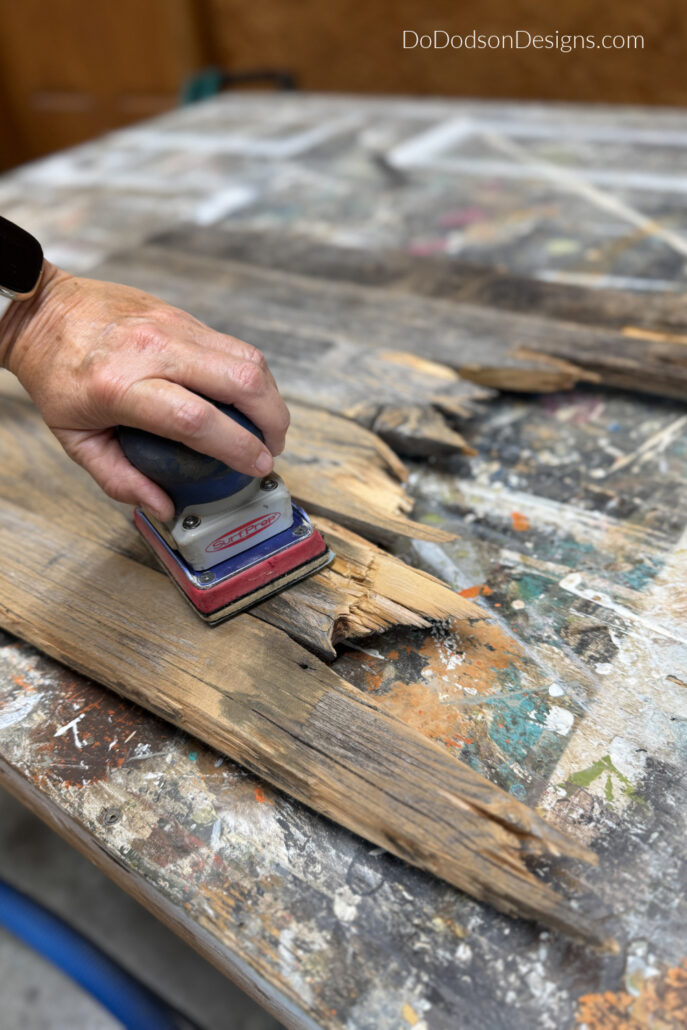
STEP 1: Gather broken wood or old fence pickets. I used pine fence pickets because that’s what I have. Any wood can be used as long as it’s broken or can be broken. New wood will not work for this project.
The boards were old and weak in the middle, where the nails attached them to the fence. Some were starting to decay, making breaking them into pieces easy.
Using six boards, I laid them out as I thought they looked the best.
Next, I used wood glue and wood screws to secure them together on the backside with two smaller boards.
Sanding And Prepping The Wood
STEP 3: Depending on the roughness of the boards, use a 180-220 grit sandpaper to smooth out the wood. Remove any remaining dust on the surface with a soft brush or compressed air and a hose.
Paint The Red And White Stripes
STEP 4: Using 1.5-inch painters tape, start at the top of the wooden flag and place the tape 1.5 inches apart. You can use a small piece of the tape as a guide for each stripe. This should work out almost perfectly. Thirteen bars (stripes). You may have to cheat a few lines, but it’s close.
Be sure to press the down edges of the painter’s tape well to get a good seal. This will help prevent paint from bleeding under the tape. Painting stripes on old wood can be tricky, which is all the more reason to sand the wood well and get a smooth surface.
Next, use the same tape to mark off the blue background in the star area. This area is in the left upper corner of the American Flag and measures approximately 11 inches by 13 inches.
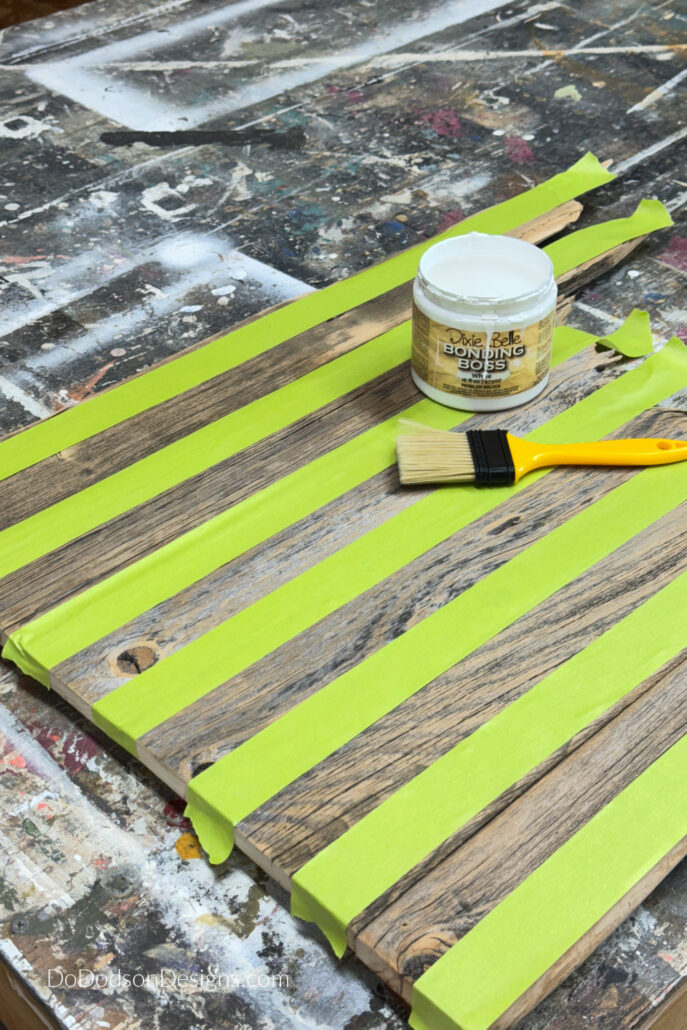
Stain Blocker On Wood
Before painting the white stripes, use a stain and wood tannin blocker. This will prevent any stains from surfacing on the white. I used Dixie Belle’s Bonding BOSS in white. Apply 1-2 coats for full coverage. Allow to dry completely.
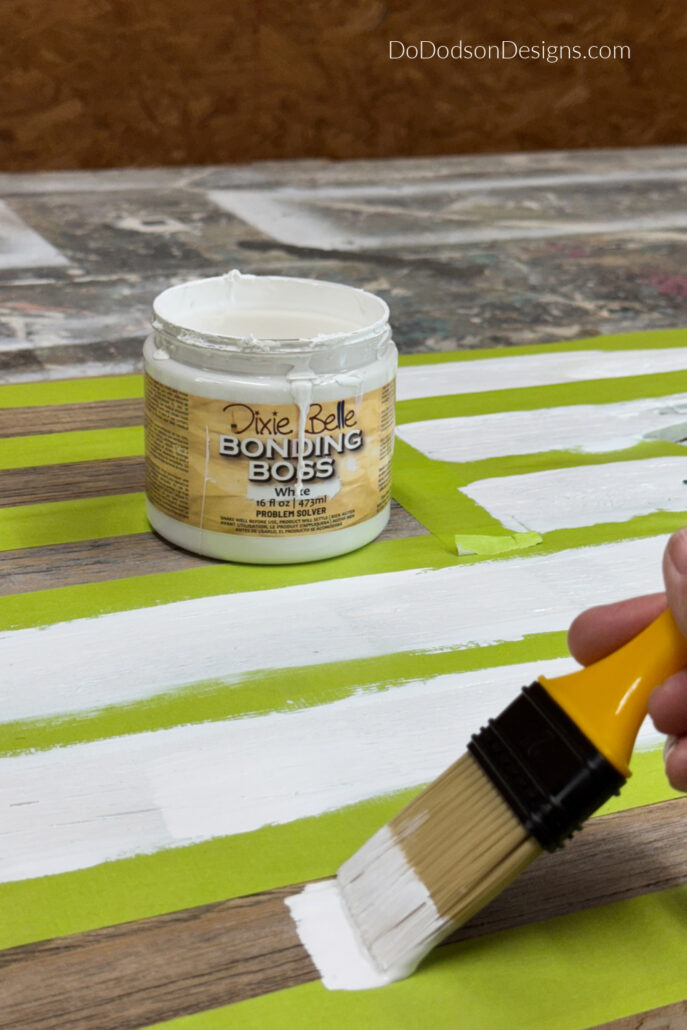
STEP 5: Now for the paint. I painted Cotton (white) Chalk Mineral Paint using a quality chip brush over the primer. One coat of paint was all it needed for full coverage.
Immediately remove the painter’s tape.
Tip of the day… use the same color primer under the paint. You will need less paint for full coverage.
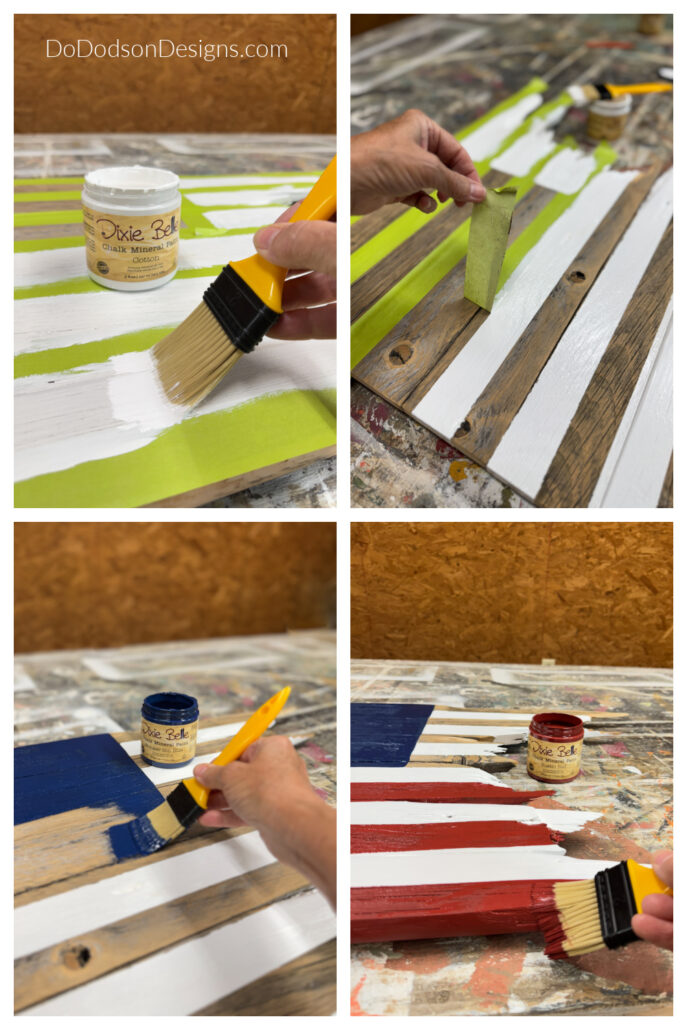
STEP 6: After applying the white stripes, paint the red stripes and the star area blue as the background for the stars. Because the blue and red paint I used is highly pigmented, it covered beautifully with only one coat each.
Using a good-quality paintbrush is key to getting clean lines. I like using the synthetic chip brushes by Dixie Belle Paint Company. They are reusable.
Change Of Plans (No White Stars)
Okay, after painting the white stars, something felt off. I didn’t feel right knowing that a torn, tattered flag should be retired.
So, I painted over them and did some digging on my favorite platform, Pinterest. Here’s what I came up with, and I’m super happy about the changes I made. It just makes sense.
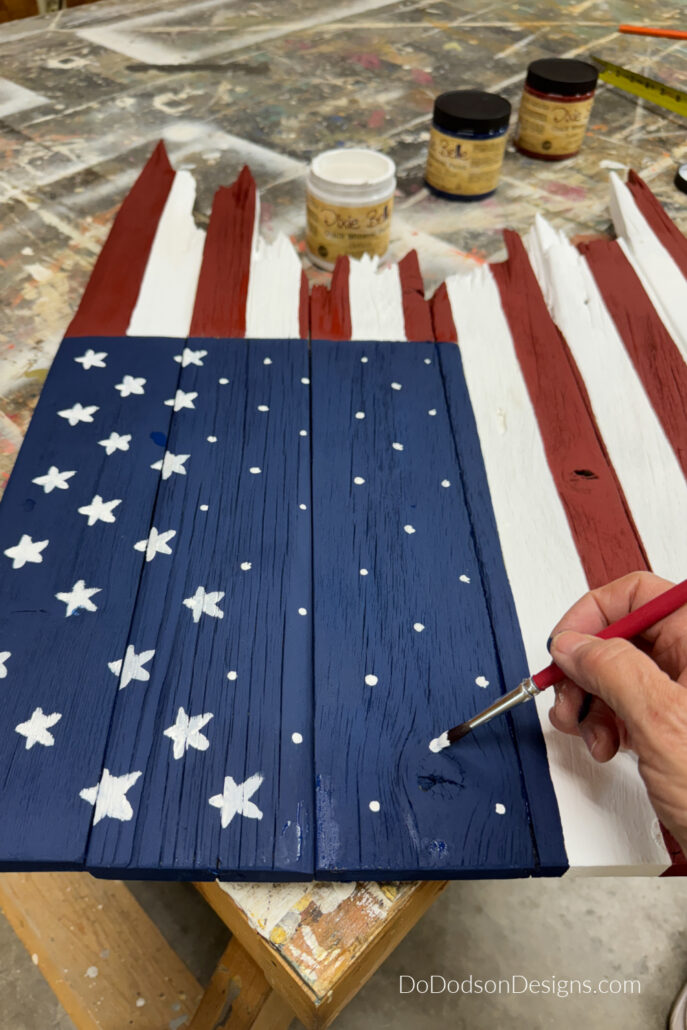
If you want to paint the traditional flag, there are 50 stars. I used a dot of white paint to mark the center of each star and freehanded them all. There are six stars across the top and bottom of the blue background and five on each end. Fill in the rest to repeat each line. This was a good workout for my brain.
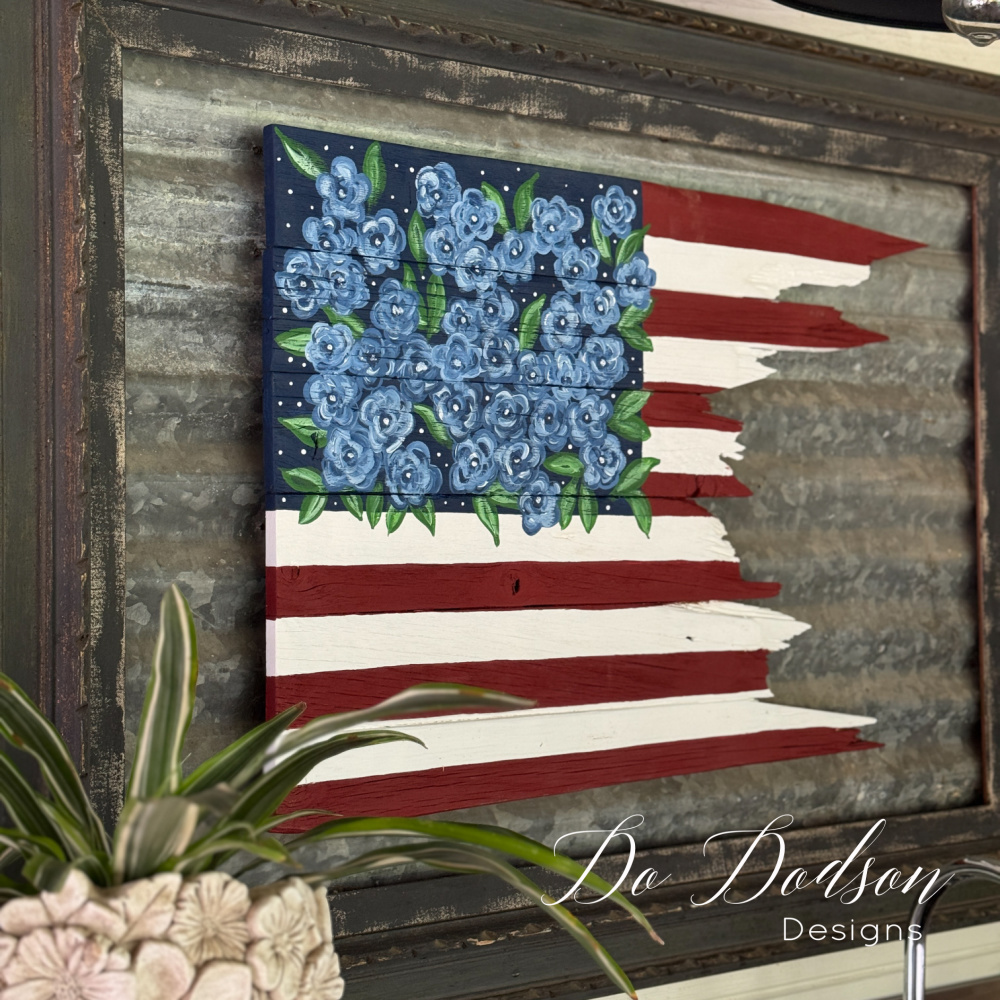
Floral Painted Wood American Flag
THIS! I decided to paint flowers instead of stars. It’s not traditional, but I like to think of each flower as a fallen soldier who gave his life for this country. Here’s how I did it.
Don’t worry, it’s simple. I don’t do anything complicated.
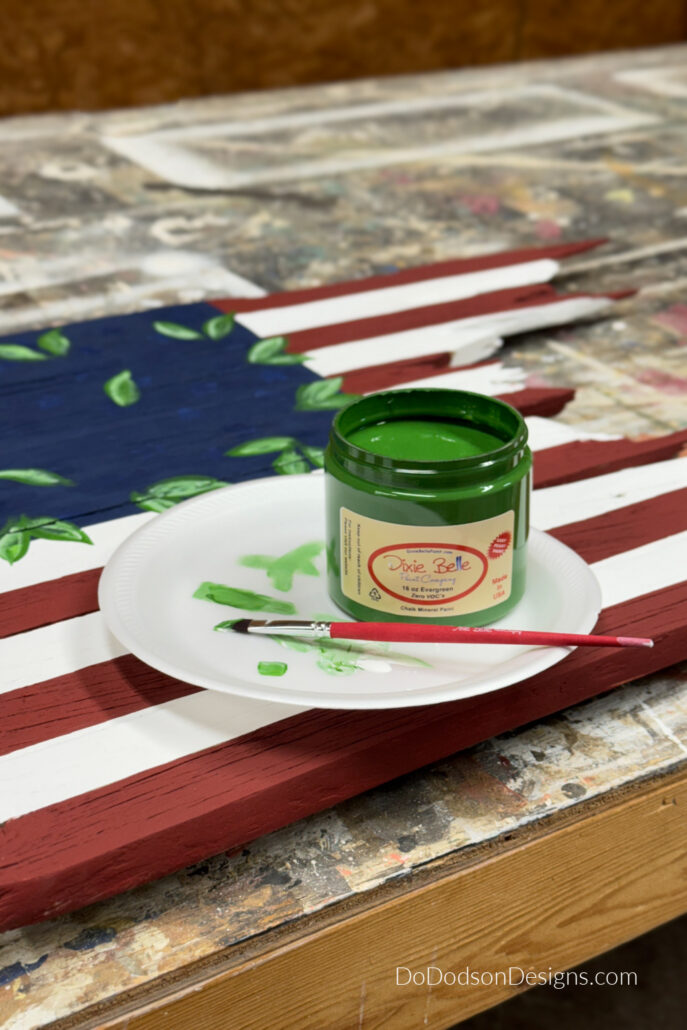
STEP 7: Using Evergreen Chalk Mineral Paint, randomly paint leaves with a chiseled-edge artist brush, overlapping the blue background. Add the green first with two simple strokes, and while the paint is still wet, dip the same artist brush in the white and overlap the same stroke with the white. This creates a blended and highlighted effect on the leaves.
When I say two strokes, I mean two strokes. If you continue trying to make them perfect, they won’t be. Trust me on this. These are very whimsical, first-grade-level flowers. LOL
How To Hand Paint Whimsical Flowers On Wood
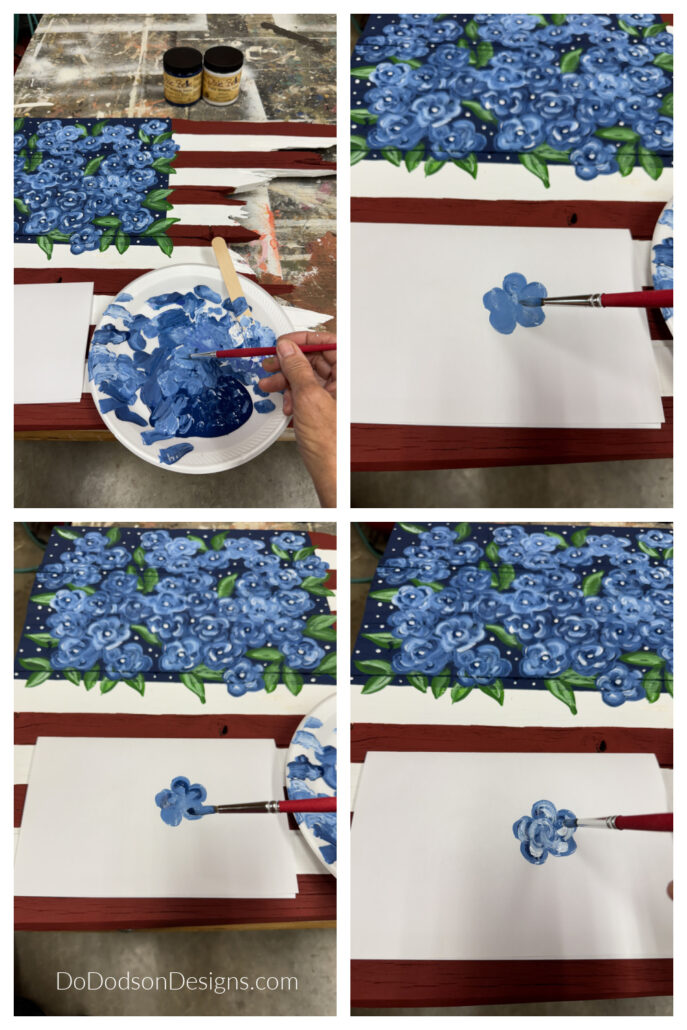
STEP 8: You’ll need the two colors, Bunker Hill Blue and Cotton, and a round, tapered-tip artist brush for the best results.
Add both colors to your paint palette (paper plate, use what you have). Mix a little white and blue to get a lighter colored blue. Push the brush down on the wood with your paintbrush loaded with paint and create a circle by twisting the brush between your thumb, pointer, and middle finger. This is the center of the flower.
In the same fashion, repeat that same circle five more times around the first circle. Now you have a five-petal flower, as I have shown in the photos above.
Next, use the dark blue (Bunker Hill Blue) and add small C-shaped strokes around the inside of each pedal using the same brush. Don’t clean the brush. The colors look more natural when blended. It doesn’t have to look perfect. Trust the process.
Next, you add highlights with the white paint over the wet paint again with the same brush.
When you think it looks terrible (and you will), add a dab of dark blue to the center of the flower. It makes all the difference. Channel that inner artist!
For more detailed instructions on hand-painted whimsical flowers, CLICK HERE.
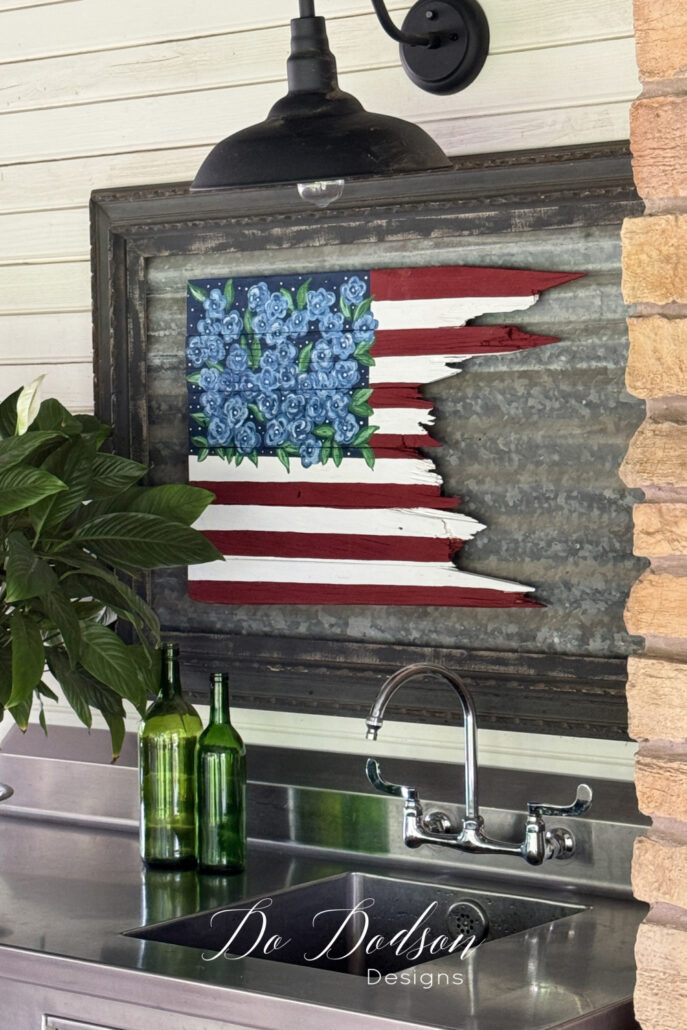
Unique Torn DIY Wood American Flag Memorial
Oh my goodness, I couldn’t be happier with how this turned out. It’s rustic, beautiful, thought-provoking, creative, and patriotic. It checks all my boxes.
I sent my son a photo of this project for his thoughts and told him about how I swapped the stars out for flowers and how it didn’t feel right to display a torn and tattered flag. He agreed and he LOVED IT! That makes this Mama’s heart happy.

My family is very patriotic, and we love our country. That’s why I made this DIY American Flag craft. I’ve been wanting to do something like this for a while, and I finally got around to it, with some help from Dixie Belle Paint Company. I used reclaimed wood, and I love the rustic result. I also love the details in the flowers and the symbolism behind them.
This is my outdoor sink, if you’re wondering. We spend a lot of time outdoors, and having this wall decor flag hanging there feels good.

I’m so thankful you joined me today.
This feel-good DIY Wood American flag project was brought to you by a Mom (me), of two veterans. I’ll never forget the “what-if” feeling and waiting by the phone, hoping to hear their voice on the other end. I’m blessed to have both my boys safe at home now.
For the parents and family members whose lives were changed by a “what-if” question: I’m so sorry. Please remember those who gave ALL on Memorial Day.
I’d love to know what you think about this project. Comment below to share your opinions or suggestions with me and others who share the love of DIY. It’s always good to hear from my fellow DIYers.
Also, remember to share it with your bestie and pin it to your favorite DIY Wood Craft Pinterest board for later. Happy DIYing! 🙂
Until the next project… xo, Do
Love this use of wood!!! There is so much that we can do to create beautiful things with what we already have. Your site is a wonderful treat in encouraging people to use to do just that!!!
Thank you, Ann! It’s not for everybody but for those that love DIY, it is a treat. Have a beautiful weekend. 🙂
This project is sentimental, meaningful, artistic, and beautiful all rolled into one. It looks so good above your outdoor sink Do! Thanks for sharing and enjoy your weekend, my friend! Hugs 🤗
Hi Denise!
It’s always good to hear from you.
Not all my projects hit like this one did. It’s very dear to me.
Thanks for always taking the time out of your busy day to support me. That means a lot, my friend. Enjoy this beautiful weekend. Hugs 🤗
You continue to amaze! Thank you for explaining everything so clearly…it is appreciated. Also, love what you put your flag on…could you describe how to make that as well in another post?
Keep these wonderful ideas coming!
Thank you, Paula! I really enjoy sharing these fun ways to create with scraps of wood. That wall hanging was made from a large wood frame with corrugated metal attached to the back. If I ever run across another frame like that one, I’d be happy to write a tutorial. I hope you have a great week. 🙂
Do- I’ve made several of your projects, and I hope to make this one as well but I also want to say that your post in general brought tears to my eyes. It’s just so sensitive, thoughtful and meaningful, thank you for sharing it. I forwarded it to my friend who is a crafter and painter and her father, who is a Korean War Veteran. This will be meaningful to both of them as well. Thank you again!
I LOVE this so much! THIS is why I do what I do. Hoping that it touches someone like it did me. So many sacrificed including the ones left behind. That’s hard too.
When I create, there’s always a reason, a purpose behind it. I’m so happy you enjoy my projects. Sometimes ai wonder if anyone is even seeing these. It’s comments like yours that encourages me to share more.
Have a fantastic weekend and thanks so much for your kindness to share this. 🙏🏻 😘