
Hey friends! Ready for another Christmas scrap wood craft? Today, I’m sharing how to create simple wood churches, a wood church village, or, if you like, a Christmas village. You can customize it however you want using scrap wood and a little paint.
Thanks to Dixie Belle Paint Co. for sponsoring this post. While I was compensated to write this post, all opinions are my own.
* As an Amazon Associate, I earn from qualifying purchases and through other companies as well. You will not be charged extra when you purchase through these affiliate links, but any income I make helps me create more amazing DIY projects to share with you! To see my full disclaimer, click here!
DIY Wood Churches
Some of you may remember my very first DIY wood church. Actually, it was the project that started me on this scrap-wood craft journey, and I have no plans to quit anytime soon as long as my scrap-wood supply holds out.
Since then, I have made many scrap wood projects. Too many to count, but if you search “scrap wood” on my blog, you’ll find them! Everything from cute wood crafts to beautiful DIY home decor.
Below are just a few of my favorite woodworking projects you might want to check out.

SUPPLY LIST:
Here’s what you’ll need to create the wood churches/Christmas Village.
- Scrap wood lumber (cedar fence pickets, 1×4, 1×6, 1×8 lumber, etc.) Use what ya got!
- table saw
- table saw tapering jig
- miter saw
- wood sander or sandpaper
- tape measure
- wood glue
- wood screws
- brad nailer
- Elderflower SILK All In One Mineral Paint
- Anchor SILK All In One Mineral Paint
- Cotton Chalk Mineral Paint (door and windows)
- Caviar Chalk Mineral Paint (door and windows)
- paintbrush
- artist brushes (for details)
Gather Your Scraps of Wood
For this project, I suggest using what you have on hand if you can. Wood fence pickets work the best because they are lightweight. You can also use various sizes of wood, depending on how wide you want your little wood churches/houses to be.
1-inch or smaller boards work the best, but you’ll need a heavier base. For the base, I used a 2×6 board and a 2×2 attached to the base to nail the wooden churches to.
Don’t worry, I’ll have plenty of pictures for your reference. I’m a visual learner too.
Cutting The Roof Angles/Tapered Cuts
Tapered cuts can be tricky if you don’t have those fancy angle tools, which I don’t. My miter saw only cuts angles up to 60 degrees. This is where my DIY story starts.
Immediately, I went to YouTube to see how the woodworking professionals were getting these angles, and I came up with a plan for the tapered roofline of the wood churches (the three main churches in the middle). Sorry, I do not know the angle. I just went with what I thought would look good.
*DISCLAIMER: This “plan” was for me, NOT you! I don’t suggest you try this unless you are advanced in woodworking, but I know some of you will want to know how I did it. So, here goes!
From a birdseye view of my table saw, you can see I used a 1×12 board and a 1×2 board to create the angle I wanted, and secured it to the 1×12 with wood screws. This was my taper guide.

Carefully, I cut away the overhanging wood with the table saw to create the taper. It was very time-consuming and even more challenging for me to describe how I did it to you. I won’t do this again.
BUY THE FANCY ANGLE TOOL (tapering jig) if you plan on making these wood churches, especially if you’re making them in mass production to sell. The tapering tool has been added to my Amazon cart, and I’m sure you’ll see me using it soon on another wood project.

The smaller wood churches were cut on my miter saw at a 60-degree angle. Much easier!

Measurements For The Wood Church Village
1 white painted center Church: 1×8 board, 20-inch length
2 black painted Churches: 1×4 board, 13-inch length
2 painted (windows) wood churches: 1×3 board, 12-inch length
3 wood churches: 1×3 board, 9-inch length
Base: 2×6 board, 32-inch length, 2×2 board, 28-inch length

Building The Base For The Wood Churches
Once you’ve cut all your wood pieces, sand them well before building the wooden church village. It’s way harder to sand the pieces once they’re assembled!
Next, build the base. The base was made from a simple 2×6 board. A 2×2 was secured to the 2×6 with glue and three wood screws. This piece was used to secure the churches to the base.
I suggest you lay out the wood churches first to get a good idea of how they fit before attaching them to the 2×2. Do a dry run. You won’t be sorry.

Painting The Wood Churches
Paint or stain the wood churches however you want. Get creative and have fun with them.
If you’re new here, I’m a neutral girly through and through, but you do you. Adding your own colors is a great way to make a cohesive statement with your DIY Christmas decor.
The main church was painted with Elderflower SILK All-In-One Mineral Paint. Two coats for full coverage. Dixie Belle’s SILK All In One Mineral Paint is the perfect woodcraft paint, as it includes a primer, stain blocker, and topcoat. All in one, just like the name says.
I also dry-brushed the window board pieces with the same color.
The color Anchor in SILK was also used to create depth behind the main church. Remember, depth = darker in the back and lighter to the front.
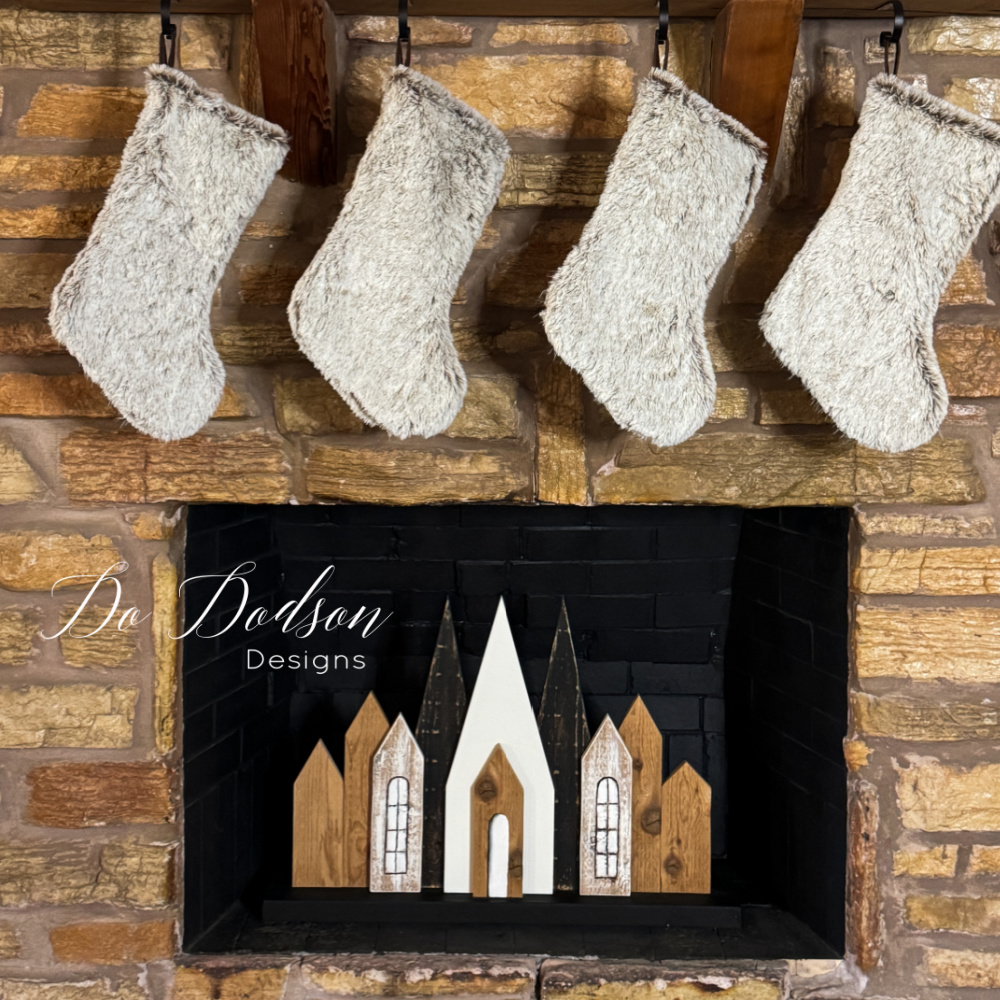
The base was also painted black to make it appear invisible in my fireplace, where I displayed them.

Assembling The Wood Churches
Start with the two black pieces first. Secure them to the 2×2 with wood glue and brad nails.

Next, lay the largest church (white) on top, evenly centered between the two black ones in the back. Use the brad nailer to secure the boards above the 2×2, connecting them and reinforcing the entire church display.
Continue layering the boards (glue and brad nails) in front of the 2×2 to create a beautiful wood church or wood village display.
Oh, and that pattern on the black ones was created by sanding the boards after they were painted and dried. A happy DIY oops!

Here’s a picture of the back, in case you’re curious how it’s all put together. I didn’t paint the back, but you totally should if you’re selling these! No one will see it except me… and you, of course.

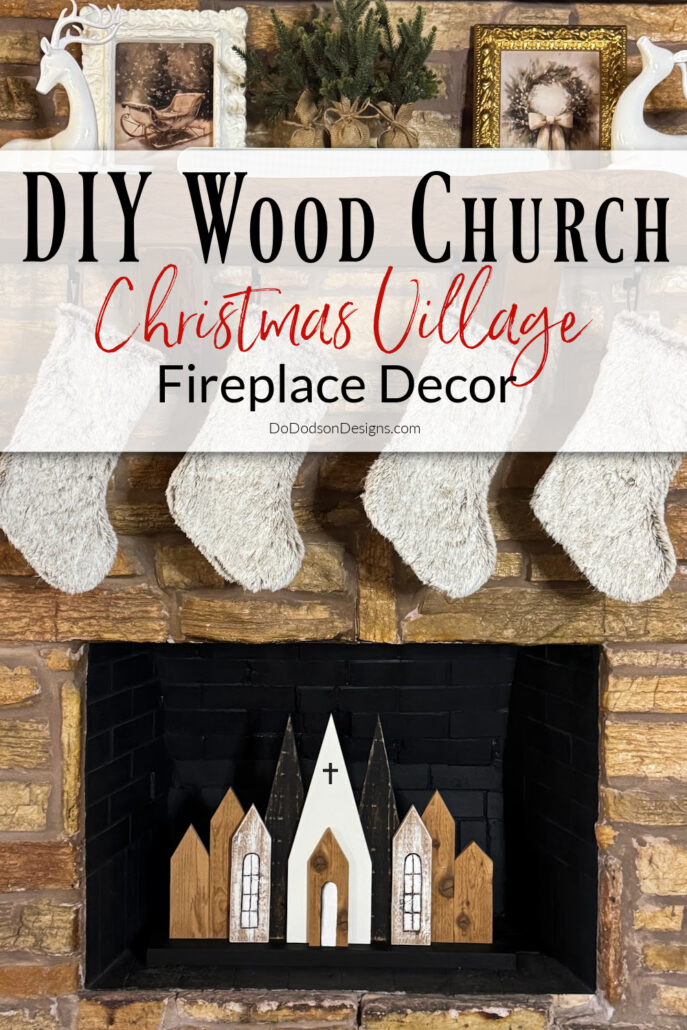
Wood Churches / Christmas Village
I LOVE THEM! Wood churches, or a Christmas village? Totally either, or both!
I was going to use some vintage crosses from an old brooch, but I couldn’t find them.
Okay, so painting them on it is! Grab some chalk mineral paint and your artist brushes and have fun with it!
And I threw in a front door and some arched windows to finish off the DIY Christmas village!

I put mine inside our fireplace box – it’s never used, so it’s perfect for some seasonal DIY decor!

Painting the base black was the perfect touch! It’s almost invisible, making the village look like it’s floating inside my fireplace.
What would you do differently? Crosses or keep ’em as is? Spill your ideas in the comments!

Feeling a bit stuck with your wood projects? Don’t sweat it, it happens! I’m sharing these ideas to inspire you to craft, even if it’s just a little something. You can DO this!
I’m not sure who gets credit for this quote, but it is definetly me. “Sawdust is a woman’s glitter!”
Thanks so much for hanging out and crafting with me! Hope you had fun!
Until the next project… xo, Do
Do,
Went out Thrifting with my friend & found a picture of Christmas trees. Very pretty & expensive. Then I realized that the pics you did with the ghost & the ones of trees when you used spackling, that was what this artist did too. My friend was impressed that I knew about so she was going to try her hand & make one herself.
Happy Crafting
Hi Sharon! That’s fantastic! I love being able to recreate beautiful artwork. I think she will enjoy this DIY technique. Thanks for stopping by and always good to get feedback on my projects. Merry Christmas! 🎄
This is so darn sweet and equally charming as your first scrap wood churches! They look so good decorating your fireplace! Pinned ❤️🌲❤️⛪️
Thanks, Denise! I figured I needed something to fill the unused dust catcher space. I think it turned out pretty cute. Thanks for sharing and enjoy your weekend. 🙂