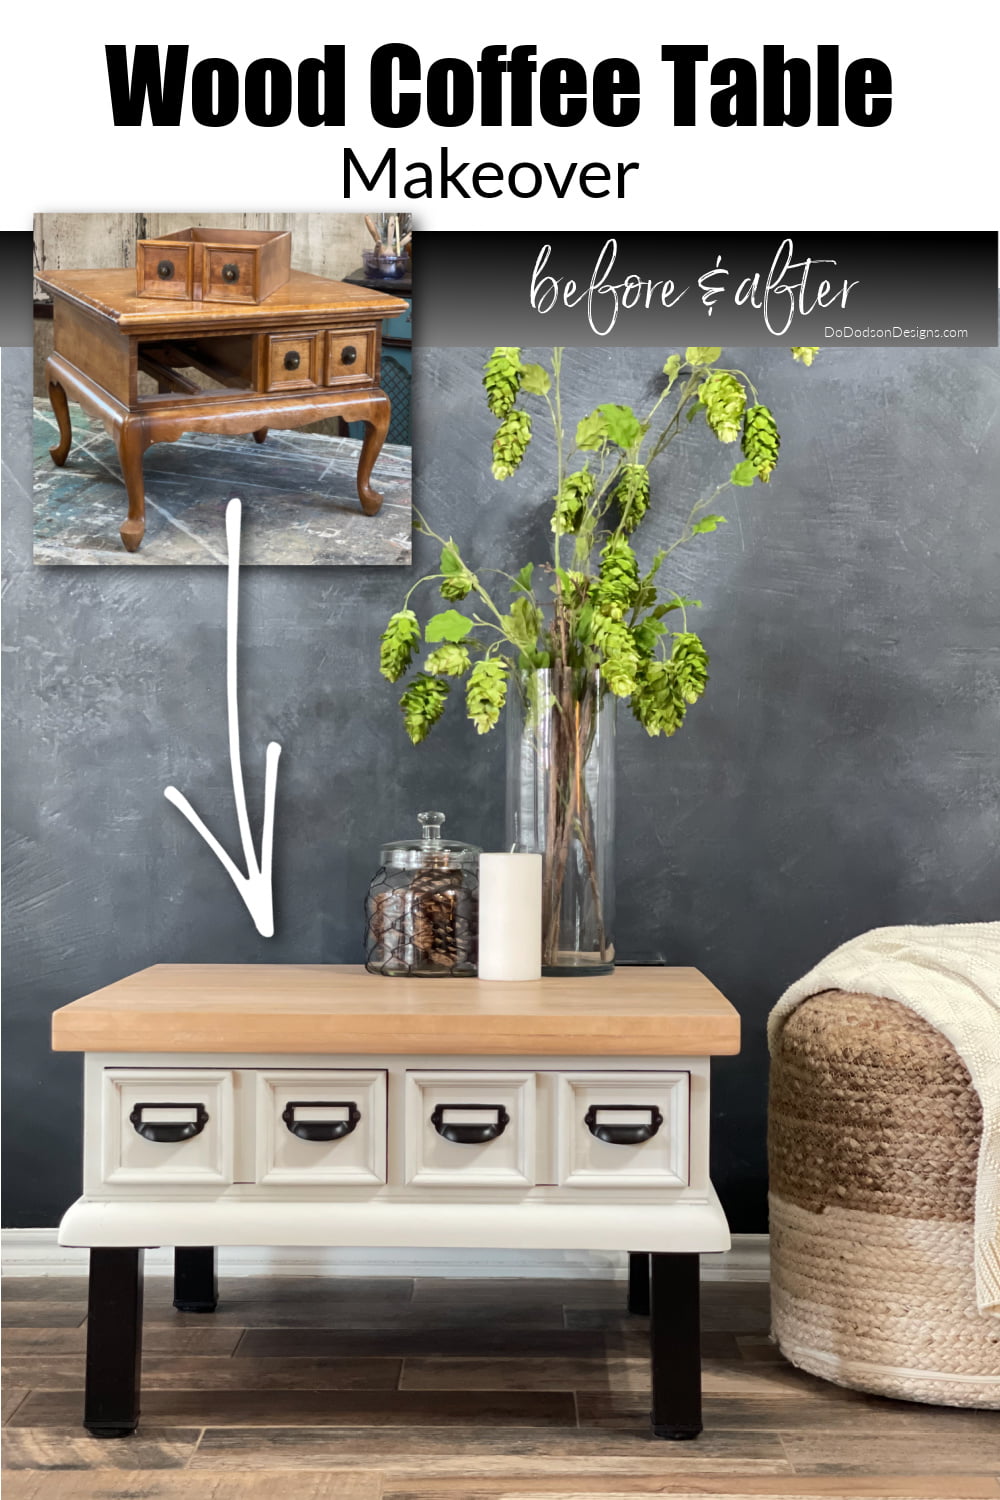
It’s not uncommon for my hubby to bring home a roadside rescue as a gift. He knows me all too well. But sometimes, I think he believes in me more than I do myself. Surrrrrre, bring me all the BROKEN, ugly furniture. Is it free, right? But this square wooden coffee table makeover was, let’s say, a bit of a challenge—nothing new here. Modern farmhouse vibes are coming your way!
* As an Amazon Associate, I earn from qualifying purchases and through other companies. You are not charged extra to use any of the links, but any income I make helps me create more amazing DIY projects to share with you! To see my full disclaimer, click here!
Wood Coffee Table Makeover: Before & After
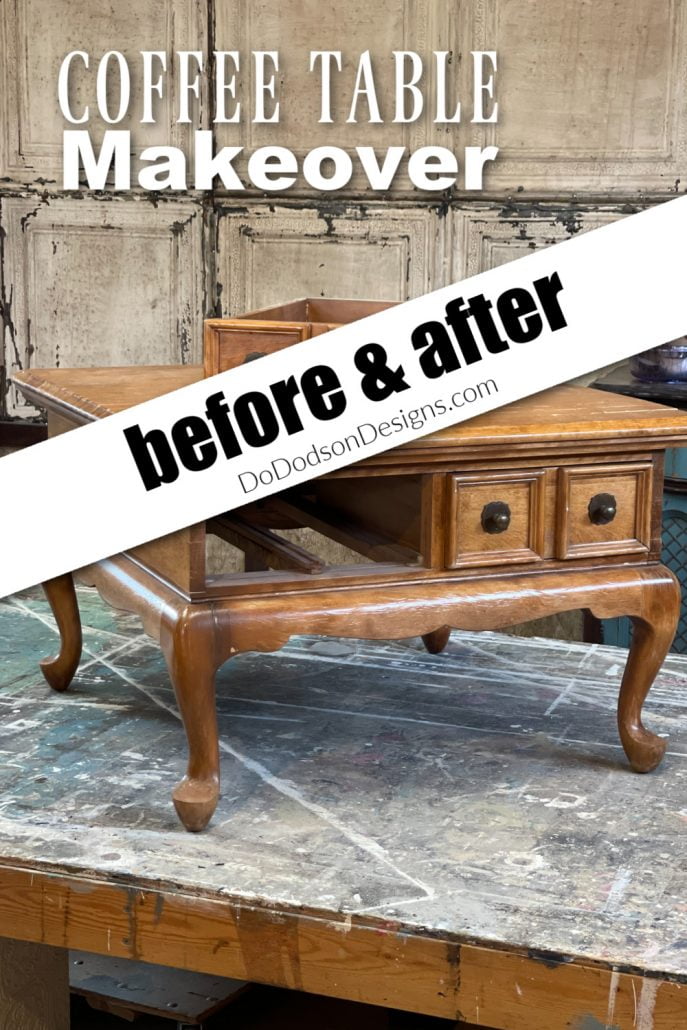
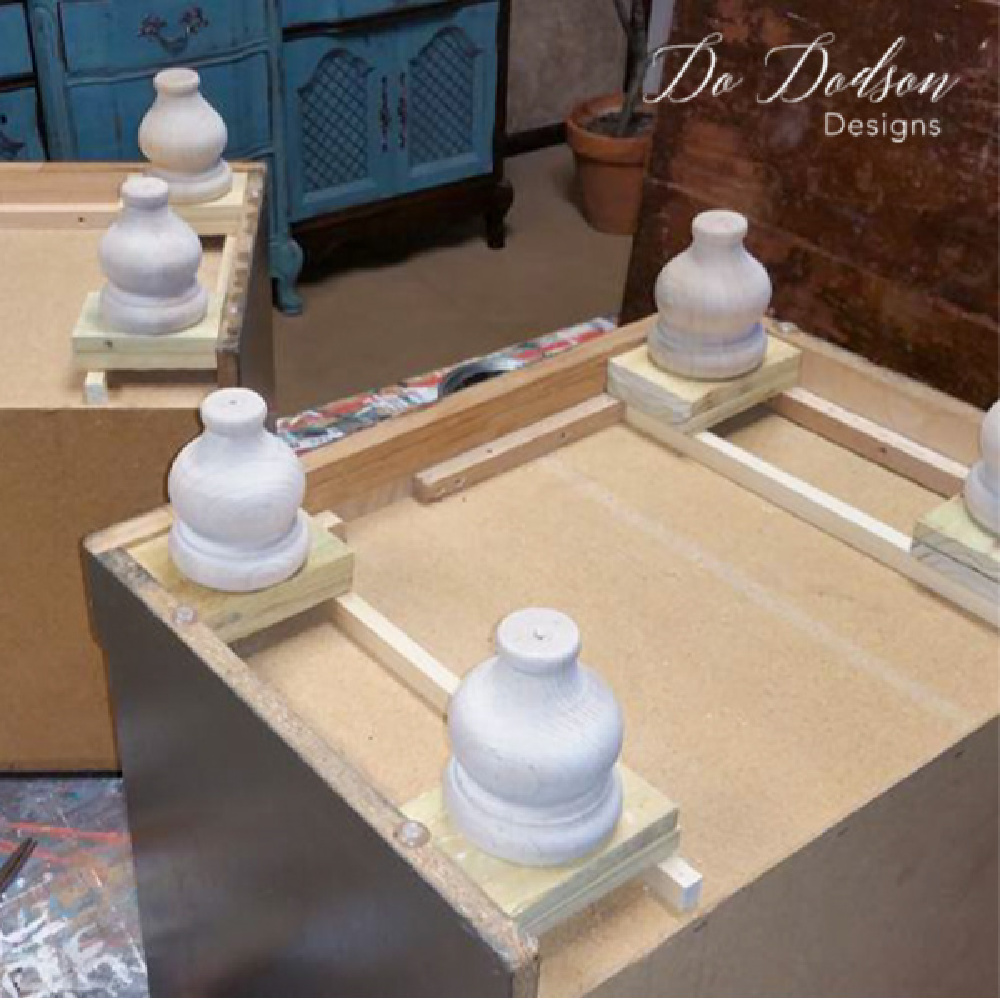
Solid hard rock maple! The wood was gorgeous, but I just couldn’t with the Queen Anne legs. I had seen a few other furniture flippers do this, so I thought I’d give it my best shot. So, I grabbed a few tools and dug right in with this coffee table makeover.

SUPPLY LIST:
- wood coffee table
- circular saw with laser guide
- safety goggles
- framing square
- carpenters pencil
- SurfPrep Sanding System (use my discount code DOIT10 and save10%)
- white best dang wax
- wax brush
- oyster Silk All-In-One Mineral Paint
- pristine clean (cleaner for wood before painting)
- scarlet paintbrush
- black industrial furniture legs
- black label holder pulls
Modification: Coffe Table Makeover
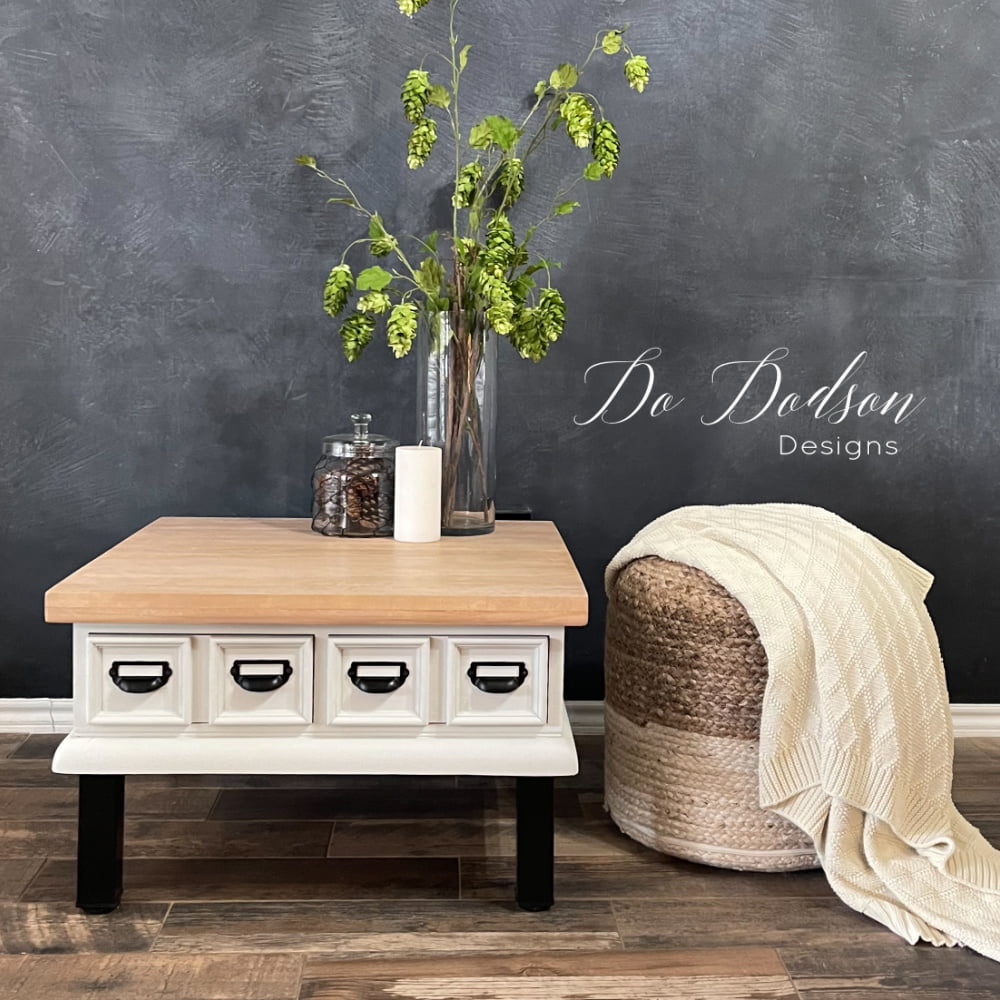
Off with her head! Or should I say off with her legs? This coffee table will be getting a modern, farmhouse industrial look with black metal legs.
Removing the legs is not as hard as it sounds. The first thing you will need to do is establish whether the legs can be removed (cutaway) without causing structural issues with your furniture piece. The best way to do this is to inspect the underside to see how it was constructed.
Using a framing square (or any straight edge will do), I established a straight line around the base of the coffee table just below where it was secured to the tabletop.
Make sure that you are free from any screws, nails, or hardware before you begin cutting away the legs.
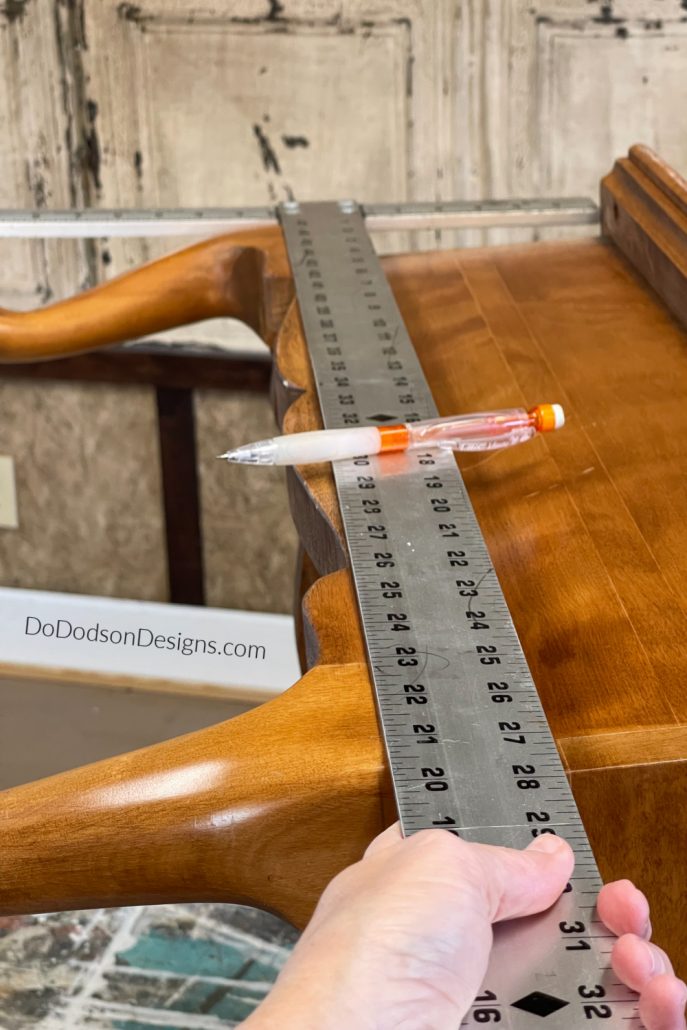
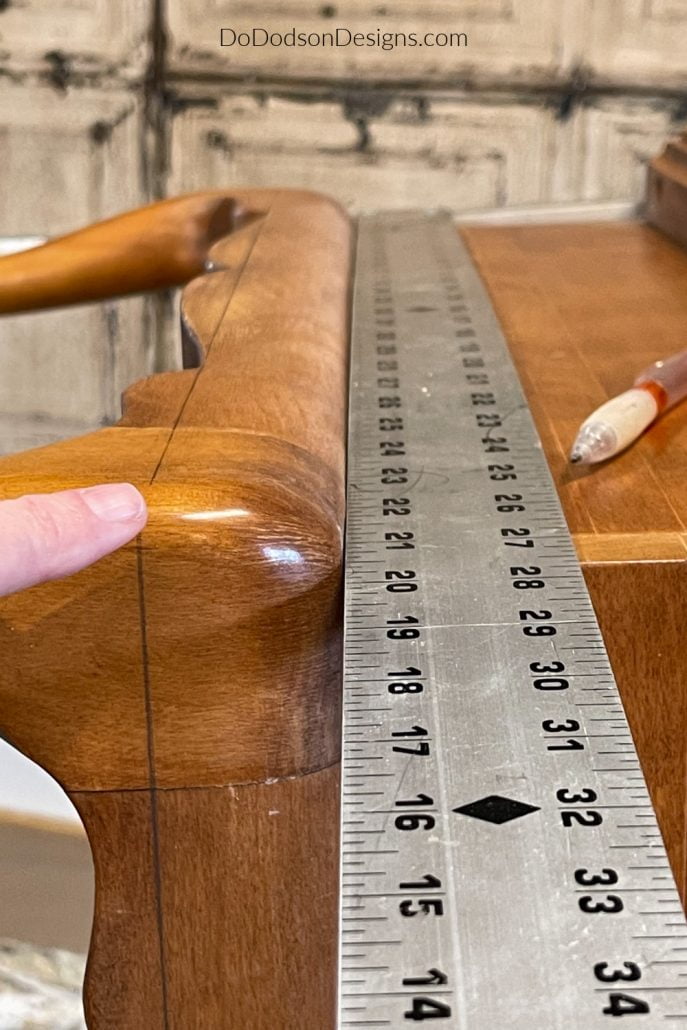
Once marking off the line, start by cutting at one end and working your way around the base with a laser-guided circular saw. The laser guide helps a lot with a straight cut. I also cut away the decorative skirting to give this coffee table makeover a clean look.
Keeping the lines straight is essential for two reasons. The first is being it’s visually pleasing. The second is that you’ll need a straight and flat base to attach the new legs.
Safety Disclaimer: DO NOT operate electric tools such as a circular saw without having proper supervision and proper safety gear. I care about your safety.

Installing New Legs On The Coffee Table
After removing the wood legs, you will need to smooth any rough areas made by the circular saw with an electric sander. This wood coffee table is taking on a new look, and I like it.
And don’t forget to save the old legs for another project.
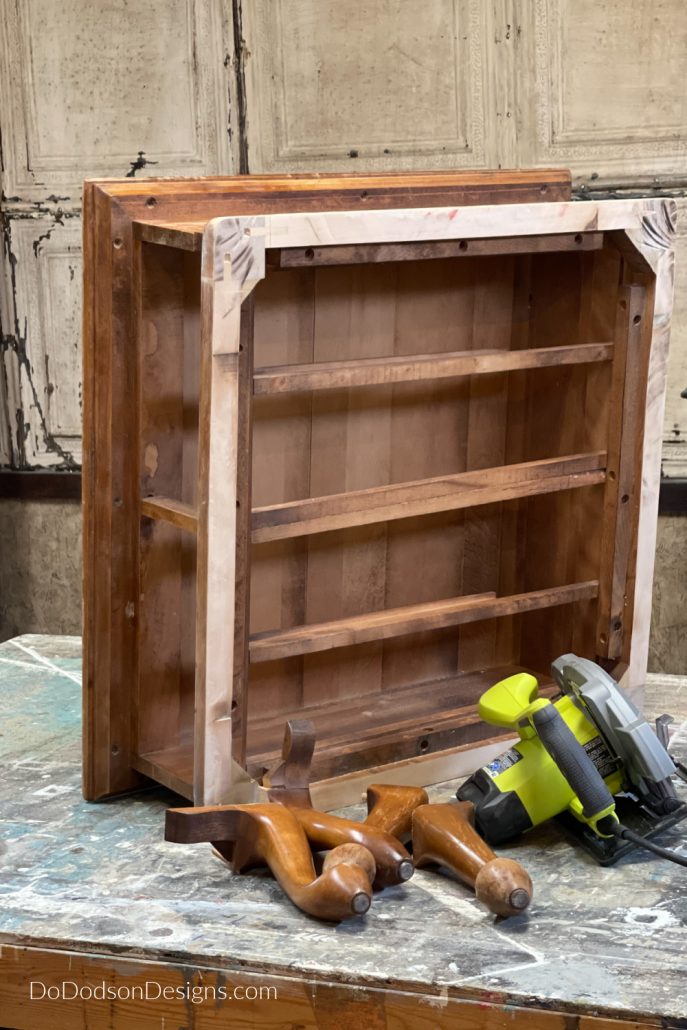
Oh, I got all excited after removing the legs and forgot to take pictures of the top edge of the coffee table.
Yep, I cut it off too!
I chose adjustable legs for this coffee table makeover because they can easily be leveled with a simple twist. No wobbly tables for me. I had these bad boys on in just a few minutes. Quick and easy.
Before Painting Wood Furniture
After the reconstruction, I gave the wood coffee table a quick scuff sanding with 220 grit sandpaper. Always clean the surface before painting with Pristine Clean to remove the dust and grime.
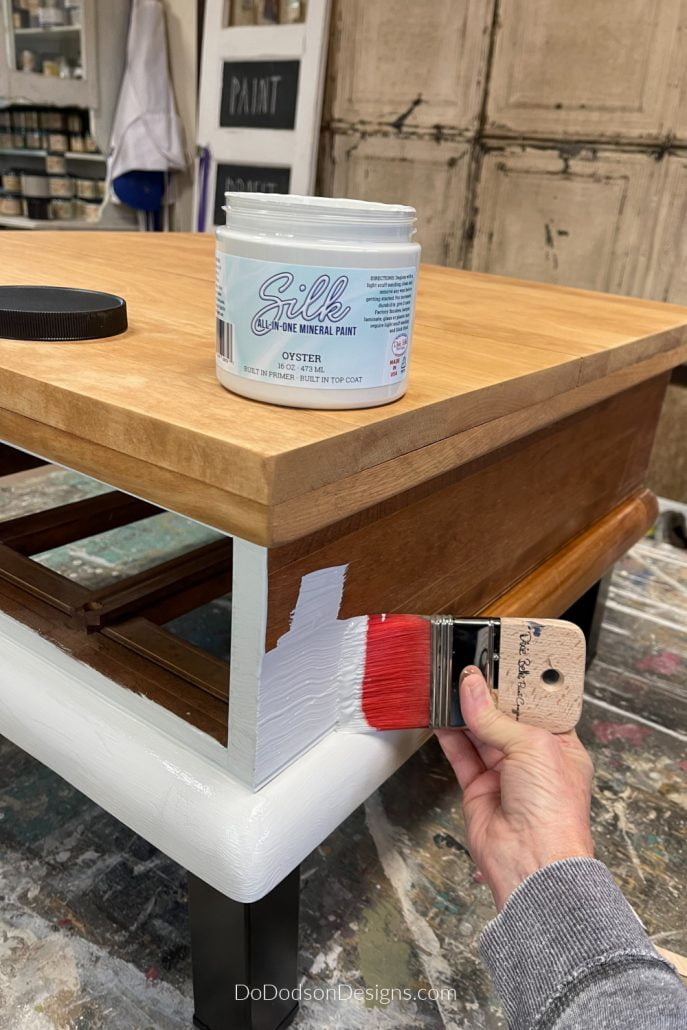
I chose to use Oyster Silk All-In-One Mineral Paint for this coffee table makeover. It has a built-in stain blocker and topcoat, and it covers like a dream. Two coats are recommended for durability.
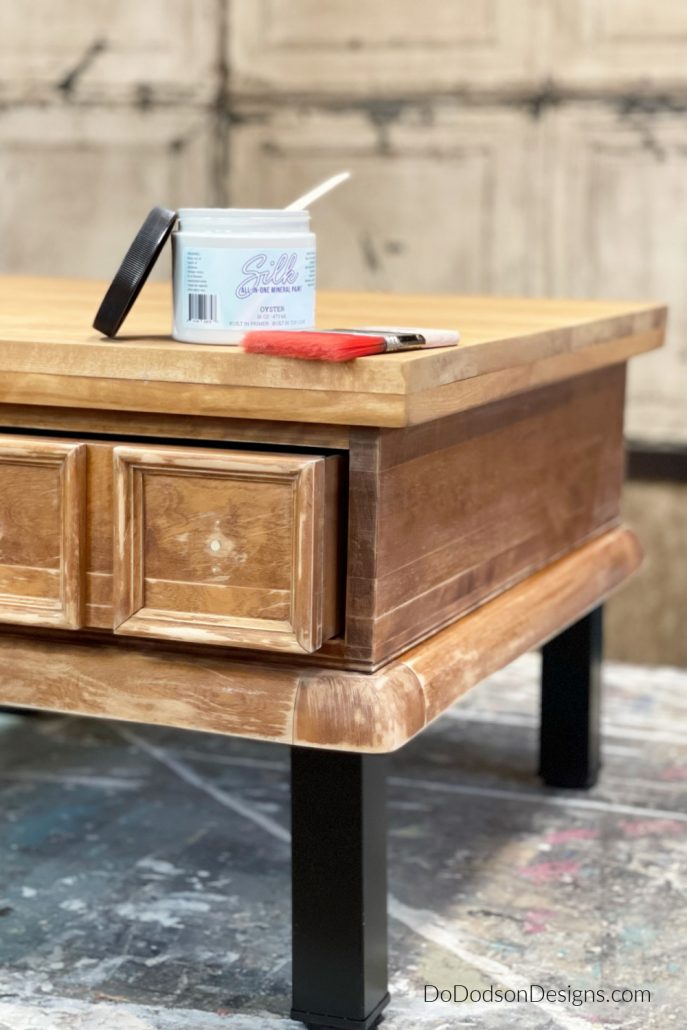
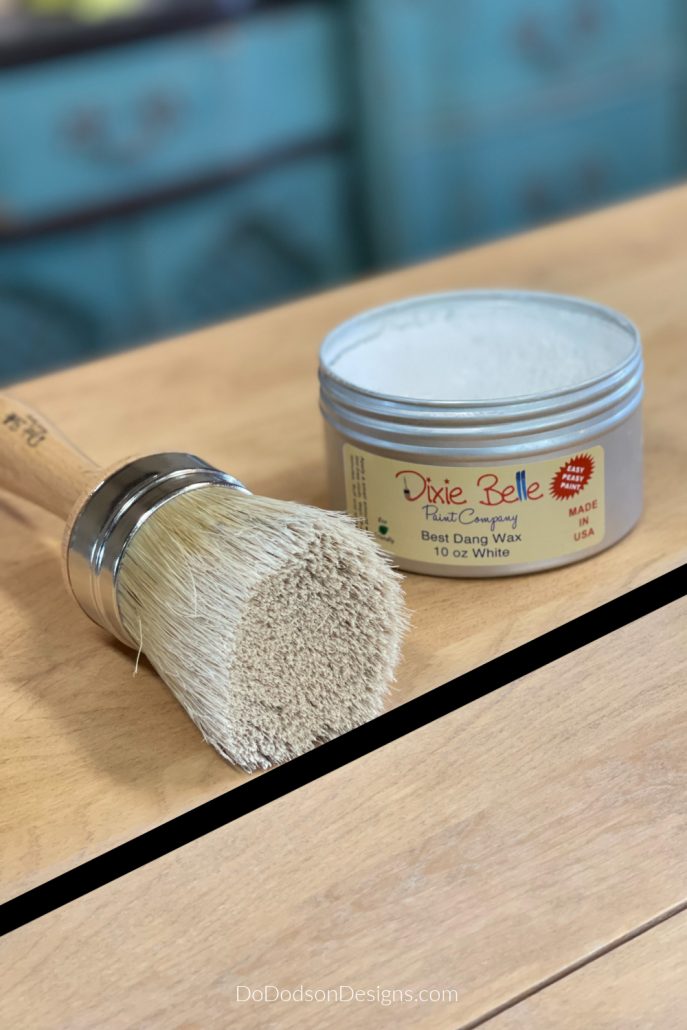
And to finish off the wood top, I added a white wax to lighten and brighten the wood while giving it protection. This is the best way to preserve that natural wood look without darkening the wood.
I plan on going back and adding a coat of Gator Hide in about 30 days after the wax has had ample time to cure for extra durability. All Dixie Belle paint products can be used interchangeably together.
The Results Of The Coffee Table Makeover
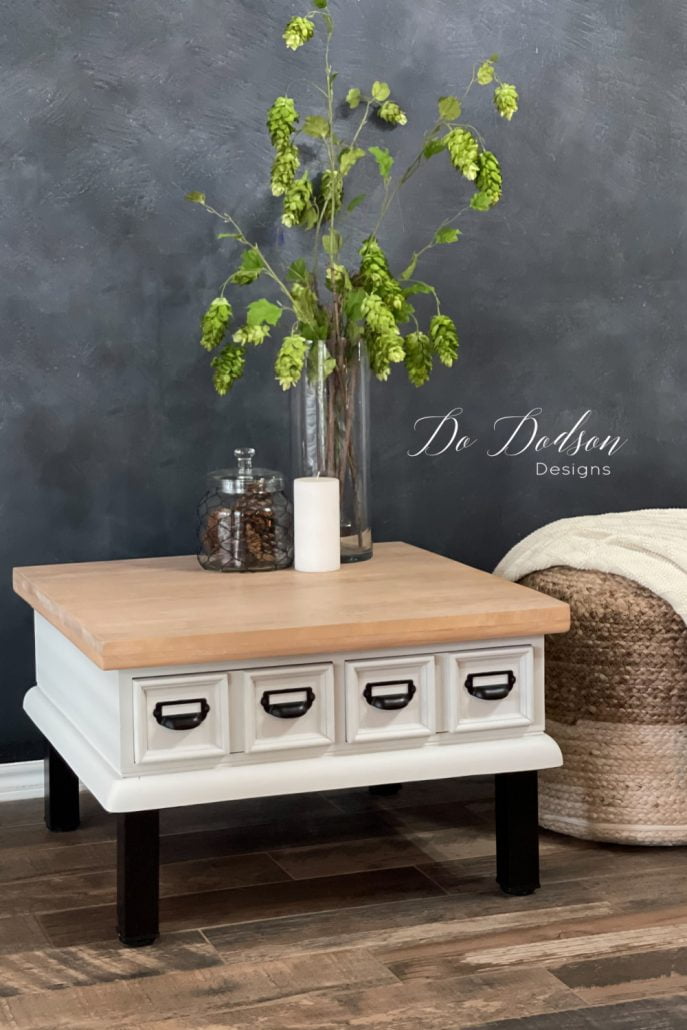
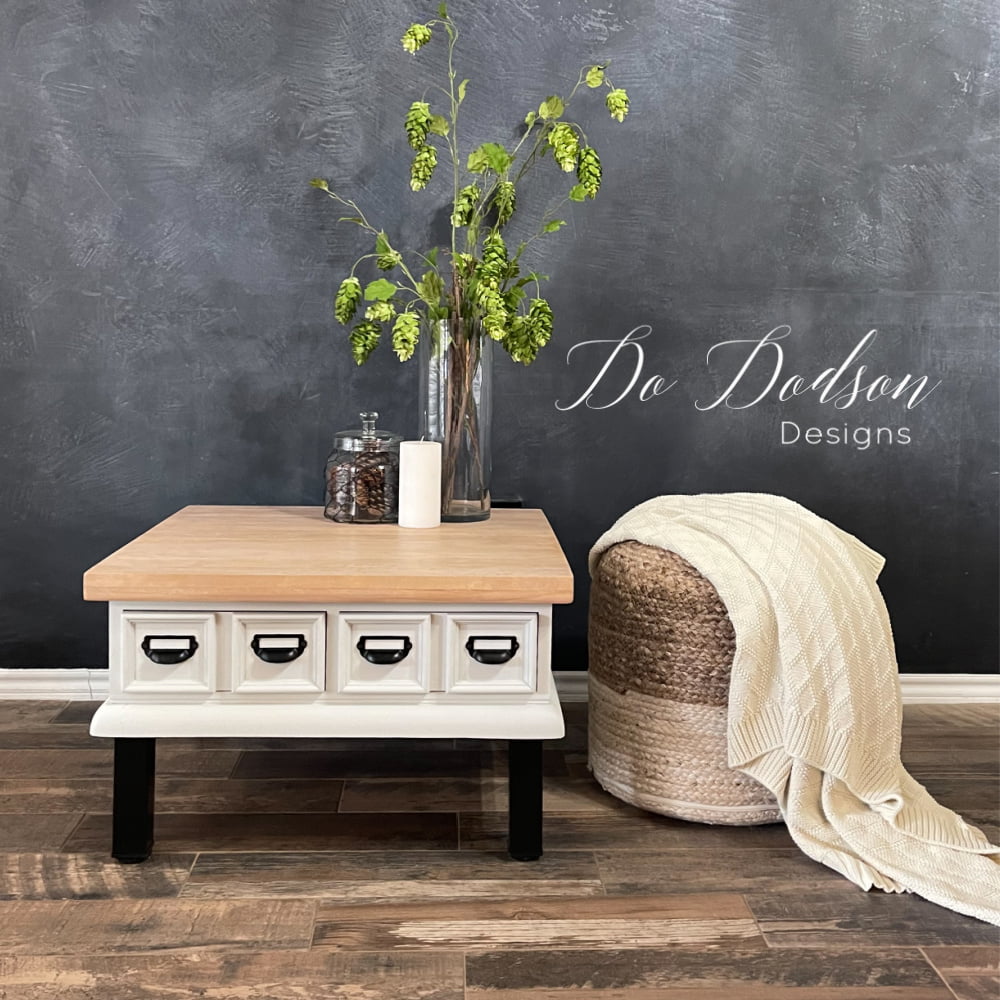
I think I found a new game table for my Grands! I didn’t know until after completing this coffee table makeover it was the perfect height to use with my new poufs. Fun stuff! Gosh, I love what I do.
So, what do you think about chopping off the legs on furniture? Would you try this, or have you done this already? I’d love to hear from you. Or say hello in the comment section, so I’ll know you visited me here. Thanks for joining me!
Until the next project… xo, Do
Do! Your vision for this is amazing! I love the transformation. Perfect! And unique. I’m
in love with it!
Thanks, Leslie! Have a beautiful weekend my friend. 🙂 xo
This is such a great makeover, Do! You had a great vision for this piece. Bravo!
Thank you, my Queen! 🙂 xo
I do want to change the legs on a piece that I am working on. I want to do something like the Queen Anne legs you removed to do on a TV armoire I have in the works. Your project was so informative and helpful getting me to that goal. Thanks you Do!
You are welcome, Frances! I hope you join me on my other blogs to learn more about DIY and furniture refurbishing. Good luck with your project. I’d love to see pics. You can email them to me at [email protected]
Have a great week! 🙂 xo
Wow – I did not see that coming. So beautiful!!!
Bam! I like it when that happens. Thanks for joining me on the blog. 🙂 xo
I love it!!! You sure do have a special knack for turning something ordinary or dated into something spectacular!!!
Thank you, Deborah. After years of doing this, I don’t expect every project to be amazing. That allows me to create without stress and have fun. Thanks for joining me on the blog. 🙂 xo
Also, you are lucky to have a husband that brings stuff home to you!! Mine would never do that!!! He cringes every time I come home with “stuff”. He says “where will you put that?” There is really no room for any more stuff in our garage.
Well, it hasn’t always been that way. Maybe I should write a blog on how I got started in this business and the negatives I had to deal with before I became successful. 🙂
I love this table. It is gorgeous and as always, your work is amazing. Thanks for sharing!
Thanks for joining me on the blog, Lori. I appreciate you. 🙂 xo
Ooo! I wouldn’t have thought to cut the legs off and replace them. Great job! Love the end result.
Thanks, Tashai! My mind is a crazy place to live some days. 🙂
Love the creativity! My question is… you’re going to use gator hide over the wax??? I’m confused as I thought the “ rule” was to always use the sealer before he wax. I’m new to this so I’d love to clarify. Maybe I have it backwards!
Hi Denise, This is true with most products, but if Dixie Belles wax is fully cured, it can be painted or top-coated over. I’ve done it many times with great success. The trick is when I use the wax; it’s strictly for color enhancement. I don’t put a super thick coat on. Always test products first before layering them.
AMAZING LOVE IT XXOO
Thank you, Cheryl. It’s always nice to hear from you. 🙂 xo
You really changed the whole look of this piece Do! It’s going to make a great game table for your grandchildren! 😊 Pinned!
Yes! It was a perfect size for a game table. Thank you, Cindy.
This is an amazing transformation! I haven’t seen this before, and now I’m ready to save even more pieces! You always impress me!!
Flip those curbside treasures, Toia! Enjoy the journey. 🙂 xo
You are so creative. Lord if I could see like you see. Just fabulous. Thanks for sharing.
Thank you! LOL, be careful what you wish for, Rachael. My head is a scary place at times. 🙂 xo
Love this transformation. Would love to have seen photos of how you trimmed top. Need to find some of these legs. Source?
Hi Nancy,
Thank you! There are links under the products list in every blog to help you find the things I use. Also, there is a step-by-step tutorial in my private subscription library. Over 50 tutorials for you to learn with me. Here’s the link for more info. https://members.dododsondesigns.com/join-the-art-of-painting-furniture-subscription-group/
Do, this coffee table turned out amazing. I love how you cut off the bottom to take it from French Country to Modern Farmhouse. As simple as changing out the legs made a big impact. Beautiful job!
I love the color selection too. It was great to see the Oyster on your piece. I am about to use Oyster on my kitchen table. It was so tough to decide what color to go with. Now that I saw it on your coffee table, I know it was the right choice.
P.S. that coffee table would look nice in my family room.
Haha, Tammy. You can have it if you drive to Texas to have coffee with me. Oyster is a beautiful color! I think you’ll love it too. 🙂 xo
You have an amazing eye for your creative transformations! You envision it and then do it! Your how-to instructions are so helpful, and you give encouragement to those of us who continue to learn by doing. I always look forward to your new creations. Keep those creative juices flowing!
Thank you, Sandy! I’m so glad you are enjoying my tutorials. It brings me joy knowing others are benefiting from what I love. 🙂 xo
LUV THE WAY IT TURNED OUT. WOULD I DO IT ? NO TOO MUCH WORK.
LOL, thanks, Bonnie.
It was, but I get a lot of satisfaction doing these makeovers. It’s the challenge that keeps me going. 🙂 xo
Good morning! Just wanted to let you know that I do read the majority of your wonderful posts and am not sure why it shows I haven’t taken a peak. Your posts are the highlight of my week. You put a smile on my face and give me many ideas for doing my own diy projects or furniture redos. Thanks for being so brilliant!
Hi Catharine. Emails can be tricky, and the best way not to miss a post is to open all my emails as soon as you see them, or they may get stuck in a SPAM file. I’m so happy you are enjoying my DIY projects. Have a great week. 🙂 xo