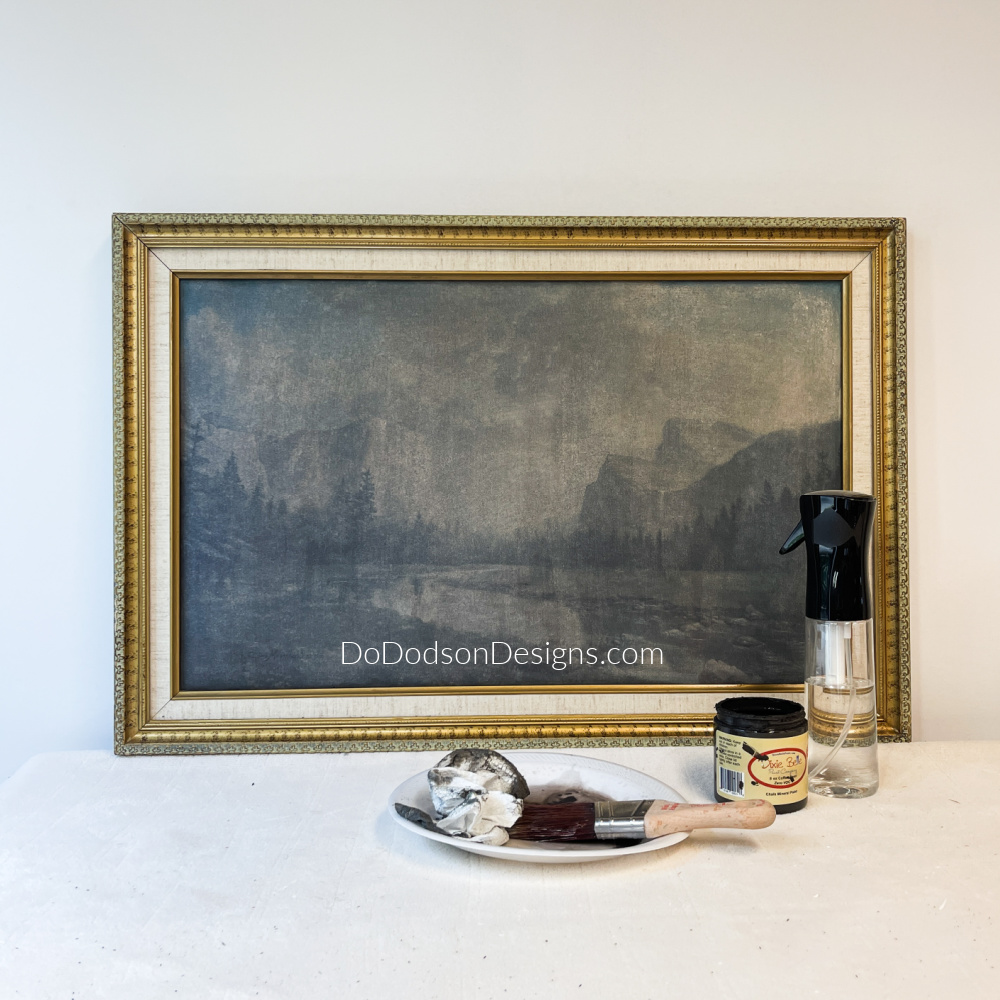
Hey, triple-D friends! Does your home need some spooking up for Halloween like mine? Here’s an easy way to paint a ghost on a thrifted print for a quick, spooky accent.
Thanks to Dixie Belle Paint Co. for sponsoring this post. While I was compensated to write this post, all opinions are my own.
* As an Amazon Associate, I earn from qualifying purchases and through other companies as well. You will not be charged extra when you purchase through these affiliate links, but any income I make helps me create more amazing DIY projects to share with you! To see my full disclaimer, click here!
Thrift Store Paintings
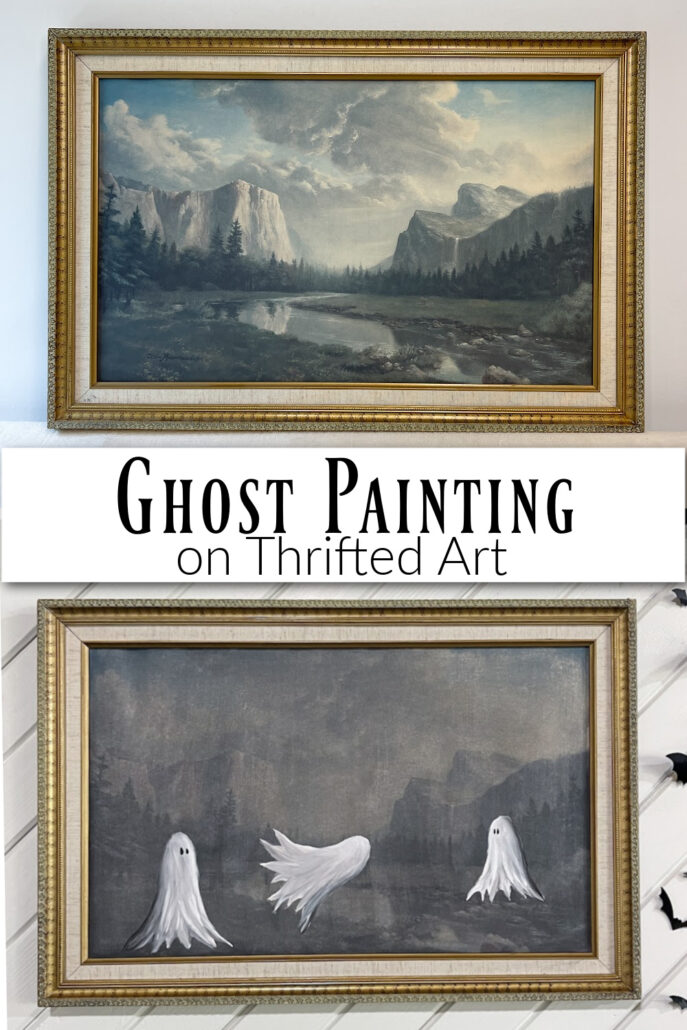
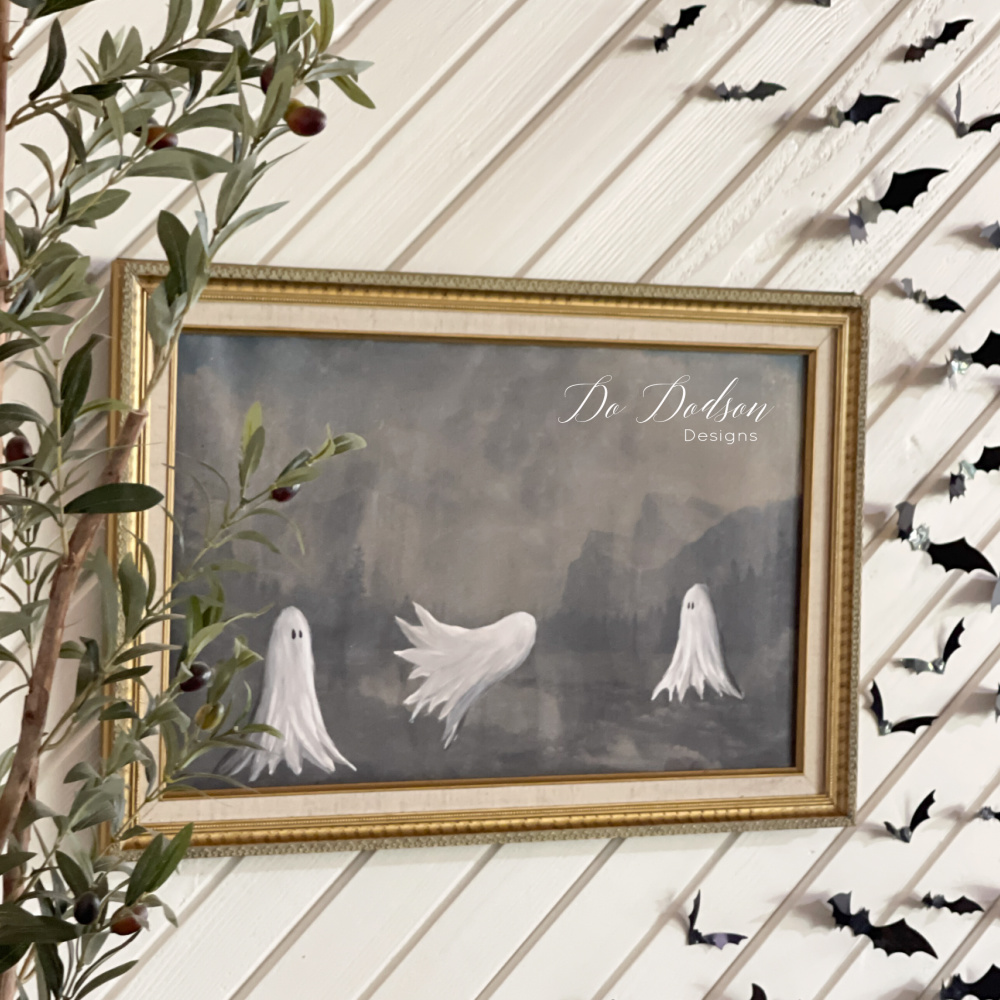
Have you seen the latest ghost painting trend on tiktok and social media? OMG! It is freaking genius! They take old paintings and paint cute little whimsical ghosts in the background. I want Halloween decorations that wow, and this is it!
I decided right then and there that the theme for our indoor Halloween decor would be ghosts this year.
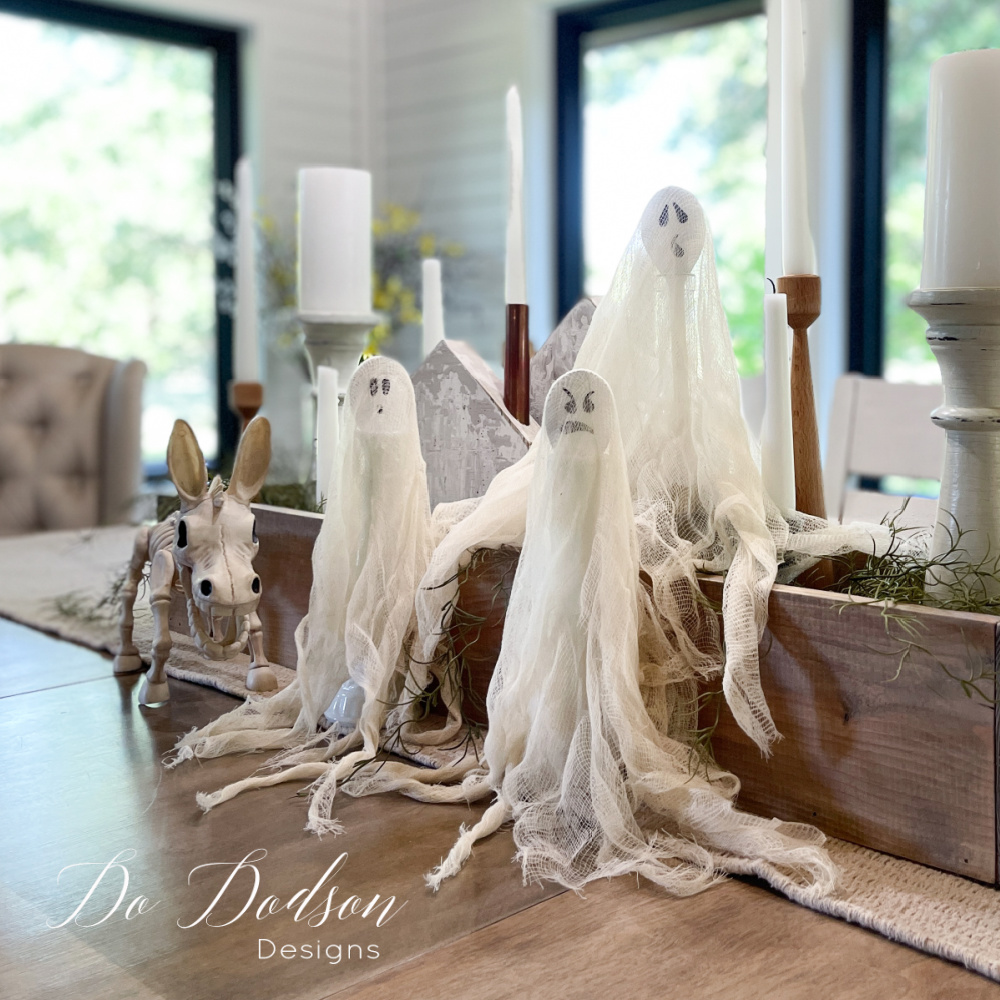
CLICK HERE to see my first ghost decor project. It’s super cute and will go well with my ghost paintings.
Of course, I headed out the same day to find an old painting and came up empty-handed. Bummer! Why is it always like that?
But I have friends in low places. Living in a small town, you know who is who, and WHO has the good junk. It didn’t take long after I told my thrift-loving friends what I was searching for. SCORE!
I just had to try this simple ghost craft using old artwork, and I’m so glad I did. Below are the step-by-step instructions to have amazing Halloween art without taking a single art lesson. This was my first attempt at painting a ghost. See one, DO one, teach one. It was that simple.
CLICK HERE to see my inspiration for my Thrifted Ghost Art.
Get ready to bring some ghoulish elegance into your home this Halloween!

What You’ll Need
- old artwork (nothing valuable)
- chalk stick (for the ghost’s outline)
- Cotton (white) and Coffee Bean (brown/black) chalk mineral paint (or acrylic paint)
- soft synthetic paintbrush
- artist brushes
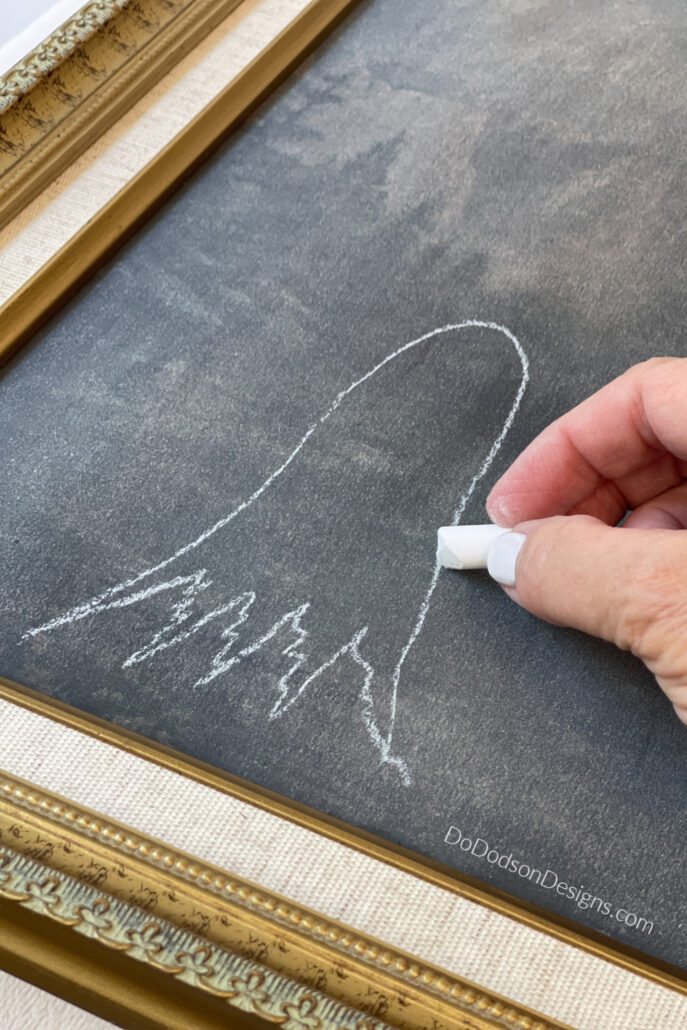
STEP 1: Painting Background (Optional)
You can skip this step if you want. The reason I’m adding a dark wash over the old print is because it had a blue hue, and I wanted the scenery to appear it was at night.
To do this, I mixed a touch of paint with water. Basically, it was colored water.
With the print lying flat, quickly brush over the whole painting with the watery mixture and a good quality synthetic brush. Immediately blot with paper towels. Be careful not to rub, as the water can cause damage to the print.
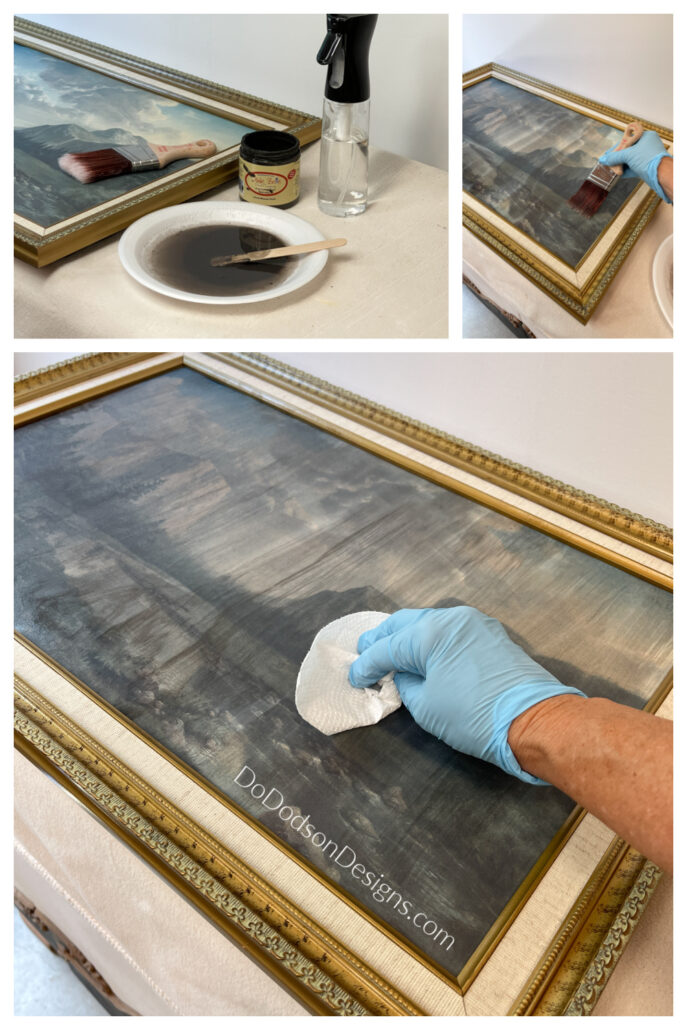
Allow the paint to dry completely before the next step.
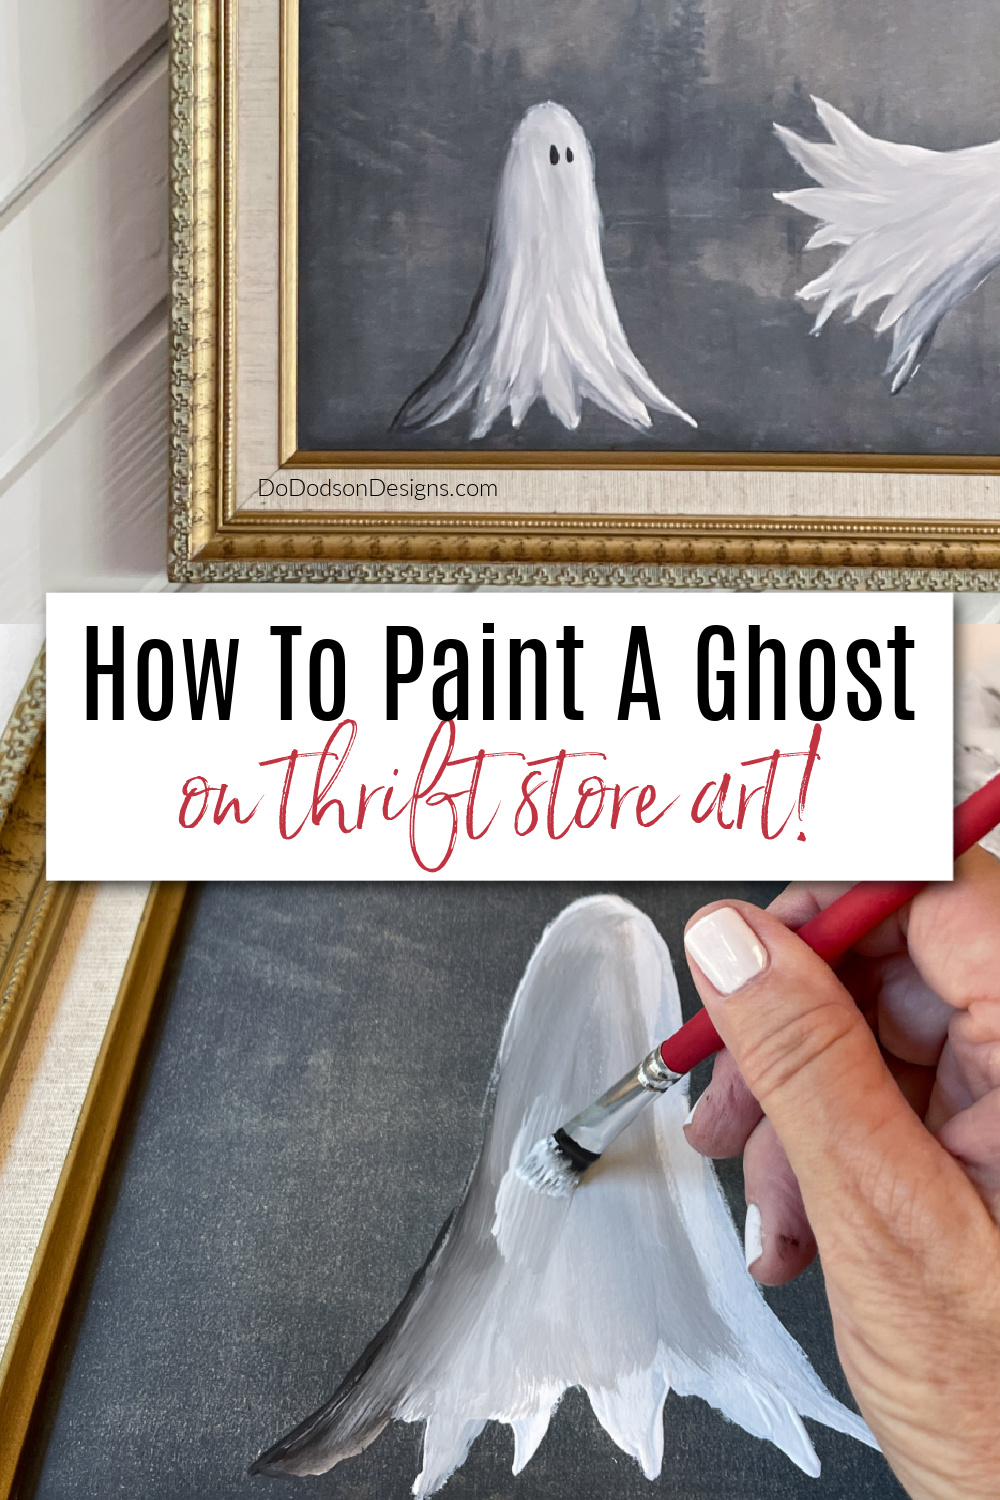
STEP 2: Easy Ghost Drawing
After drying the background paint, draw the ghost’s outline using a chalk stick. You can also use a pencil, but I find it was easier with the chalk stick. If I messed up too badly, I could always use a damp paper towel and blot it off.
I admit I did some ghost drawing practicing the night before to feel a bit more comfortable since this was my first attempt. All the ghosts I’ve seen painted were more whimsical with simple shapes.
You know I gotta put my own spin on them. I wanted mine to be more “realistic” with a flowing gown. What is that thing called that ghosts wear? A sheet? I dunno!
STEP 3: Painting The Ghosts – Blending & Shading
With my ghost outlines in place (two of them), I pulled out the paint and brushes. I placed the two paint colors (white and black) on a paper plate. My artist’s palette for the day. Disposable with no cleanup. Also, grab the paper towels and a bowl of water to wash out the brush as needed. Blending colors can get messy.
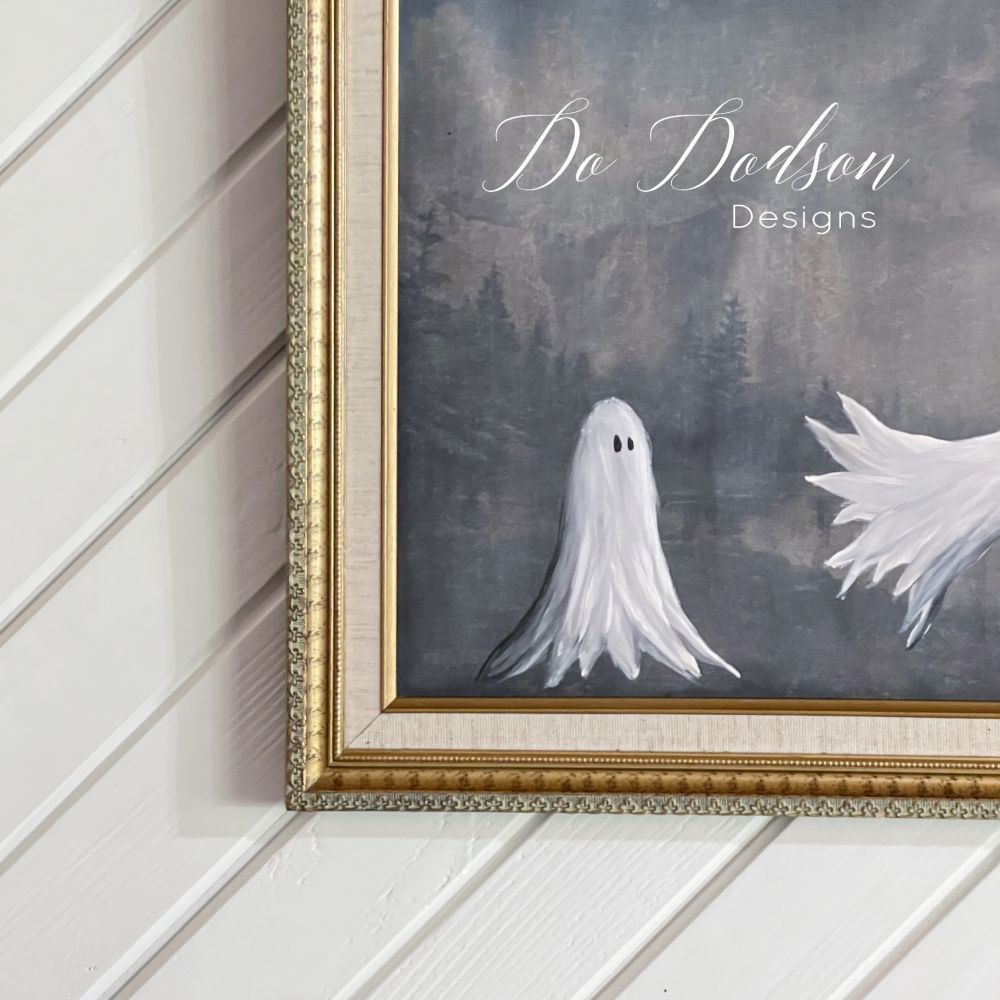
With white paint, fill in the ghost figure with a chisel-tipped artist’s brush. It works well with curves and blending. Here’s where you’ll need those fine motor skills. Don’t worry about full coverage; you will blend gray paint (made by mixing white and black) with white for shading.

Don’t forget about shadowing. Imagine the light hitting the front of the ghost. That is the side that will be the lightest in color.
Add a bit of black to the back side where the light doesn’t hit. This may take a bit of practice, but you can do this too.
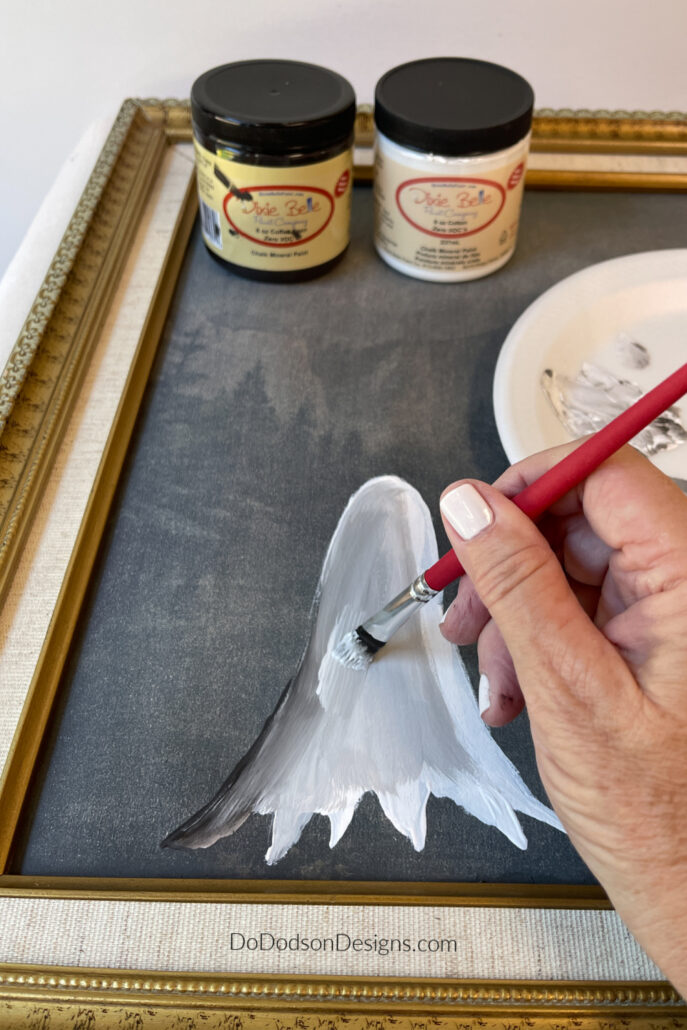
Lastly, add some ghost eyes using a pointed-tipped artist’s brush and a tiny amount of black paint.
I thought about adding googly eyes, but I didn’t. The solid eyes were more of the ghost look I was wanting.
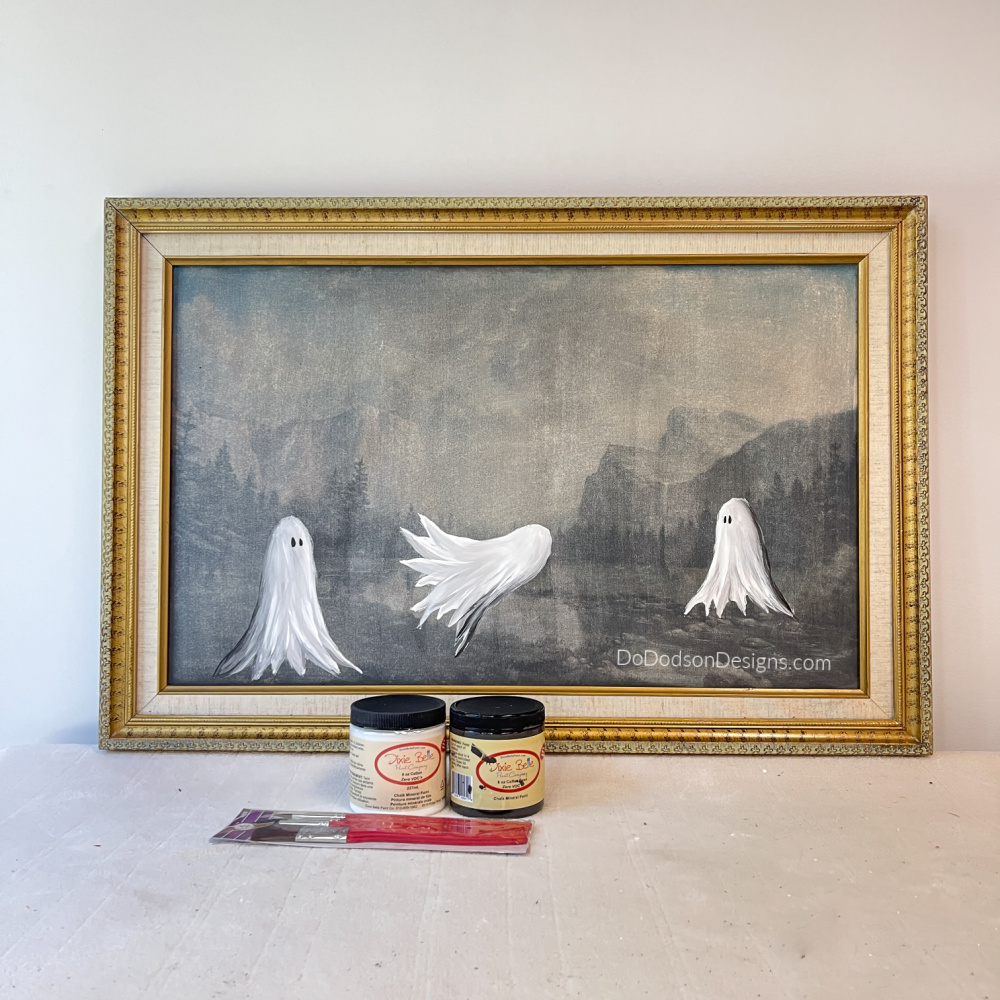
STEP 4: Painting An Oops Ghost!
Okay, remember I said I was painting two ghosts? Stuff happens, and I was less than happy when I mistakenly smeared white paint in the middle of my artwork. That’s what I get when I set the paint on top of it like it was spillproof. Will I ever learn? Probably not.
A third ghost it is! I had to get creative with the placement and make this one fly away into the midnight sky. No one will know but you and me. You have been sworn to secrecy.
Step 5: Displaying Your Ghostly Masterpiece
Don’t restrict yourself to traditional wall display methods, either. Get creative and explore other options. Prop your ghost painting on a mantel with vintage apothecary bottles and dark lace. You can even lean it against a black-painted door for a dramatic effect. I almost did the door thing.
Remember, your ghost painting doesn’t have to stand alone. Experiment with complementary decor to enhance the overall Halloween theme. Add cobwebs, faux spiders, or bats to bring the Halloween painting to life.
The Results Of A Thrifted Ghost Painting
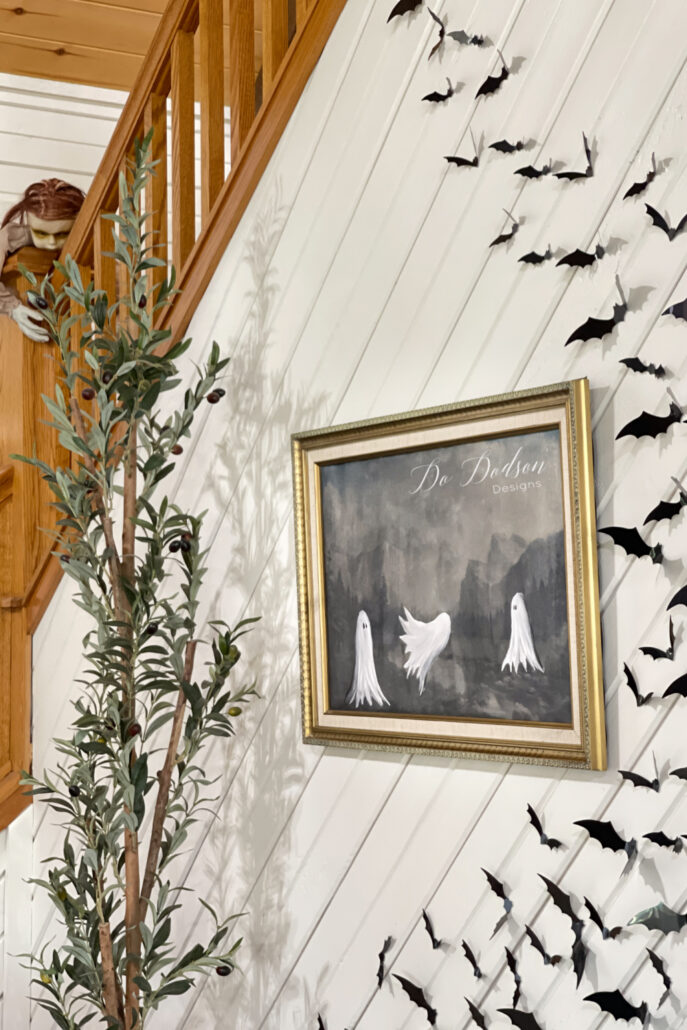
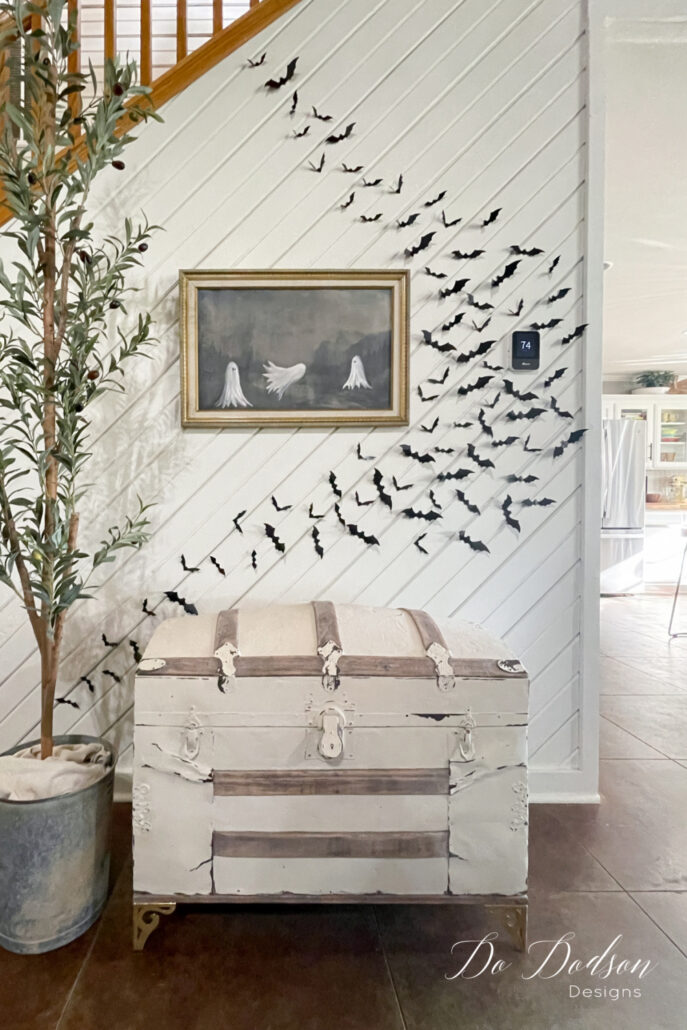
Transforming this thrifted art piece into a ghostly masterpiece was a fun and creative way to add a touch of Halloween spirit to our home. I know our friends and family (don’t forget those GRANDS) will surely be impressed by my hauntingly creative skills. Shhhhhh… don’t tell them it was easy. It will be our secret.
Hey, thanks for joining me today with this ghostly experiment. I’m so happy it turned out so well, and I got to share it with you. Let me know what you think about this project. What other fun things would you paint on old prints? Looking back, I wish I had painted a big, ole full moon hovering over the ghost. I can always add it later.
Don’t forget to PIN and share this FUN Halloween craft idea with your friends who love creating outside the box. It’s the best place to be.
Until the next project… xo, Do
Omgoodness this is so fun Do! I love your creative spin! Pinning 🥰
Thanks, Cindy!
It’s fun creating unusual pieces for our home. It’s never boring. Have a great week. xo 🙂
This is so darn fun Do! I love these painted ghosts and the fun bays you staged it with! 👻🦇
I know, right? Those bats are adorable. My two year old Grandson is coming over tomorrow. I’ll let you know if they stay stuck to the wall. 😂
Oh my goodness, Do. This is the best Halloween decorations ever! I love everything about this cute
project. I want one for my home. Now, you have me out thrifting for an old landscape. It’s a darling
project.
Hey Tammy! Isn’t it a fun idea? When I saw another creator do it, I knew I had to try it. Thanks for stopping by. 🙂 xo
I’m going thrifting this week and this will be made. Just recently started following you. So glad I did. I will post on my blog and will link back to you.
Hello Tonia!
I’m glad you found me too. It’s always good to hear from a fellow blogger. I can’t wait to see your ghostie pic. Super fun! 🙂
Hi Do!! I love it!
Thank you, Cheryl. 🙂
I genuinely love your “oops” ghost, I think it adds more whimsy to the painting! Such a fun transformation, and I definitely want to give it a go. Our Halloween decor budget is a bit slim right now since we just had our floors refinished, so this DIY project is right up my alley! Here’s to hoping it turns out as good as yours!
Hi Amelia!
This is just a great project for first time painters. Grab that thrift store art and give it a go. It will look great with the new floors. 🙂
xo, Do
Thanks so much…your the best!!
Hi Bonnie! You’re welcome. So glad you enjoyed this fun fun project. Happy Halloween 👻
I wanna try this! Looks like so much fun and such a cute end result! 👻
It’s is fun. Sometimes, a girl just wants to paint a ghost. 👻