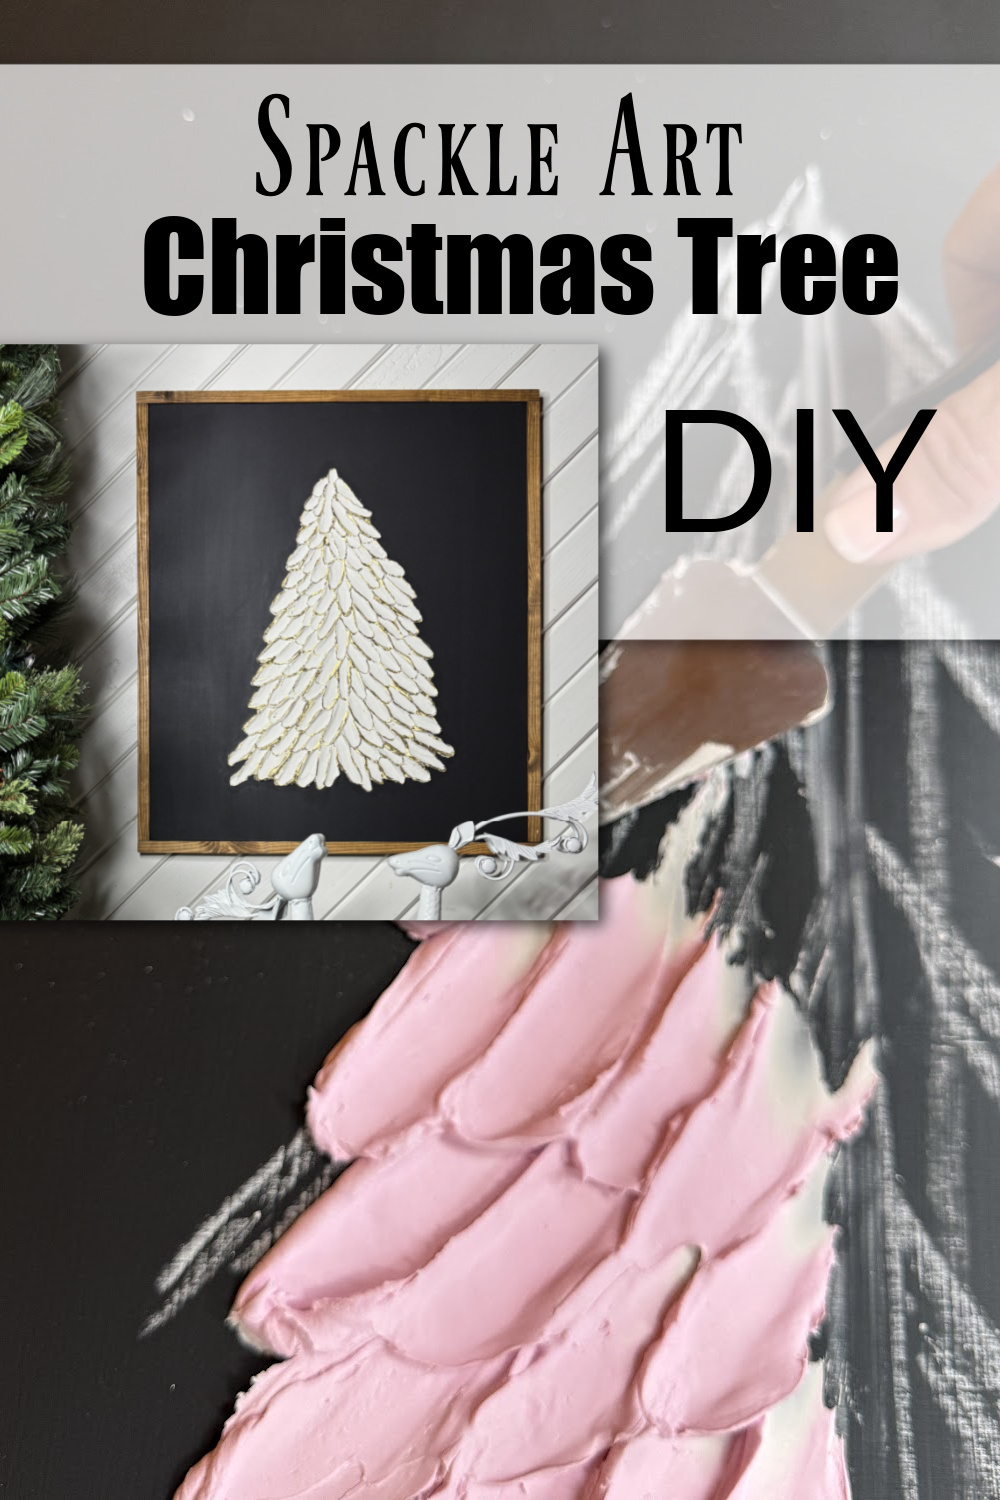
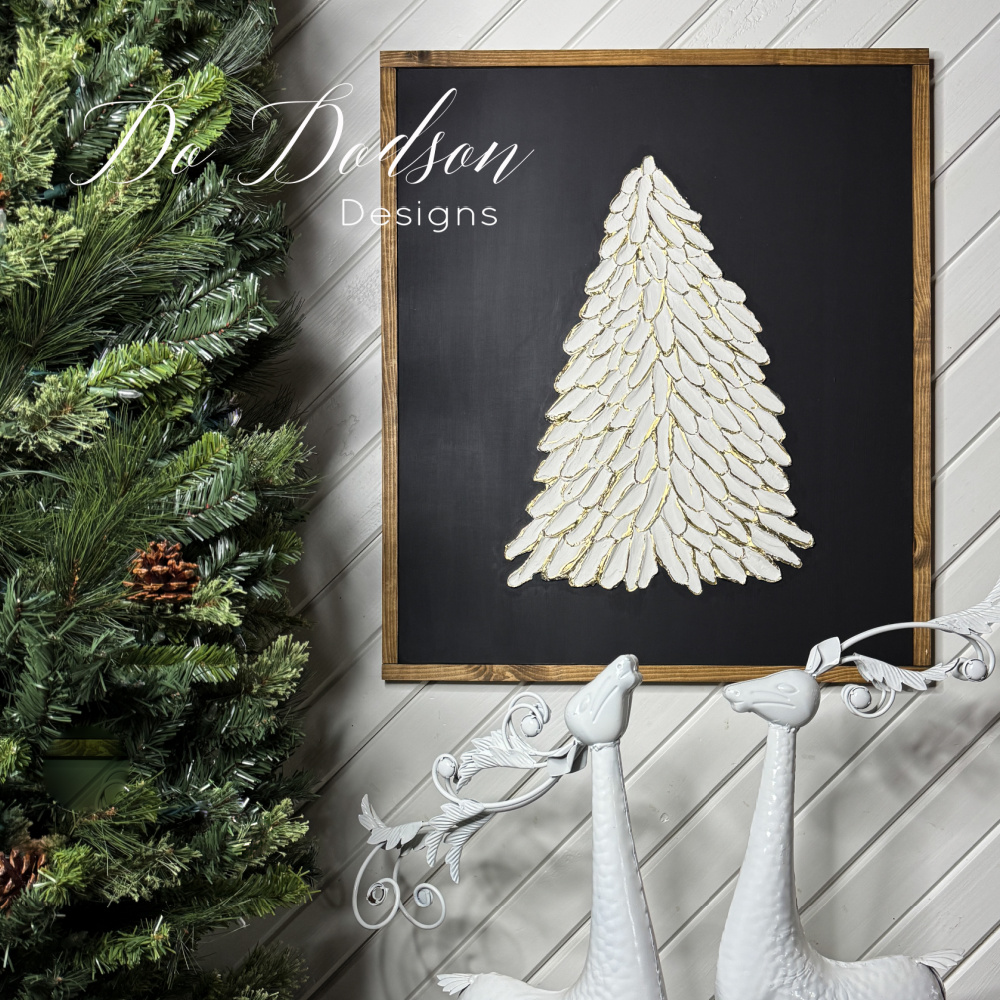
DIY Spackle Art Christmas Tree
Happy holidays! So glad you’re here! Today, I’m gonna show you how to make this very pretty, artsy fartsy, spackle art Christmas tree to spruce up that boring wall this holiday season. This DIY Christmas scrap wood decor project will definitely bring out your inner artist, and I just know you’ll have a blast with this one!
Thanks to Dixie Belle Paint Co. for sponsoring this post. While I was compensated to write this post, all opinions are my own.
* As an Amazon Associate, I earn from qualifying purchases and through other companies as well. You will not be charged extra when you purchase through these affiliate links, but any income I make helps me create more amazing DIY projects to share with you! To see my full disclaimer, click here!
DIY Spackle Art (Christmas Tree Edition)
Remember that art wall hanging I made last month for Halloween out of spackle? CLICK HERE if you missed it.
It was so cute, I just had to make another one! My creative brain went into overdrive! Does anyone else get totally hooked on a fun technique and can’t stop? That’s me! I guess I’m working on my plaster skills. But seriously, it’s so much fun. It’s kinda like Play-Doh, which is the best way I can describe it.
We have a large, empty wall under our staircase, and I put one of three Christmas trees there every year. Yes, I’m extra, I know. It’s the perfect place for a large wall hanging, and the wall is wood, so I have no issues hanging heavy items.
This DIY Christmas tree wall art would also look awesome sitting on a mantle or shelf, making any room feel festive.

Ready to make this spackle art Christmas tree? Here’s what you’ll need:
SUPPLY LIST:
- scrap wood (plywood) or stretched canvas
- 1×1 or 1×2 lumber (wood frame)
- chop saw
- Premixed Drywall Spackle (heavy weight)
- painting knife
- Anchor SILK All In One Mineral Paint
- Elderflower SILK All In One Mineral Paint
- paintbrush
- artist brush (for small details)
- Golden Ash No Pain Gel Stain (oil-based)
- GOLD Marker (THIS is beautiful!)
- 2 D Rings (picture hangers)
STEP 1: Gather Your Scrap Wood Lumber
Because I typically use whatever scrap wood I have on hand, I might use things that you may not have. No worries! Use what you got!
I found this piece of plywood in my stash that was a bit heavier than I wanted, but, like I said, I use what I have. My board measures 24 x 28 inches for your reference.
I understand that not everyone has wood walls in their home, and I totally get that hanging something heavy isn’t an option.
If that’s the case, you can also use a stretched canvas (any size) for a much lighter, wall-friendly version. Make it work for you!
STEP 2: Painting The Background
First, paint the background with a contrasting color from the tree. Our Christmas decor is pretty neutral with black, white, and wood throughout the home, so I chose Anchor (black) SILK All-In-One Mineral Paint.
SILK paint is an excellent option for wood projects because it’s just like the name says. All in one. It has a built-in primer, stain blocker, and top coat. It’s self-leveling with a silky smooth finish and usually covers in two coats (recommended). Lighter colors may need three.
Apply the paint with a good-quality synthetic paintbrush for the best results. Allow ample time to dry between coats as suggested by the manufacturer.

STEP 3: Creativity With Spackle
Now for the fun part! SPACKLE! It’s pink but dries white.
But, before you jump right in, get a picture in your head of how big you want your spackle art Christmas tree to be.
I like to use a piece of chalk and draw an outline over the painted surface. This is a great way to keep the tree centered. Once the drywall spackle has been applied and dried, wipe away the chalk with a damp cloth.

Load up a painting knife with spackle. Be sure to smooth the knife’s edges with the spackle. You only need a small amount.
Starting from the bottom of the tree on one side, create the tree’s branches by pushing down on the end of the knife and then dragging it upward while adding more pressure as you drag. Add branches one at a time, working your way up the tree.
Once you’ve reached the top, leave the top branch blank.
Next, do the same technique on the other side, leaving the middle of the tree until last.
Lastly, start at the bottom center of the tree and work your way up to the top, with the last branch being the top piece.
See photo below for visual instructions. Left to right.

It’s always good to practice on a cardboard surface to get the technique down. Typically, you can make one branch per stroke, but you can make adjustments as needed.
As you can see, mine isn’t perfect. I have never seen a tree that is! Good enough!

The whole process of creating the Christmas tree from spackle took about 10 minutes max. You’ll need to work quickly, as the spackle will start to dry and get harder to work with.
STEP 4: Lightly Smooth The Rough Edges
Once the spackle is dry, grab some superfine sandpaper or a sanding sponge and gently smooth down the rough edges of the dried spackle. Since it’s meant for fixing holes and stuff, it sands super easily, so be light-handed!
I recommend wearing a dust mask when sanding drywall. Blow away any remaining dust outside. This stuff isn’t good for your lungs, and it’s pretty messy.

STEP 5: Paint The Spackle Art Christmas Tree
Paint two coats of the SILK paint and allow to dry. I applied it pretty thick because there were a lot of crevices and pockets between the Christmas tree branches. It’s okay to fill those in with paint. The paint is self-leveling and will spread back out as it dries.

Using a small artist brush is best for getting into hard-to-reach areas, especially around the tree’s edges.

As for the trees’ background, use a small artist brush to cut in with the color (black) to clean up any white paint that may have gotten on the background.

STEP 6: Adding Highlights to The Spackle Art Christmas Tree
This was a last-minute change of plans. Initially, I planned for the tree to be solid white.
Then I remembered the GOLD MARKER I had used back in the Summer on another project. I just had to add the gold.
To use the gold marker, shake the marker well for a minute or so. Prime the marker by pushing gently on the tip until you see the gold fill the chisel tip.
It’s a great way to highlight intricate details and add a brilliance that only metallic gold can give.
Each snow-covered Christmas tree branch was outlined with the pen, with some branches receiving a thicker coat to give them depth and dimension.
Look at that shimmer!

STEP 7: Consider Framing Your Spackle Art Christmas Tree
Adding a frame is optional if you choose to use a canvas for your Spackle Art Tree.
But if you’re using plywood, I highly recommend adding this simple-to-make frame around your artwork.
Using 1×1 or 1×2-inch wood, cut four pieces.
Two cut the length of the board, and two cut the top and bottom, overlapping to create a square frame.
Sand them smooth, then stain or paint them the color of your choice.
My frame was stained with two coats of No Pain Gel Stain in the color Golden Ash, and it was secured to the plywood with brad nails. CLICK HERE for a quick tutorial on how to make them.

Check out the links below for more DIY holiday projects.
Gold Highlighted Spackle Art Christmas Tree
Let me just say… the photos don’t do this gorgeous Christmas tree justice. It’s hard to capture the naked-eye vision.
All the tiny details, the peaks and valleys of the snow-covered branches, the texture of the snow, and the midnight background of a cold winter’s night.
No tree trunk or star was needed. Just this magnificent snow-covered tree. Simplistic beauty.

It’s everything I wanted for my Christmas wall.


Hope you enjoyed my DIY Christmas project! Maybe I’ve inspired you to make your own, and seriously, wouldn’t this make a cool gift?
Make the trees big or small – totally up to you! You could even make a bunch if you have a shop or Etsy store. Extra cash for the holidays, right?!
I’m so glad you joined me today, and I wish you all the very best in your DIY journey. Don’t forget to PIN, save, and share this unique DIY scrap wood project with your DIY loving bestie, too. See you soon with another fun project!
Until the next project… xo, Do