

I really love decorating with wood accents, and one of my favorite ways to add that cozy farmhouse feel is with DIY cutting board decor. Whether your style leans toward farmhouse, cottage, vintage, or modern rustic, decorative cutting boards can instantly make a space feel more collected and inviting.
The best part is you don’t need fancy tools or a huge budget to make them beautiful. A simple thrifted cutting board or an unfinished wood board from the scrap pile can be completely transformed with a little creativity.
* As an Amazon Associate, I earn from qualifying purchases and through other companies as well. You will not be charged extra when you purchase through these affiliate links, but any income I make helps me create more amazing DIY projects to share with you! To see my full disclaimer, click here!
Why I Love Decorating With Cutting Boards
Have you seen the prices of vintage cutting boards?! I’m on a budget, and no way am I paying that much for something I can make myself. Of course, making them isn’t the same as the real thing, but it sure will save you money on your cutting board display, and no one will know any different.
Cutting boards add natural texture and warmth that work in almost any area of the kitchen. I especially love leaning them on kitchen counters, layering them on open shelves, or using them in my seasonal displays.
Even a simple wooden board beside a crock of utensils or a vase of greenery can make a kitchen feel cozy and lived in.
One thing I love about this project is its flexibility. You can keep things very simple or dress them up depending on your decorating style. Here are a few ways you can use them in your everyday home decor.
- On kitchen counters
- Layered on shelves
- Gallery Wall Display
- Leaning against backsplashes
- In farmhouse tiered trays
Supply List For This DIY Cutting Board Decor Project
- Scrap Wood (1×6 and 2x6s are good sizes to use)
- Chop Saw or hand saw
- Scroll Saw for woodworking
- Wood Sander or sanding blocks
- Key Hole Saw (padsaw/jab saw) or drill
- Butter Cream Chalk Mineral Paint
- Thicket Chalk Mineral Paint
- Dainty Botanical A2 Rice Decoupage Paper
- Synthetic Paintbrush
- Satin Clear Coat
- Walnut No Pain Gel Stain (oil-based)
- American Honey No Pain Gel Stain
- Golden Ash No Pain Gel Stain
Here are some other popular supplies you might consider using to make cutting board decor.
- Unfinished wood cutting boards (if you can’t cut your own)
- Stencils
- Twine or ribbon
- Faux greenery
- Wood beads
- Decoupage paper
- Hot glue gun
- Transfer designs or rub-on transfers
Have fun and get creative, the possibilities are endless!
STEP 1: Designing A Primitive DIY Cutting Board Decor
Okay, so any wood will do for this project. Because they’re just for looks, no need to worry about if they’re super strong or safe to put food on.
Alright, time to get creative! Cut your boards to the desired length first. Grab a pencil and start sketching. I’m all about the more primitive look, unless you’re going for something modern, of course. I’m a sucker for unusual shapes and sizes. The funkier the handles, the better!
And don’t sweat it if you mess up drawing the design; a wood sander or sandpaper will take those pencil marks right away.
Need more inspo for designs? Pinterest is your friend for finding just the right cutting board shapes.

STEP 2: Cutting Out the Design
Once you’ve got your design on the wood and you’re happy with it, grab a scroll saw or jigsaw and cut it out slowly.
Because I used 1×6 scrap lumber, I kept my cutting to a minimum. The width was perfect for the width of the cutting boards I wanted.
You can use any size wood board you have, but I found this method saved a ton of time. Plus, it cuts down on your saw time, which is always a win when you’re working on DIY projects!

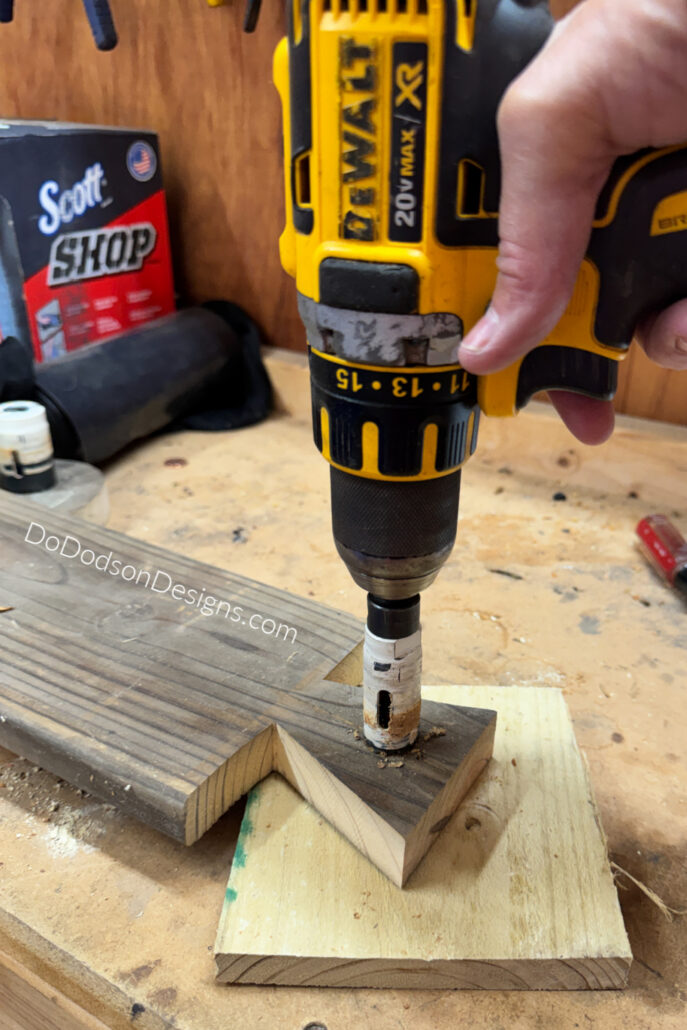
STEP 3: Cutting Holes
Depending on your display plans, you might want to hang your cutting boards on the wall. If so, use a keyhole saw to cut the perfect-sized hole. This tool makes it easy to get a perfect circle.
When using this tool, be sure to protect the surface beneath what you’re cutting by placing another board underneath.
STEP 4: Sanding The Cutting Boards
To achieve a beautifully polished, professional-looking finish for your DIY cutting board decor projects, it’s important to properly prepare the wood surfaces. I recommend sanding the boards, starting with 180-grit and finishing with 120-grit sandpaper, until they are completely smooth to the touch. This step will give you a flawless base for your chosen decorations or finishes.
After sanding, be sure to thoroughly clean the boards; wipe away all remaining sawdust or sanding particles before applying your desired finish, whether it’s paint, stain, sealant, or anything else you have planned for your creative cutting board projects.

STEP 4: Easy Ways to Customize DIY Cutting Board Decor
I decided that simple is best when adding a design to an already beautiful cutting board. So, I used one product in two different ways to bring a cohesive look.
I chose two of the six that I cut out and decided to use a whitewash technique with two beautiful farmhouse colors. This technique is very forgiving!
First, lightly mist the board you want to whitewash with water. Then, mix a small amount of paint with an equal amount of water to dilute it.
Apply the watered-down paint with a paintbrush, and immediately wipe away any excess to achieve a uniform color wash.

Then I added some super-pretty decoupage paper – I’ve used it a bunch of times before! I love it, and it totally gives off that vintage farmhouse feel. Plus, you can totally switch up the look by adding other products with it.
The application is simple. First, add a layer of Clear Coat (which acts as a decopage adhesive), then lay the paper over it and smooth it into place, and add the clear coat over the paper. For small projects such as this, I used my hand to smooth out any wrinkles or bubbles that can form under the paper.
While the clear coat is still wet, gently rub the paper edges with a sanding block. Once the paper is dry, apply another coat of clear coat.
If you like, lightly sand between coats with fine-grit sandpaper for an extra-smooth finish.

To give the paper a finished look, I used the same paint color at full strength, taping off a line above the design to complete it.
For the second board, I achieved a similar look by first painting the background green, then applying a strip of the paper once the paint was completely dry.


Stain Finishes For Cutting Board Decor
If you want a simple finish, try an oil-based gel stain. Here are the three colors I used. Walnut, American Honey, and Golden Ash.
The application is wipe-on and wipe-off. Because it’s an oil-based product, there’s no need for a top coat sealer. Gorgeous, rich wood tones!

Tips for Making Cutting Board Decor Look High-End
Keep things simple when styling your cutting boards for that handmade, custom look! Think natural wood tones, soft colors, and a little texture – it makes a big difference without being too much. I love mixing old, vintage-looking boards with newer ones; it adds so much character and warmth.
Sometimes, the plainest designs are the prettiest and most memorable, showing off how cool simplicity and good crafting can be.
Need more DIY wood projects to inspire you? Here are a few I think you’ll like.
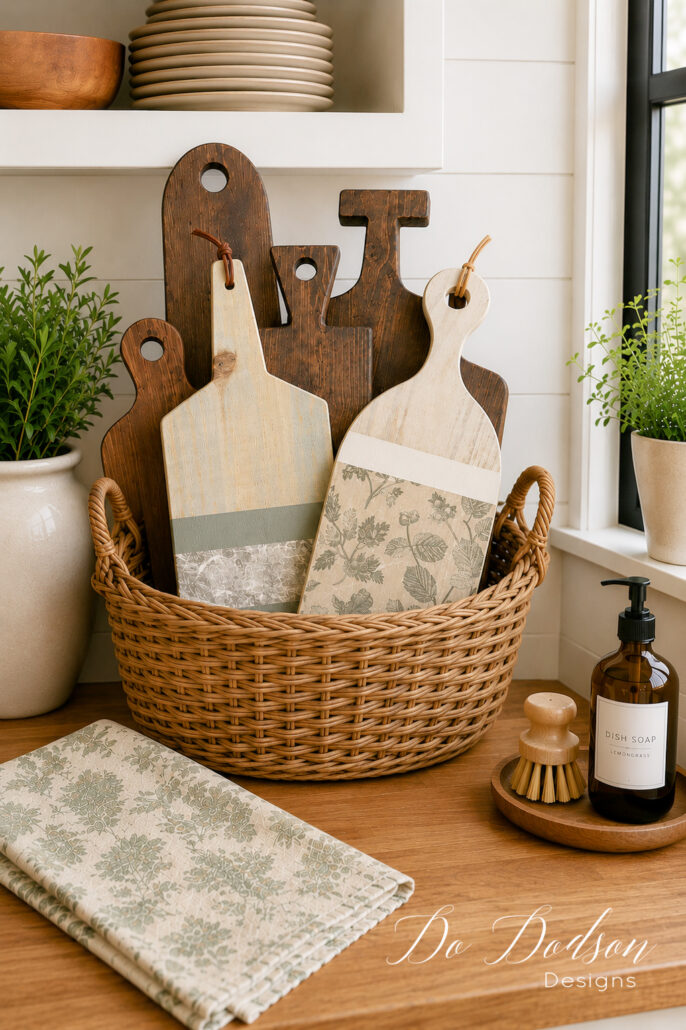
Displaying Cutting Board Decor on the Kitchen Counter
Decorative cutting boards are one of the easiest ways to add warmth and character to a kitchen countertop. For a cozy farmhouse look, layer cutting boards of different heights, shapes, and wood tones together in a wicker basket or lean them against a white shiplap backsplash.
Mixing painted or decoupaged boards with darker natural wood boards creates a beautiful contrast and gives the display a collected, curated feel. Add a few simple accents like greenery, a candle, or a soft floral tea towel to soften the arrangement and make the kitchen feel welcoming without looking cluttered.


Mixing Styles
DIY cutting board decor is one of those easy projects that makes a home feel warm and welcoming without spending a fortune. Whether you paint them, decoupage them, or simply style them in layers, they add so much charm to a space.
Cutting Board Decor Gallery Wall Ideas
Cutting boards make beautiful wall art. Try mixing them together for the perfect wooden cutting board display.

I like projects like these because they’re easy peasy, great for newbies, and super customizable for any time of year or style!
Thanks for stopping by the Do Dodson Design blog today! Hope you stick around, I’ve got lots more stuff coming! And if you make your own DIY cutting board decor, I’d love to hear how you styled it in your home. Leave a comment and share your favorite farmhouse decorating ideas!
Go ahead and pin this to your DIY wood projects board so you can find it later! 📌
Until the next project… xo, Do
Are these purely decorative? How do you know what products are food safe?
Yes, these are decorative and not what I consider food safe. But, you could make them safe to use but using a food safe cutting board oil. Tung oil, Beeswax wax, etc. I guess I need to write post of this. Thanks for reading. 🙂
These are super charming and really warm up your corner, Do! 💙 Love your idea of turning them into a cutting board gallery wall! 🖼️ I have a ton of scrap wood from all my projects and want to try a few of your creative ideas. Thanks for the inspiration, my friend. Pinned! Enjoy your weekend. Hugs XOXO
Aren’t these fun, Denise?! I have a few more designs I want to add to the mix and need to make some that are food safe. Thanks for reading and I hope you have a lovely weekend too. 🙂 xo