
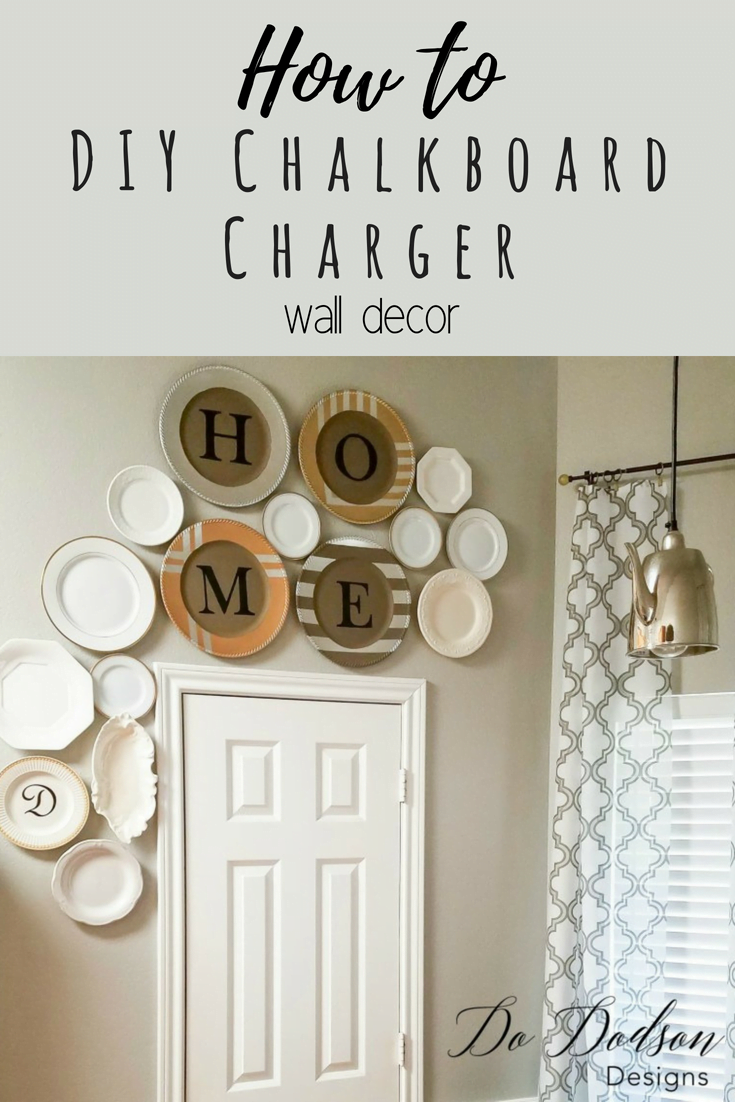
They know me all too well. I can’t say no to FREE stuff! It’s one of my weaknesses. My son and daughter-in-law gave me all their leftover plastic chargers from their wedding. For years now, they have sat on a shelf in the garage, just calling to me every time I walk by, as I threaten to throw them away. So, what’s a gal to do? Make chalkboard decor for my wall!
This post contains a few affiliate links to help you find the products I use. You are not charged extra for using any of the links, and any income I make will go toward more fun projects! To see my full disclaimer, click here!
Chargers have a circular indentation that allows plates to sit inside them as a holder, preventing them from slipping. They’re the perfect surface for a small chalkboard. My HOME decor idea called for 4 of them.
Supply List:
- Plastic Charger Plates
- Painter’s Tape
- Krylon Gold Metallic Spray Paint
- Burlap Chalk Mineral Paint (can be used as chalkboard paint for small projects)
- Blami Chalk Marker
- Coke can tab (plate hanger)
- E6000 Craft Glue
Easy DIY Chalkboard Charger Wall Decor
Chargers have a circular indentation that allows plates to sit inside them as a holder, preventing them from slipping. They’re the perfect surface for small chalkboard signs. My HOME wall decor idea called for 4 of them.
Adding The Background Design
I used painter’s tape to tape off the pattern I wanted on three of the four plates. I have a fancy for stripes, so I incorporated them into my design.

After carefully taping off, I found some leftover Krylon Gold Metallic spray paint from another project. I had two golds on hand. One was ahigh gloss shine, and the other was metallic. Because the chargers were already metallic silver, I only needed to spray 2 of them. The other two I left silver.
I sprayed the two chargers with two light coats each. I carefully removed the tape to reveal the pattern and allowed it to dry. They were dry in about 30 minutes.

Painting The Center Chalkboard
Next, you’ll need chalkboard paint. Honestly, if you are making home decor and don’t plan to change the lettering, I would just use a chalk-based paint. No need to spend the extra money if you have chalk paint at home.
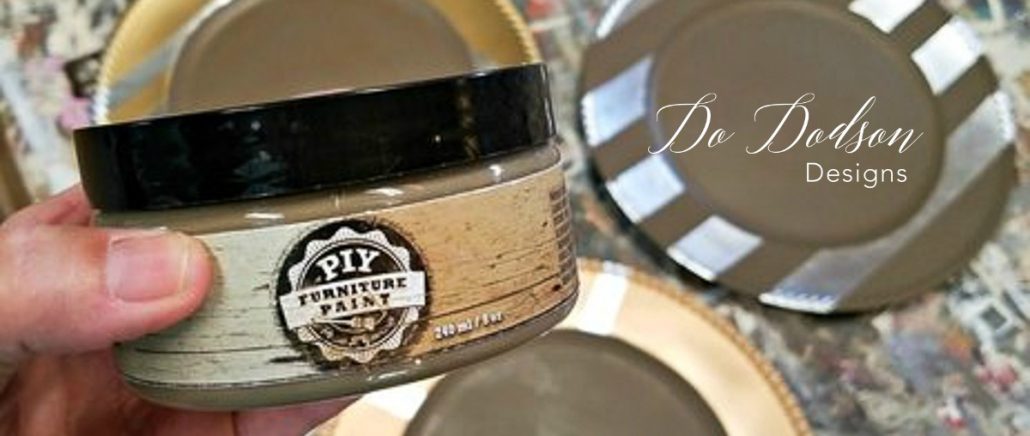
These chalkboard charges aren’t really going to be used as a chalkboard. It will just give the lettering a matte, chalkboard-like appearance and help them stand out.
I painted two coats of Burlap (a nice neutral color) and allowed ample drying time between coats. I let it sit overnight just to be sure that the paint was well cured.
Applying The Stencils To Your Chalkboard Decor
Afterward, I traced around my stencil (or you could do freehand) with a pencil.

Then, I used a black Blami Chalk Marker to fill in the letters. I prefer the liquid chalk markers to regular chalk sticks. The markers give you cleaner lines without smudging.

You’ll need a steady hand, so you may want to go light on the coffee the day of. Ha!

Hanging The Chalkboard Decor
You’ll need a hanger for the back of the chalkboard plates. Soft drink pull tabs work great!
I used E6000 crafter’s glue to attach them to the backs for hanging. Make sure the glue is completely dry before hanging because things could get messy!

“Do as I say, not as I do.”
And messy they did! I got in a big hurry to hang my plates on the wall and didn’t wait long enough for the glue on the back to dry. *insert broken heart* CRASH! Plastic chargers do break when dropped on a porcelain tile.

Chalkboard Wall Plate Decor
Fortunately, it was only one I had to replace. All was saved because I have 19 more charger plates to repurpose. It only took me a bit to create another one.
I love how they look over my pantry door in our kitchen.

Thanks for joining me today. I hope this DIY home decor wall project inspires you to look around and find items you can repurpose into amazing home decor on a budget, too.
If you loved this chalkboard decor project, go check out a project I did with Habitat for Humanity (CLICK HERE). It costs almost nothing to make!
Until the next project…
