Hey friends! Have you ever considered bleaching a wood dresser to achieve a brighter, lighter finish? It’s a popular wood finish that is trending in the furniture design industry, and I’m excited to try this new wood bleach kit.
Thanks to Dixie Belle Paint Co. for sponsoring this post. While I was compensated to write this post, all opinions are my own.
* As an Amazon Associate, I earn from qualifying purchases and through other companies as well. You will not be charged extra when you purchase through these affiliate links, but any income I make helps me create more amazing DIY projects to share with you! To see my full disclaimer, click here!
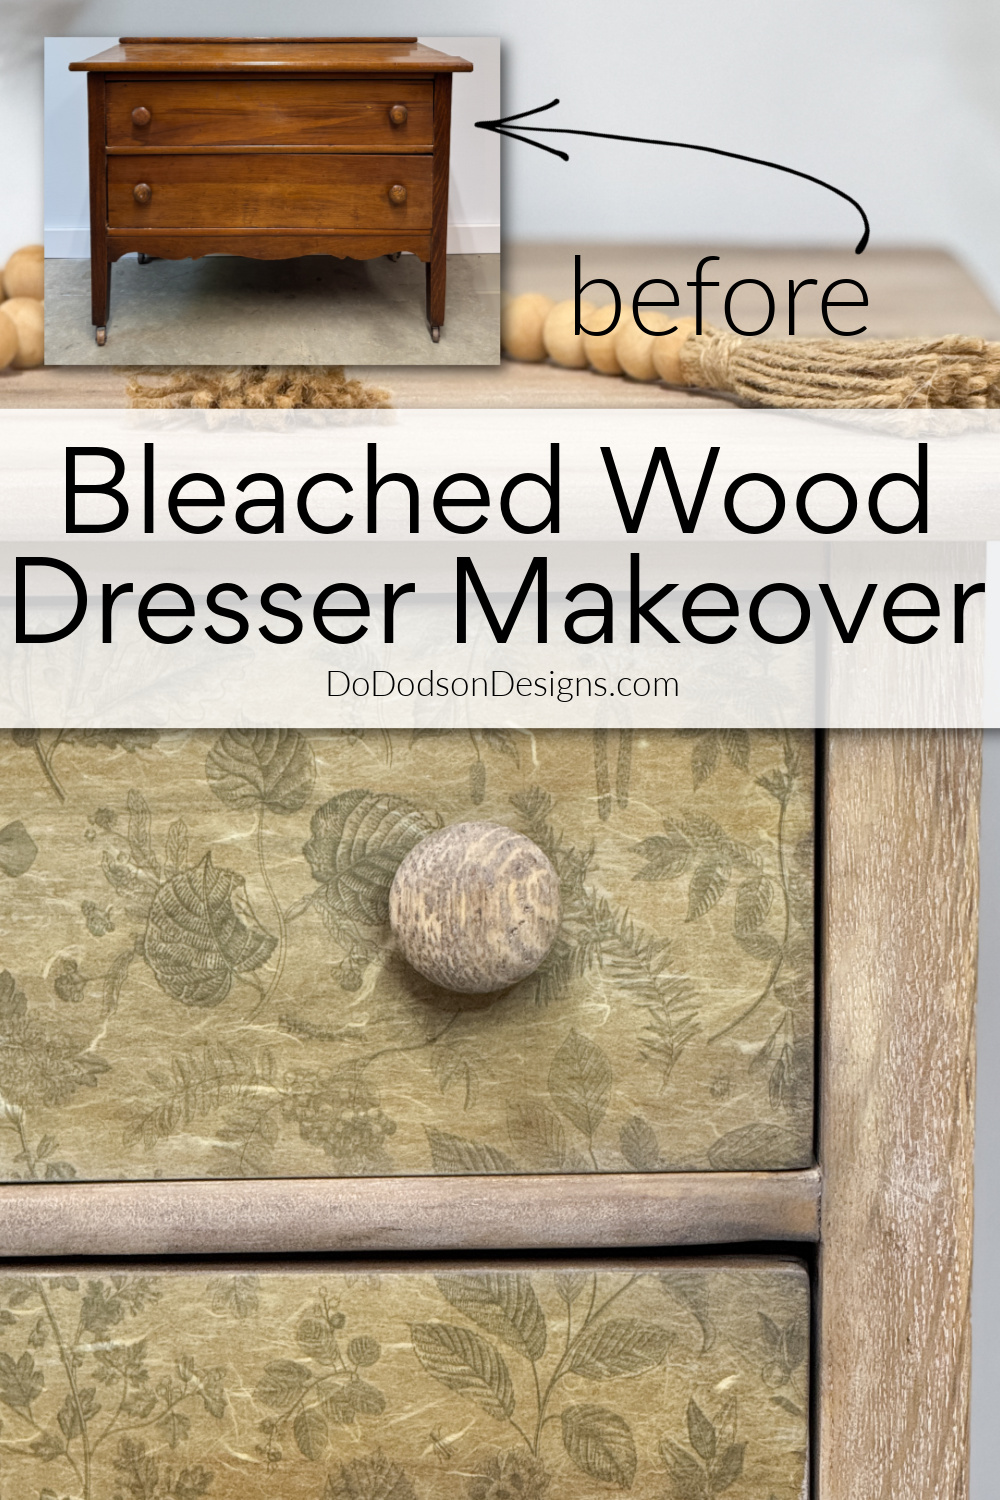
The Right Wood Dresser For Bleaching – Before
Bleaching wood isn’t too hard, but it can take a while, and the outcome might be different depending on the wood. But a bleached wood dresser really shows off the natural beauty underneath.
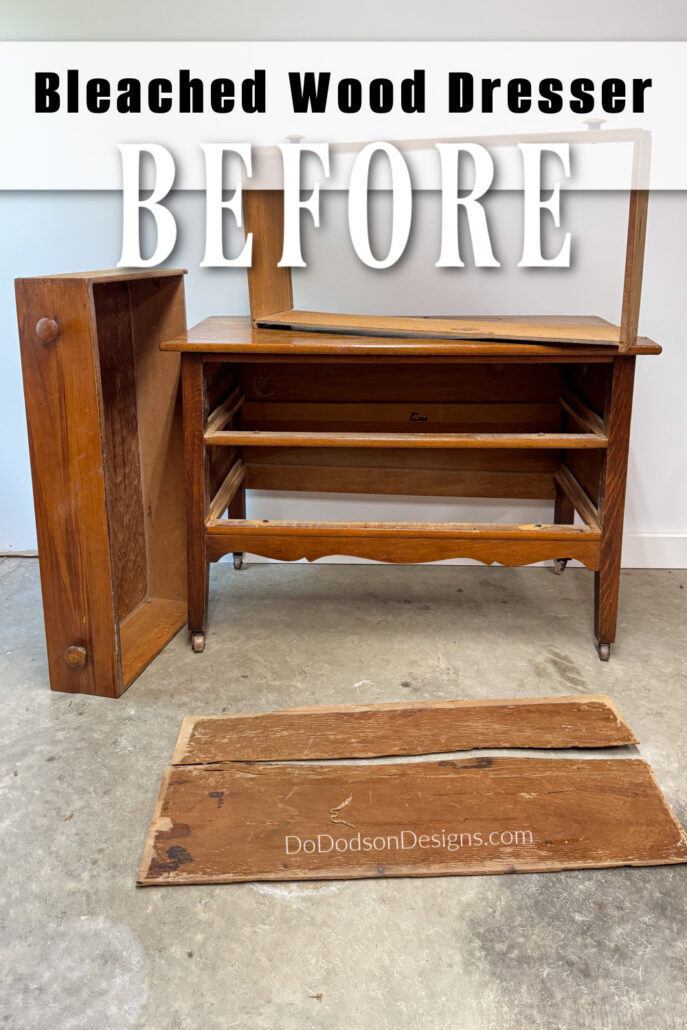
Today, I’m using a small dresser that belongs to my Mom. The wood dresser has several cigarette burns and numerous surface scratches and gouges on the top, a broken drawer bottom, as well as nail holes from previous repair attempts. That would be my Dad.
The wood is super blotchy with a yellow/orange tone, and I was hoping this wood bleach would tone that down and even out the finish for a beautiful bleached wood look.
It was a garage sale find from many years ago, on one of our frequent garage sales excursions. That’s probably why I love thrifting so much now; it’s in my blood. 😁 I also remember back in the day when Goodwill was actually good, and I loved playing in the clothes bins while Mom shopped for treasures. Those were some great memories.
Like so many of my thrifted finds, this little dresser needed a little TLC, so I’m also sharing how I replaced the broken drawer bottom, too. It was super easy!
Oh, and Mom said I could do whatever I wanted to this dresser. That’s what I’m talking about. Let’s go! Transforming it into a bleached wood dresser is going to be fun.
Love the idea of bleaching? Here are some other projects that you may enjoy.

SUPPLY LIST:
Here are the supplies you will need to bleach a wood dresser.
- wood dresser or wood furniture
- wood sander
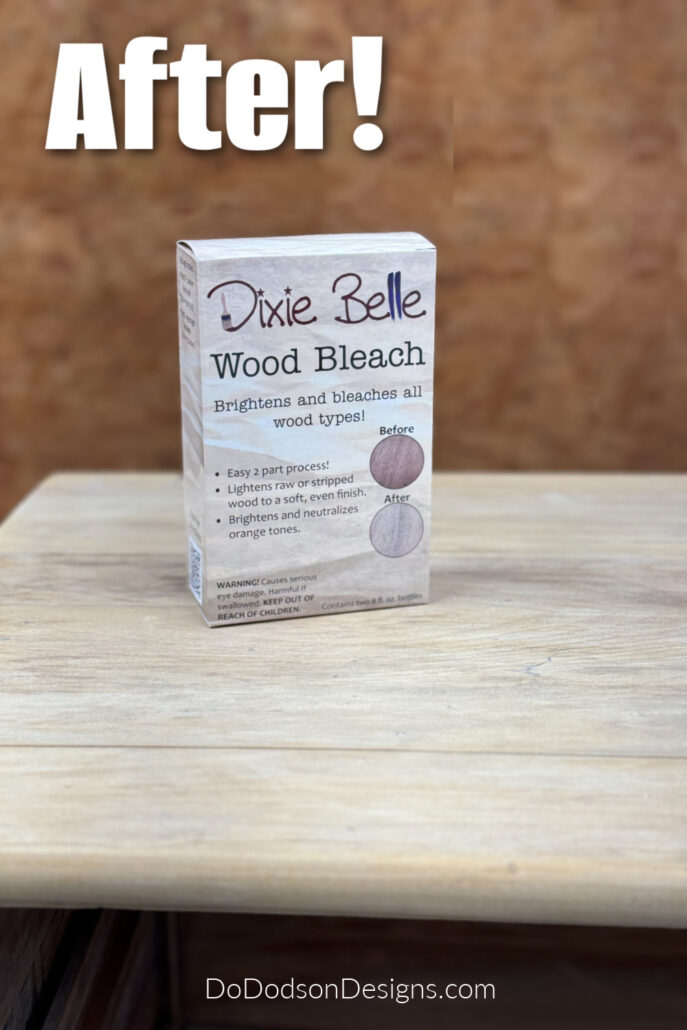
- Wood Bleach Kit
- sanding sponges
- Clear Coat Satin Finish (for decoupage)
- synthetic paintbrush
- Dainty Botanical Rice Decoupage Paper (2 sheets)
- Best Dang Wax – White
- Best Dang Wax – Black
- Best Dang Wax Brush
- French Tip Brush Dixie Belle
DRESSER DRAWER REPAIR:
- 1/4 inch plywood
- pencil
- table saw or circular saw
- wood glue
- woodworking clamps
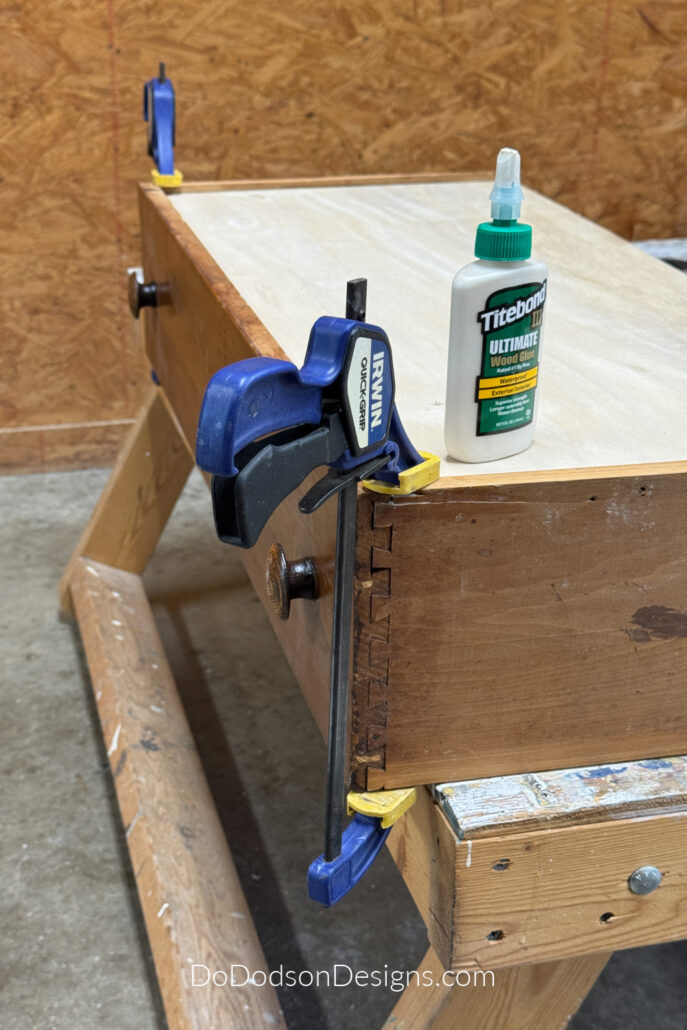
How To Replace A Broken Drawer Bottom
Seriously, if I got a nickel for every busted drawer bottom I’ve seen, I’d be swimming in money!
The great thing is, most of ’em are easy fixes! The secret is to take out the old, broken piece and use it as your guide. Getting that bottom out is the tricky bit, though.
The drawer bottom slides in from the back, and it’s usually held on with nails or glue. To remove it, pull out any nails and give it a gentle wiggle. Hopefully it will come right out!
If you’re lucky enough to get it out in one or two pieces, the old one can be your template! Just grab some 1/4-inch plywood and cut it to the same size.
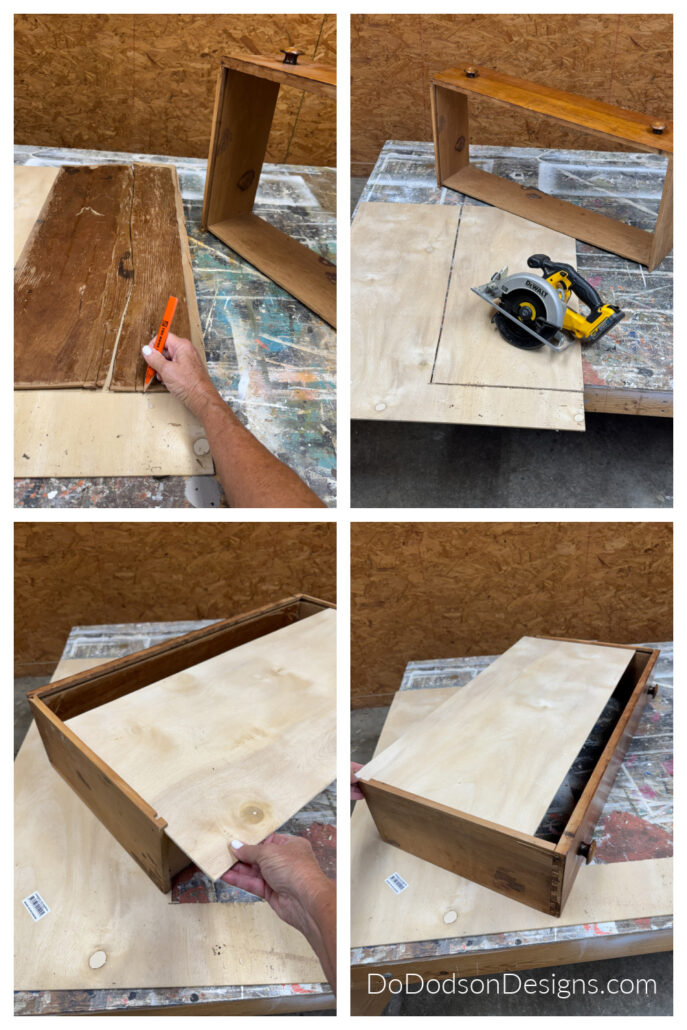
Next, apply some wood glue to the drawer guides and then slide in the new bottom.
I always test out the replacement piece before gluing to make sure it’s a perfect fit.
Just clamp it down good and tight until the glue sets!
And while you’re in there, take a peek at the rest of the drawer, especially the dovetail joints – they might need a little glueing too.
Removing The Old Finish To Bare Wood – 2 Methods
You must remove the existing finish before bleaching wood, and I see two ways I can approach getting this task done.
#1 Use a chemical stripper to remove the existing finish. It’s a messy process and requires protective equipment—a mask, gloves, and eyewear. Also, you will need to be in a well-ventilated area or do it outside.
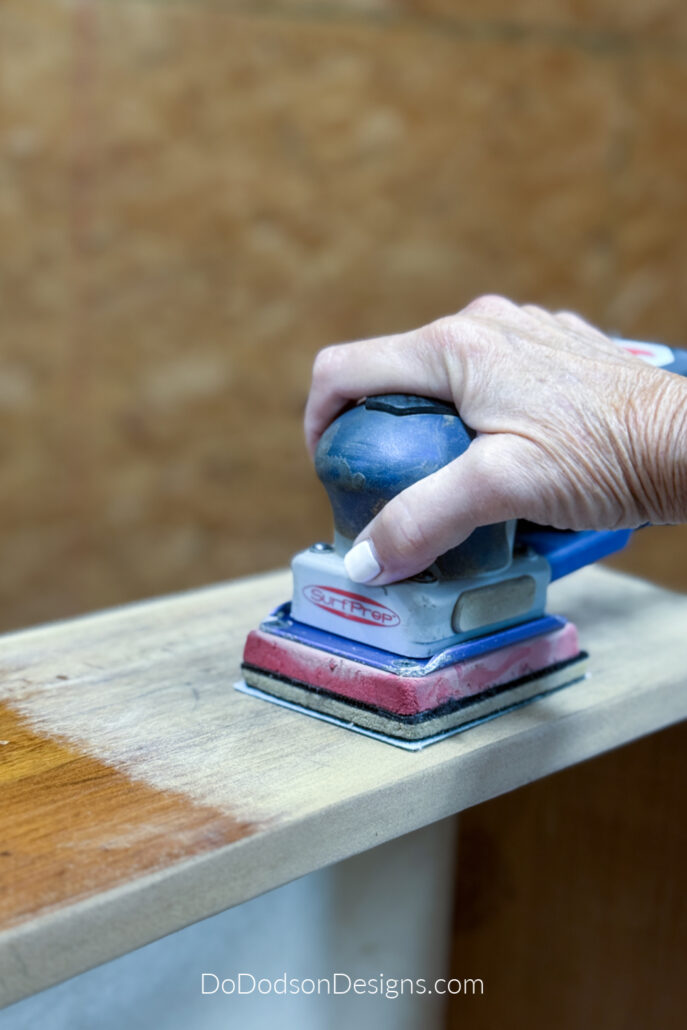
#2 Rip the existing finish off with a sander if the existing finish is old and dry. This is my preferred method. Yes, it can be messy too, but very effective if you want a raw wood finish and no chemicals.
I start with a 100-grit abrasive to strip away the first layer. This method is excellent for pieces with extensive surface damage, where you want to remove as much as possible.
Next, use 180 grit, and then 220 grit for the final sanding to get a smooth wood surface.
There are many wood sanders on the market, and I’ve gone through my fair share. Seven years ago, I started using the SurfPrep sander with a vacuum attachment that allows me to sand indoors. Game changer! It’s an investment, but if you use a sander often, it’s worth the money. CLICK HERE if you want to learn more about my preferred sander.
Bleaching Wood On A Dresser | Two-Part Method
After I sanded down to bare wood, the dresser top had a lot of dark patches—possibly stains from years of neglect. This will be a good test on this dresser to see if the wood bleach can lighten those spots, too.
Remove any wood dust left over from the sanding. I used my shop vac to make sure it was clean.
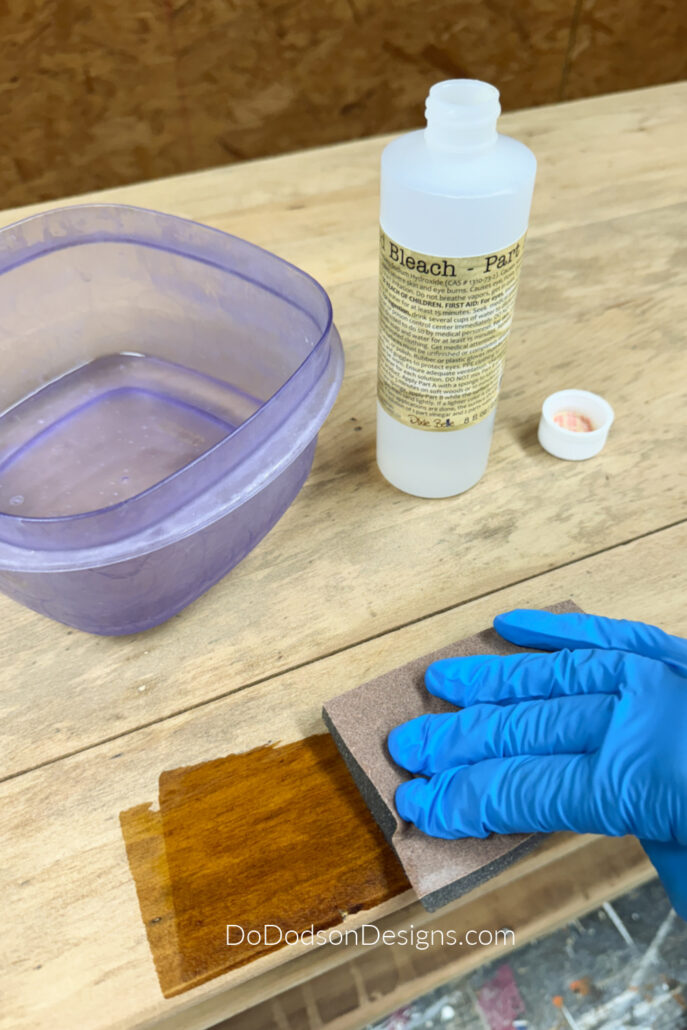
STEP 1:
Wear protective equipment! Gloves and protective eyewear. Work in a well-ventilated area. Follow the directions on the bottle for best results.
Pour the solution of Part A into a bowl. Using a sponge, apply it to the wood, making sure to cover it completely.
You will immediately notice that the wood will turn a darker color. That is normal. Allow the solution to soak into the wood for 5-10 minutes, but do not allow it to dry. It needs to be wet to work..
STEP 2:
Pour the solution of Part B into a clean separate bowl. Do not mix the two parts. While the wood is still wet from Part A, apply Part B over Part A with a clean sponge in the same manner.
I noticed Part B started bubbling right away. I wasn’t sure if this was normal, so I did some research and found that it is normal, but it doesn’t happen to all wood. When bleaching wood furniture, specifically with a two-part bleach, some foaming is expected as part of the chemical reaction.
Leave the product on overnight and allow it to dry.
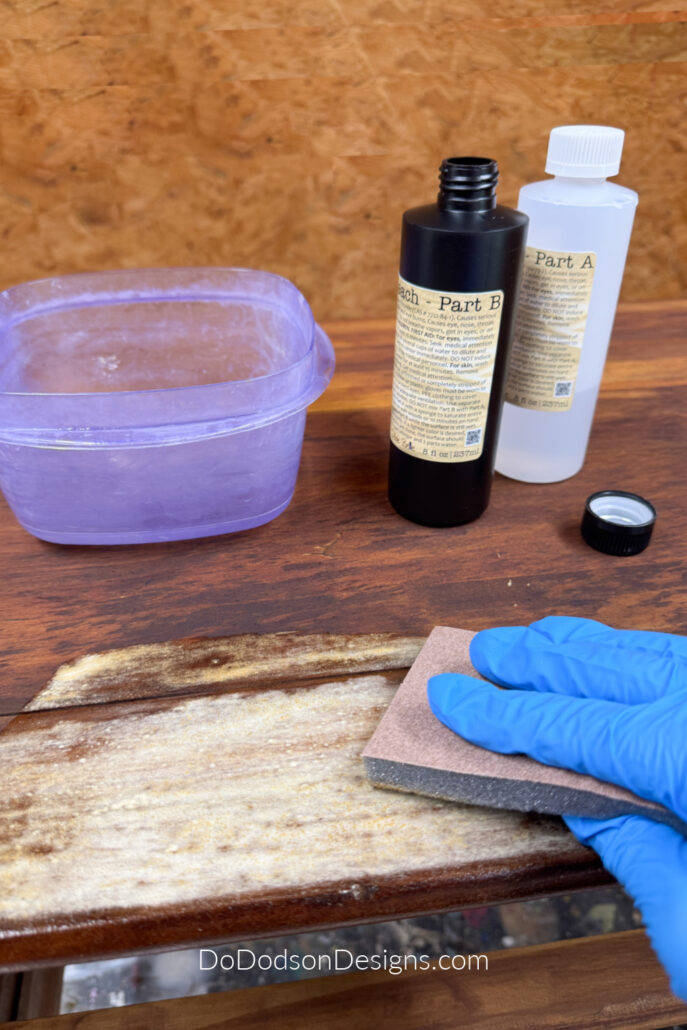
The next day, I noticed some lightening of the wood but not a lot. However, I did notice that the wood tone had improved and the dark blotches on the dresser top had lightened significantly. This product can be applied a second time for lighter results.
There was noticeable grain swelling (opening) of the wood from the product. This, too, is normal. The wood grain will swell and open up when it becomes saturated with water or water-based products.
To bring the wood back to a smooth state and to close the grain, I used a 220-grit sandpaper and lightly sanded the surface smooth again. This is when I noticed that the wood had lightened even more.
How To Decoupage Furniture With Rice Paper
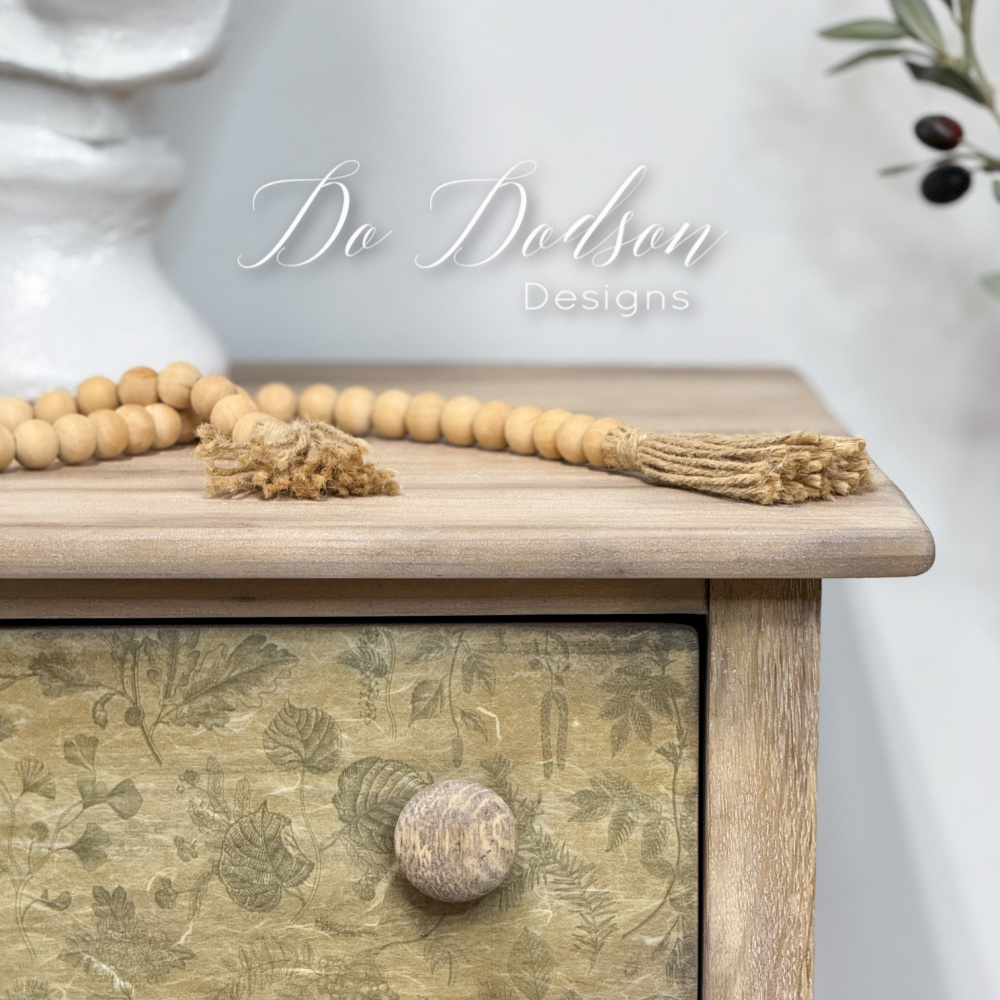
Now that the wood bleaching is complete, I decided to add a beautiful rice decoupage paper to the fronts of the dresser drawers using Dixie Belle’s Clear Coat as my decoupage glue.
I wasn’t sure how this was going to turn out (I never really do), but I knew that if I used a water-based top coat, it would bring some wood tannins to the surface of the drawers. Usually, that’s a bad thing, but this rice paper is thin, and I was hoping that the wood would be visible through the paper, and I was right!
I applied one coat of the clear coat (satin finish) over both drawers and allowed it to dry.
Next, I applied the second coat liberally, making sure to add more to the edges so the paper would adhere well.
I lined up both drawers (in the same order as they were in the dresser), one on top of the other, to avoid wasting the paper. Starting from the middle of the drawers, I laid the paper across half of both drawers. Once attached to the drawer, I applied a clear coat on top of the paper. Using my fingertips, I smoothed any bubbles or wrinkles on the paper.
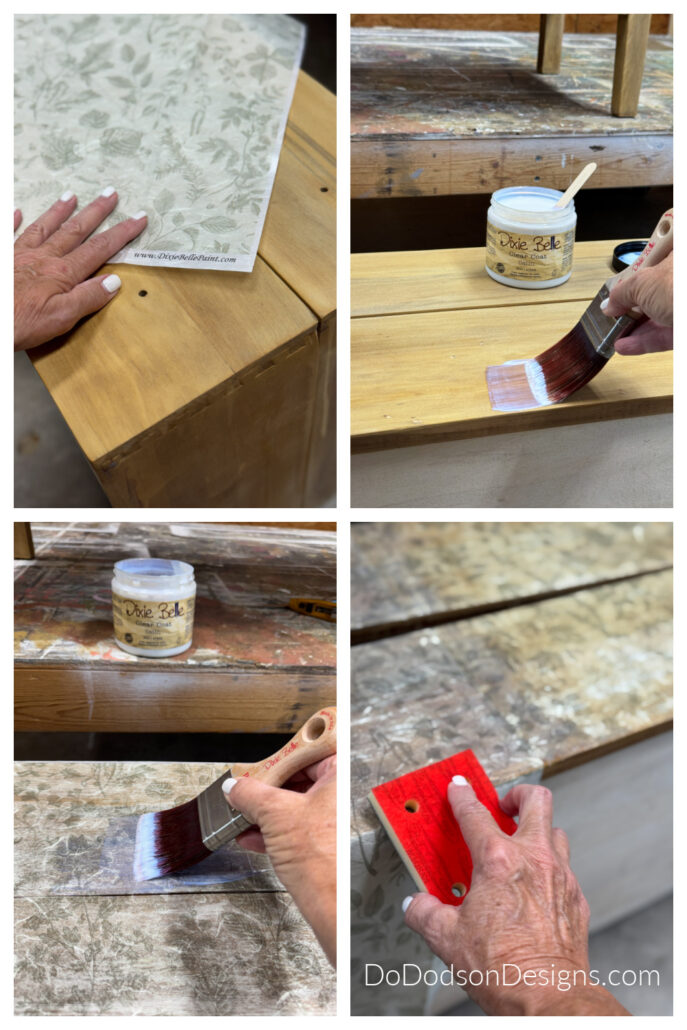
While the paper was still wet, I used a sanding block to gently rub along the edges to trim the paper around the drawers for a perfect fit. I used an exacto knife to cut the paper between the two drawers.
After the top coat had dried, I applied one final clear coat to seal the paper.
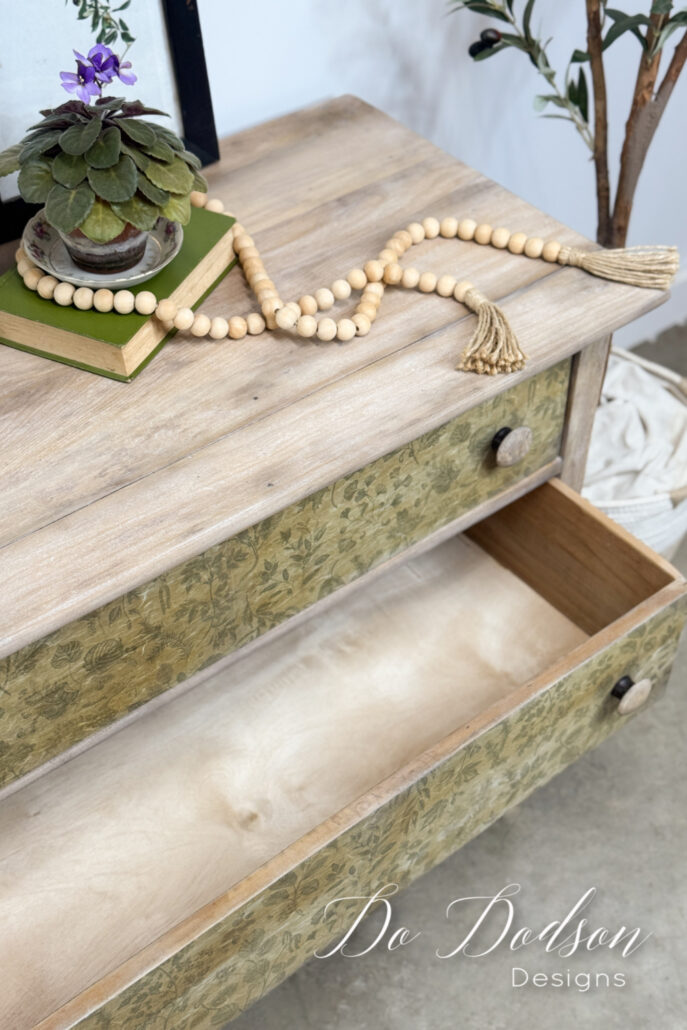
It was easy to line up the pattern on the paper, and I had paper left over for another project. I used two sheets of the Daintily Botanical Decopage Rice paper for this project.
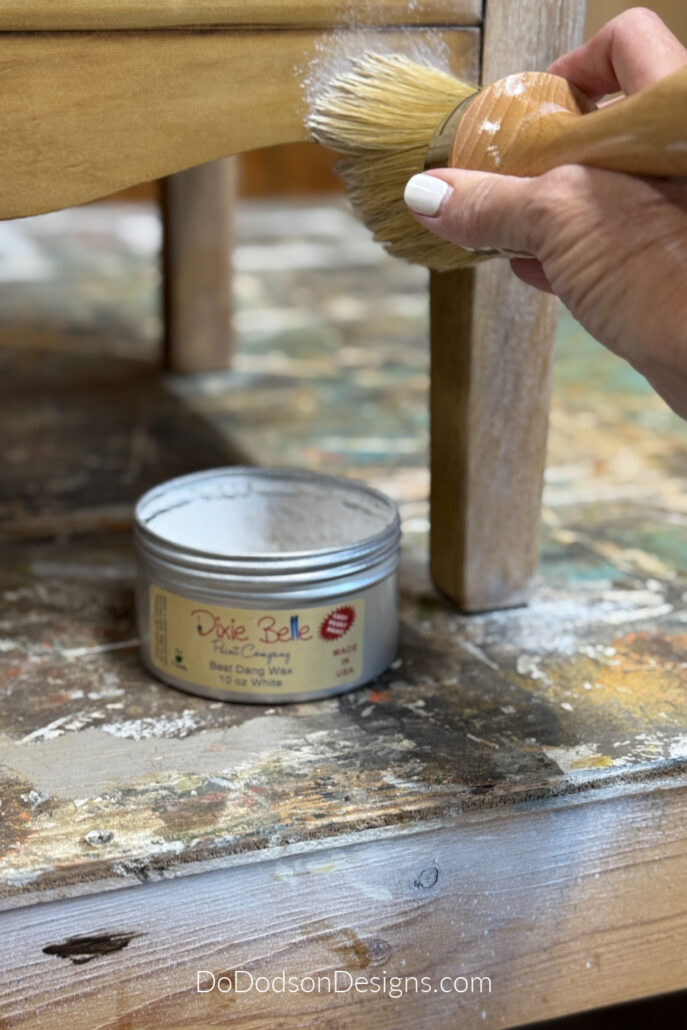
Bleached Wood Dresser With White Wax
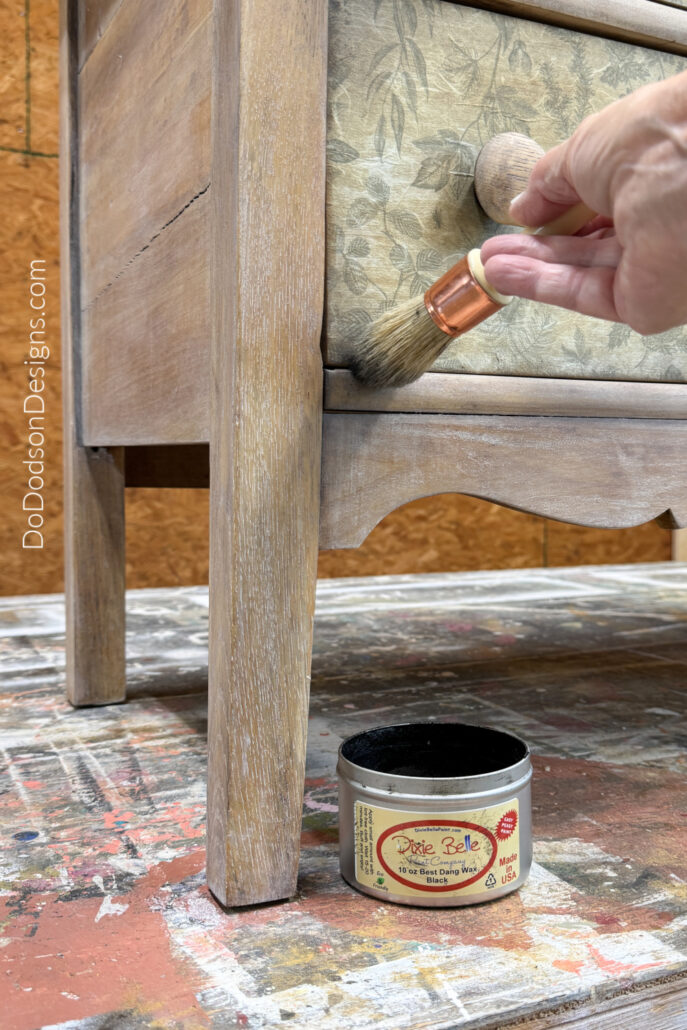
To seal the bleached wood dresser, I used Dixie Belle’s Best Dang Wax in white. It’s easy to apply.
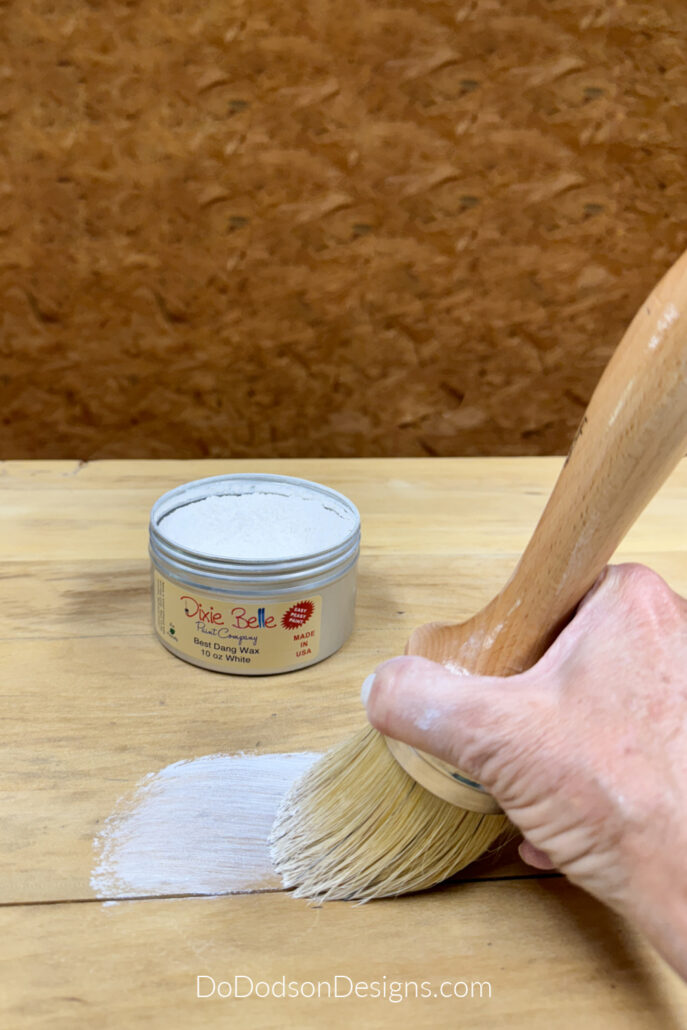
Grab a wax brush and apply it in a circular motion, making sure the wax penetrates deep into the wood grain. Working in small sections is best. Immediately buff any additional wax away with a soft cotton cloth for a buttery smooth finish.
Nothing feels better in my honest opinion than wax over bare wood. If you know, you know.
Lastly, I added touches of black wax in the corners and areas where I wanted it to look a bit dirty and worn.
If you need extra protection on the dresser top, after the wax has fully cured, you can apply a topcoat over it. The wax is a water-based product and is formulated to work with Dixie Belle top coats.
DIY Bleached Wood Dresser Makeover AFTER!
It’s vintage perfection! The bleached wood and the vintage rice paper worked so well together on this little dresser. Don’t you think?

Check out the new drawer bottom! I also added wax to the bottom of the drawers to make the drawers slide like butter. It’s like a new/old dresser.

Hey, thanks for joining me today, and I hope you enjoyed my beached dresser makeover. I always enjoy trying out new products. I try not to stress about the outcome, and usually it all works out. It’s how we learn.
Don’t forget to PIN and share this DIY project with your DIY bestie and let me know you stopped by. I always love hearing from you and what your thoughts are on this project in the comment section below.
Until the next project… xo, Do
Another beautiful project, my sweet friend! Nicely done and I enjoyed the read, very engaging.
Thanks, Wendy!
I’m not quite sure where I’m going to put it yet. Perhaps my office. My office has green accents. Have a wonderful day.
Magnificent makeover Do! 😃 I love the light-bleached wood look and the decoupage paper looks sooooo good! Pinned XOXO
Thanks, Denise.
That’s a lot coming from. I always appreciate your kind words and support. The bleach was fun to work with.
Have a beautiful day 😘
WOWSERS! One of my Favorites! Love wood grain and appreciate projects that let it steal the show. The rice paper was a perfect choice as it did allow the grain to show. Was not aware of rice paper. THANKS for sharing and bringing rice paper into my crafting world
Hi Janice.
It’s good to hear from you. Yes! The rice paper is so fun to work with. I’m glad you enjoyed this one. I’m pretty happy with it too. Have a nice day. 😘
Love it Do! You are so talented😊 Thank you for the step by step instructions. It looks beautiful. I love your weekly newsletter and look forward to it👍
Hi Lisa! It’s always good to hear from my readers. It ket’s me know I’m giving you want you want. I appreciate the kind words. Have a beautiful day. 😘
STUNNING!!
Thank you! It was fun to see the transformation. Have a nice day. 😘
Hi Donna! I love this tutorial. I didn’t even know Dixie Belle sold the Bleach kit. Thats how long I have been out of the furniture business. I have 2 or 3 of these oak dressers and I think I just might try this. I love the paper as well. Great makeover and great tutorial! Thank you!
Thanks, Cheryl! Yes, it’s new and it’s was my the first attempt. I’d like to try it again on different wood. I’m glad you enjoyed this. 🙂