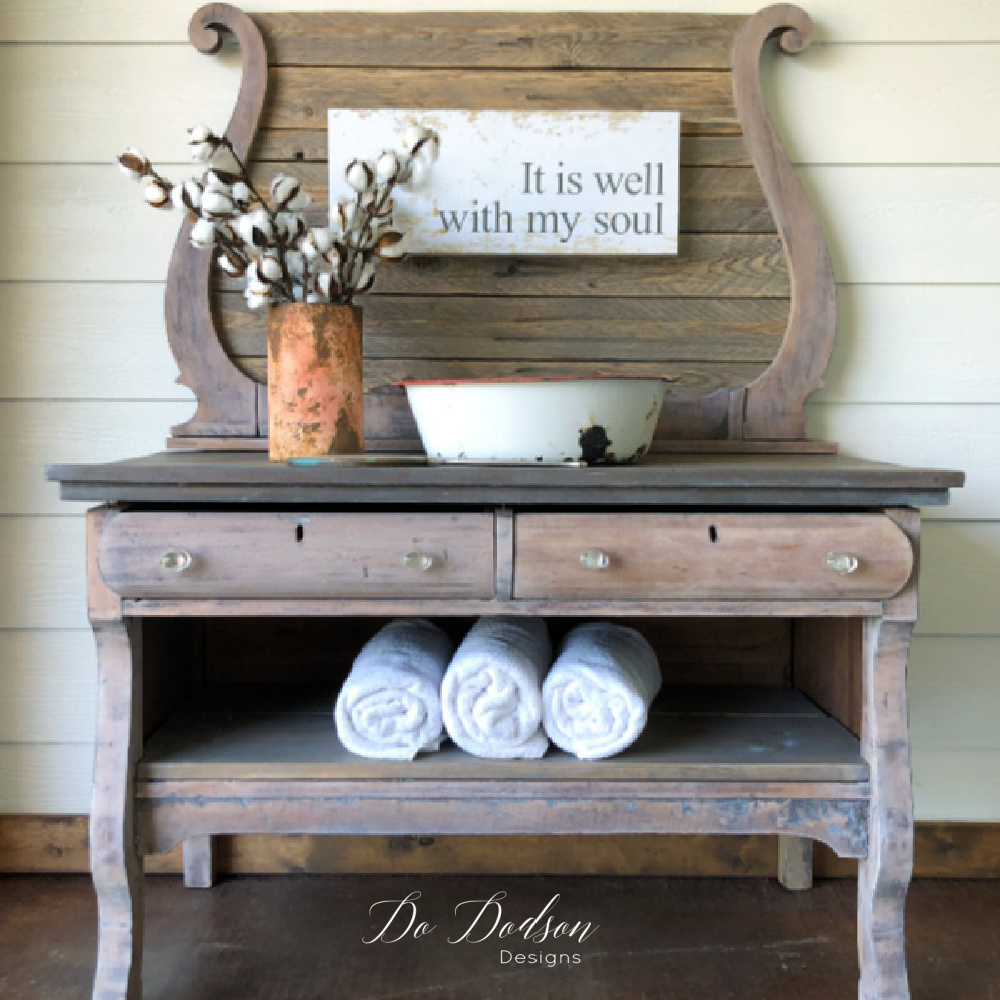
What would you say if I told you that white wax created this whitewashed look on my antique dresser in one easy step? I was totally shocked at the results. Read on…
This post contains a few affiliate links to help you find the products I use. You are not charged extra to use any of the links, but any income I make will be used for more fun projects! To see my full disclaimer, click here.
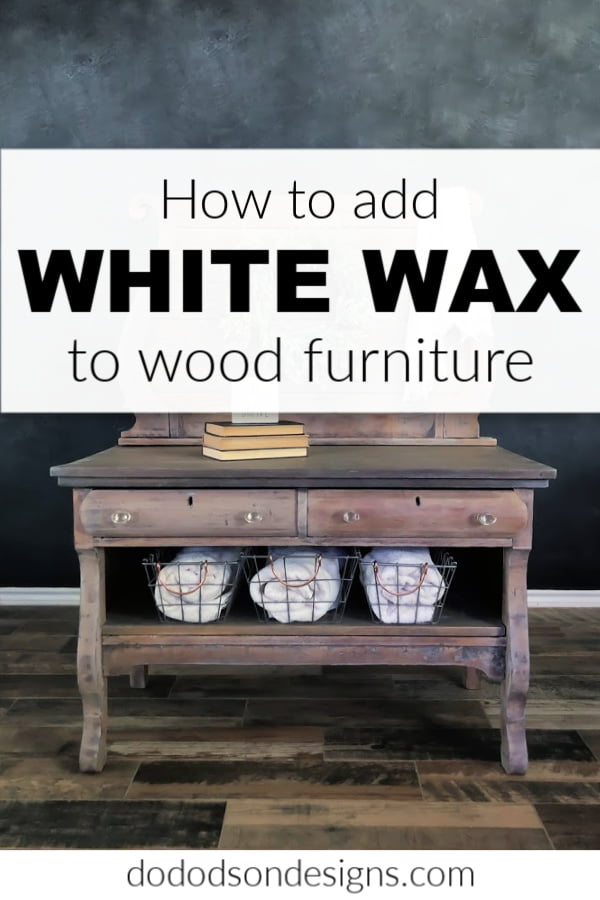
How To Easily Apply White Wax On Furniture
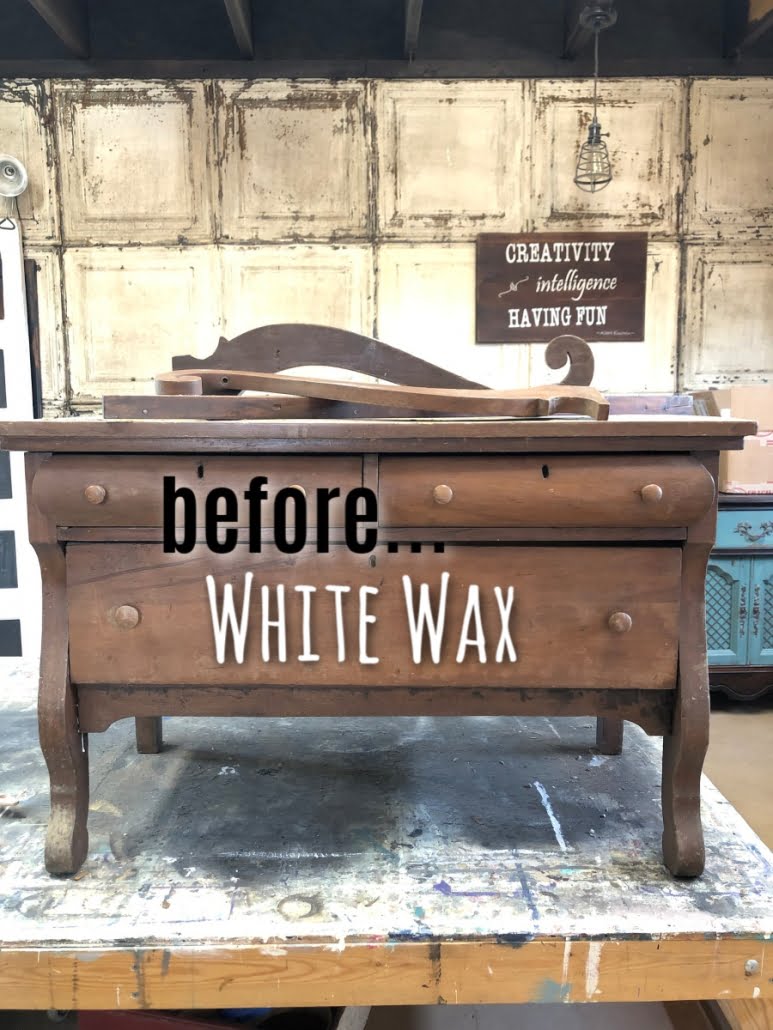
I thought long and hard before I started this one. This dresser was given to me by a local lady that had been disabled from Lupus. We share the love of making old new again. The day she reached out to me to see if I could do something to save it, I was overwhelmed that she wanted to give it to me, and I had a hard time taking it without some kind of trade. All she wanted was for it to be beautiful again. It had been sitting in her barn for 10 years, and I knew before I even picked it up there would be many issues. The words she spoke to me that day I’ll never forget. “I just know you can make it beautiful again.” It would be a challenge!

Product List:
- Antique Dresser
- Orbital Sander
- 180 grit sandpaper
- 220 grit sandpaper
- Denatured Alcohol and water (1:1 ratio)
- Spray bottle (alcohol and water container)
- soft cotton cloth
- Wagner Heat Gun
- Paint scraper for wood
- Hammer
- Wax Brush
- White Wax (Dixie Belle)
Removing The Old Varnish
First of all, remove the old varnish from the wood to expose the raw wood. I used the Orbital Sander. This made the job quick and easy. I started with 180 grit sandpaper and finished with 220 grit sandpaper. Because the antique dresser had been sitting in a barn exposed to extreme temperatures, the finish had become old and almost powdery. Looking back, I am pretty sure it was easy because my sweet rescue pup “Bud” was helping me. Furniture licking is a thing you know. 🙂

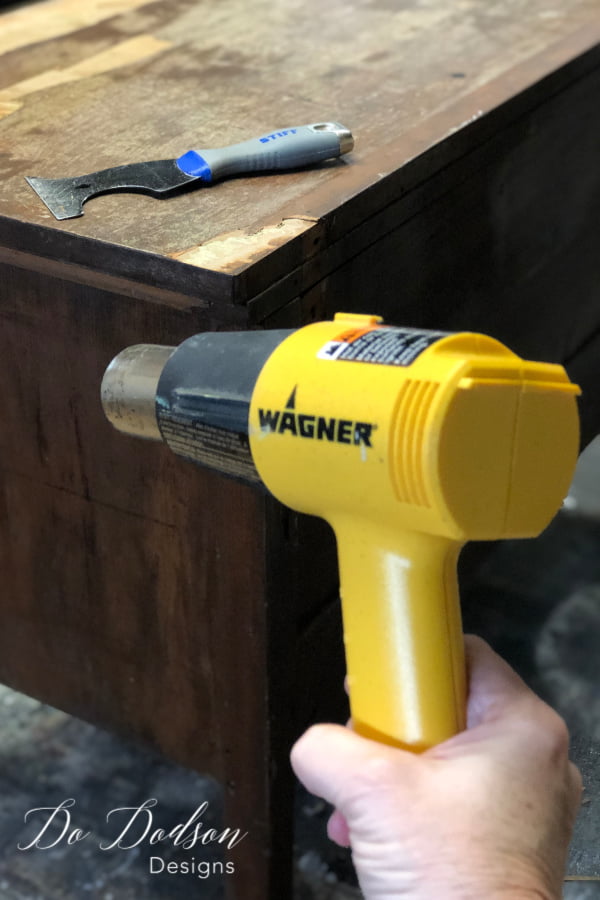
Removing the Damaged Veneer Before Using White Wax
Now the hard part. This is where Bud took a nap, and I called in the big guns for some help. Thanks to Mr. Honey Do for rescuing me because I get stuck from time to time. It seems like the right thing to do. *wink
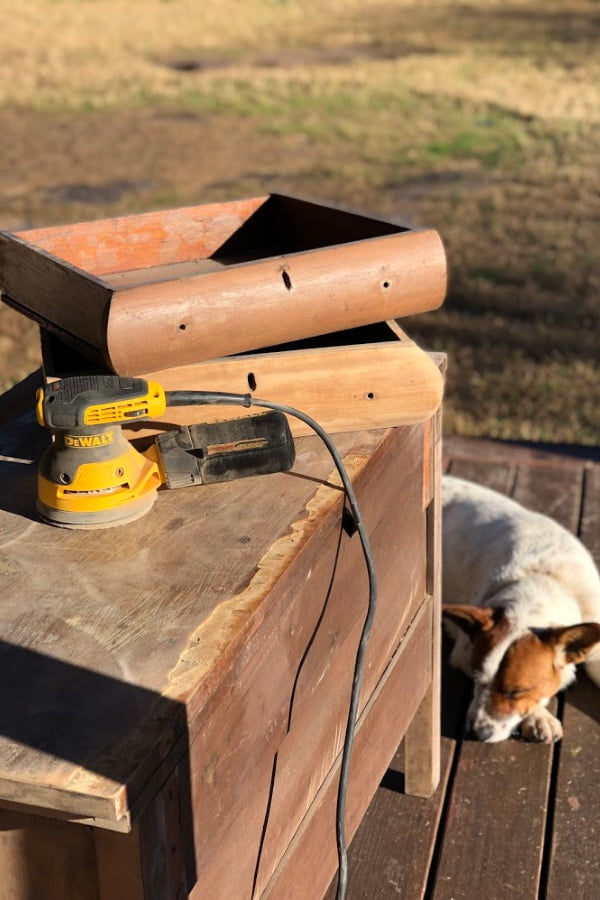
A heat gun to loosen up the veneer, and the rest was just sheer muscle work. Then I used a hammer and paint scraper to pry the veneer away from the top of the dresser. It always amazes me that they cover up beautiful wood with veneer. Whew! Now for the fun part… white wax!
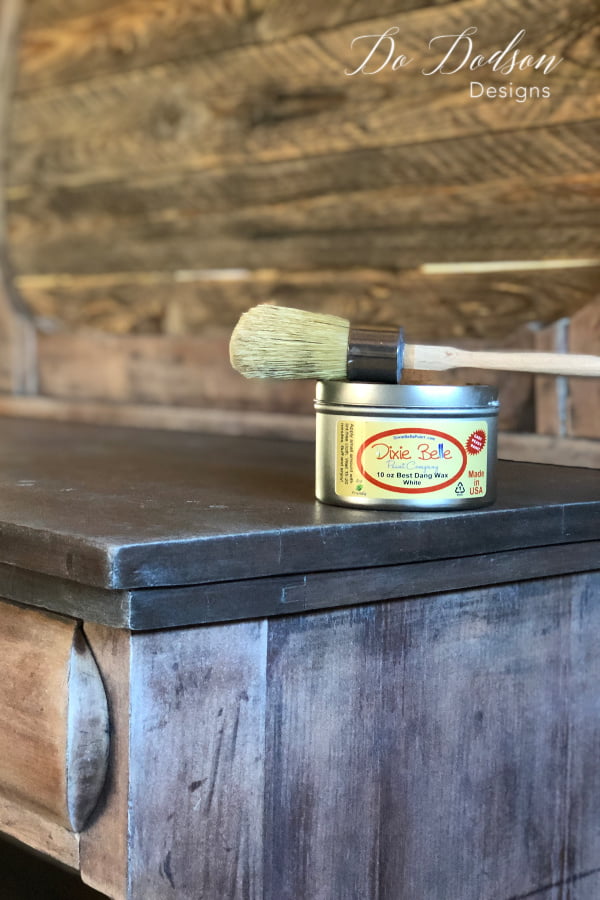
Applying White Wax
Most importantly, before applying white wax, clean the raw wood with a 50/50 solution of denatured alcohol and water because a dirty piece of furniture and white wax don’t mix well. For that reason, I carefully clean it first.
The next part of the makeover was so quick and easy it blew my mind! Using long strokes working with the wood grain, I applied a thin even layer of the white wax with a wax brush over the raw wood, making sure to work it in all the cracks and gaps. Again, I used long, smooth strokes to ensure even coverage.

I allowed the white wax to dry for about 30 minutes and buffed it with a soft white cloth. The preparation of the wood was the hardest part of this makeover. Look how gorgeous this is!
White Wax Instead Of Whitewash
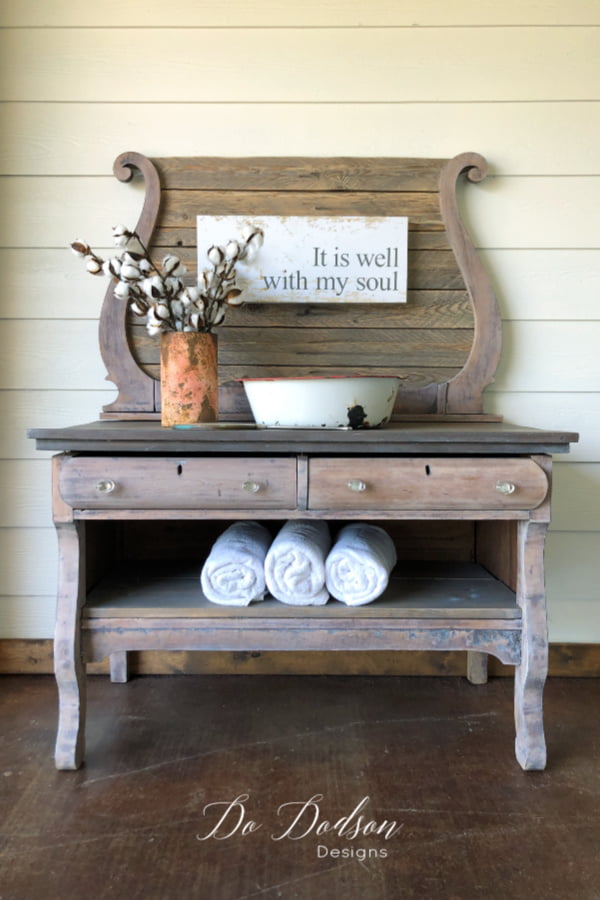
I hope this has inspired you to try white wax on your wood furniture makeovers. It’s so much easier than that messy whitewash. I like EASY PEASY!
What do you think about this makeover? I’d love to hear your feedback. Please drop me a comment below or just let me know you stopped by.
Until the next project… xo, Do

Hi Donna, the lady was right to trust you, only you could bring this piece to life again. What a awesome work you did with this dresser. Wish you a wonderful 2019!
Awe thank you Val! I really enjoy my work. Happy New Year to you and yours. 🙂
I couldn’t get any sound on your video, thank you for your tutorials, I love them!
Hi Michelle! Sorry you’re having trouble. I went back and checked them and they’re working for me. Hopefully it was a temporary glitch. Thanks for looking out for me. Happy New Year! 🙂
Did you use any other products on this piece or only white wax? I’m amazed at this transformation without the use of paint or stain. ?
Hi Regina, just the white wax. I know, I was very pleased at the look. No more messy whitewash and stains to get this look. So glad you enjoyed it.
Could this white wax be used over the grout on a fireplace? Ours is black and want it from a gray to white color.
Hi Kelly! I would not use it on grout. They make a grout paint. Try doing an Amazon search. Hope this helps.
xo Do
I love your finished product!!
Did you take all of the laminate off or just the corner piece that was chipped? I have a similar piece of furniture that has a chip on the corner. Not sure how to go about making it smooth before starting this project.
Thanks for your advice.
Yes Peg, I removed all the veneer down to the wood. The wood was beautiful. Funny how they always covered it up. I guess that was the style back them. 🙂
What if anything did you do to the bottom part? Would this also work with dark wood? Tnx.
Hi Kathy! Thanks for stopping by. The bottom was also waxed with the white. This was the finish over the whole piece. You absolutely could do this with Dixie Belle Dark wax. I prefer their waxes because it’s water based and can be painted over later unlike other waxes on the market. Hope this helps. 🙂
xo, Do
It’s fantastic! I love it and I’ll bet the lady who gave it to you would too.
Thanks Bliss! She did and I was so blessed to have her generous donation. Thanks for stopping by. Have a fantastic day and happy painting!
xo, Do ?
This turned out beautifully. Do you think it would work on previously painted furniture?
Hi Deb! I think you would have to strip the paint and go from there. If you have a great piece, it’s worth a try and I don’t see why not. Let me know how it works out. I’d love to see pics. Best wishes.
xo, Do
Would this wax work over chalk paint, to lighten the color a bit? Also, does it seal as well?
Hi Darla! Yes, it’s beautiful over any colored chalk mineral paint. I recently used it over blue and created a washed denim look. I have a video library of all of my finishes including the white wax. If you would like to learn more, I can give you all the details so you don’t miss a step by clicking here. https://bit.ly/2PC82xK
Happy painting!
xo, Do
What a beautiful story, and a beautiful turn out with the dresser!!
Thank you so much, Shelia! I hope you will revisit often for more DIY project inspiration. xo, Do
I can not believe that it looks that amazing with only white wax!! I have a piece waiting for me in the shop screaming for me to do just like this. I absolutely love it and I think you are amazing person and an amazing artist. Great job! By the way I’ve been binge watching all ur YT videos since I found you. You really are an amazing artist!♥️?
Thank you, Misty! I’m so glad to connect with you. I send out weekly newsletters full of info and sharing all my latest projects and business tips. Be sure to sign up if you wanna stay connected. Happy painting!
xo, Do
Beautiful outcome!
Thank you so much! xo, Do
Love LoVe Love! What did you use on the top surface after you removed veneer? Assuming you first sanded! Looks like black stain?
Hi Kayla! Thanks! Yes, after removing the veneer I sanded it clean down to the raw wood. I don’t remember the stain I used but I’m pretty sure it was General Finishes Java Gel stain It’s what I use most when I want a dark top on wood. I used the white wax on the top too (after a long dry time) but not as heavy. Just enough to give it the same look. While I love painting, not everything gets painted.
Happy painting 🙂
Beautiful work! I love that you just enhanced the natural finish to bring out the gorgeous wood’s potential. Keep up the great work!
Thank you, Caron! I love to preserve the wood when I can. 🙂
Hi Do, you have given me some hope for a missing mirror on an old dresser! I think I will use chicken wire on the old harp since that’s what I have. It was also given to me for free, but one of the bottom drawers has damage that will need to be bondod. I will paint it countryfied and use the chicken wire, thanks you saved me from buying another mirror for it! Happy Restorations!
Hi Lynette! I’m so happy this gave you the inspiration to save that old mirror frame. I believe there’s a purpose for all broken left-over pieces.
xo, Do 🙂
Hi, I have just now found you on pinterest and I was very impressed how your dresser turned out. It is beautiful. I have a question. I have a huge antique dinning room table that came with many leaves. After sanding they were different types of wood and we found out that it had veneer on top. Many bad places that we tried to use wood filler. (Not a good look). Could you tell me more about removing the veneer? I had never thought of that. I am a beginner but I loved the table legs and had to have it.
Hi Kim,
I have a video that explains how I remove veneer on my projects. Click here to learn more. https://dododsondesigns.com/transfers-for-furniture-floral-designs/
xo, Do
Im working on a antique dresser with my daughter. It is mahoghany and we wanted to do a bleach raw wood look with a little white wax added. SInce we have stripped it we have discovered that the front of the drawers is veneer and theres a few pieces missing and we are not sure that the raw wood look will work now. SO the question is if want to put some kind of finish coat on it and then white wax what would you suggest as a product for the finish coat
Hi Amy,
You will need to repair the missing venner first with a wood filler. If it’s a small area, try staining the wood filler once it’s dried with a water-based stain in a similar color to the wood. Or you could try removing the veneer to get down to the wood. That may be your best bet.
If you just want to finish it, I would use white wax first and then a topcoat. But not just any ole topcoat. It needs to be waterbased so the wax and topcoat work together. Dixie Belle Wax is waterbased and can be used before a topcoat. I would recommend using Gator Hide as a topcoat. I hope this helps.
xo, Do
Donna,
It turned out GORGEOUS!!! I have a question.. I am refinishing an Ethan Allen solid wood shaker style desk. I’ve stripped the wood and was going to leave it 100% natural and just seal it with Dixie Paints Gator Hide… but I am afraid just sealing it will bring out the red undertones of the wood. I want something light and have thought about using white wax as you’ve done with this piece.. Would you recommend sealing with gator hide after applying the white wax?
Hi Sharon! Thank you!
Yes, the best way I have found is to use white wax over the raw wood. Keep in mind that if you have any red stain in the wood, it may have a pink hue. I would try a small spot on the back or side first. The wax is a sealer but I would use Gator Hide on the top only. Be sure to let the wax cure completely. I’m talking 2 weeks before using the gator hide. It’s better to be safe than sorry. I just know it’s going to be amazing! I’m just finishing up another natural wood piece today. It will be my next blog post so check back or subscribe to my weekly email so you don’t miss a project. Please share it with me after it’s complete. I’m excited to see it. xo 🙂
I have my great grandmothers platform rocker which I refinished 30 years ago with stain and oil varnish, it is still good. I’m reupholstering it and am think about putting a white wax over the varnish for a new look. Would that work or would the wax not stick to the varnish?
Hi Kay,
The wax is designed to be used over a porous surface… like chalk paint or raw wood. I would not recommend using it over varnish. You would need to stripe the piece first.
Good luck with your project. Sounds like a fun makeover. 🙂 xo, Do
Hi Donna
Wondering if the gator sealer w/ out the white wax will still bring forth those warm red tones?
I understand the white wax use ;but is there anything to use aline that keeps the piece bleached out?
Everything I have tried ( plain wax and satin sealers makes it darker and warmer !
Just want
To maintain that bleach look
Thanks
Hi Dinna,
You can also do a paint wash. Use a light color and dilute the paint with water. I’ve done this technique a lot; it works well and helps tone down the colors in the wood. I wrote a blog post using a color wash on bare wood. I hope this helps. https://www.dododsondesigns.com/dresser-redo-before-and-after/
Good luck with your project. 🙂 xo