

Hey everyone! I’m kicking off the DIY holiday season with these easy wood Christmas trees. They’re simple to make and will totally add a touch of charm to your rustic farmhouse holiday decor!
Thanks to Dixie Belle Paint Co. for sponsoring this post. While I was compensated to write this post, all opinions are my own.
* As an Amazon Associate, I earn from qualifying purchases and through other companies as well. You will not be charged extra when you purchase through these affiliate links, but any income I make helps me create more amazing DIY projects to share with you! To see my full disclaimer, click here!
DIY Wood Christmas Trees (Tabletop Version)
I’m starting my Christmas projects early this year. Yeah, the holiday season had to start for me because I’ve got tons of awesome DIY scrap wood decor ideas I want to share! You know I can’t help myself, but I have a feeling if you’re reading this, you’re here for it.
My idea was to build tabletop wood trees that can be used year after year. By “tabletop,” I mean on the dining room table, mantle, shelves, coffee table, kitchen island, or bedside table – you get the idea!
Timeless, neutral holiday decor that will also blend in with a new color scheme if I change my mind next year, or the year after that.🎄
Without further ado, let’s get this DIY scrap wood party started.

SUPPLY LIST:
Here is what you’ll need to create these DIY wooden Christmas trees.
- scrap wood 3.5 in fence pickets or 1X4 lumber
- miter saw
- tape measure
- carpenter pencil
- wood sander or sanding blocks 220-grit abrasive
- wood glue
- Brad nailer or hammer and nails
- Elderflower SILK All-In-One Mineral Paint
- Fireside Ash VOODOO Gel Stain
- synthetic paintbrush Mini Angle 2 inch
- painter’s tape
Gather Scrap Wood/Fence Pickets
Before you get started, make sure your wood isn’t damaged and is pretty straight. It’s important to pick your wood carefully when making mitered cuts!
When you’re cutting and connecting the mitered pieces, remember that if your board is cupped or warped, the connection won’t look good. A little gap in the connection doesn’t bother me, but some of you may be perfectionists, and that’s totally okay. You do you!
You can also use wood filler if you plan on painting them.
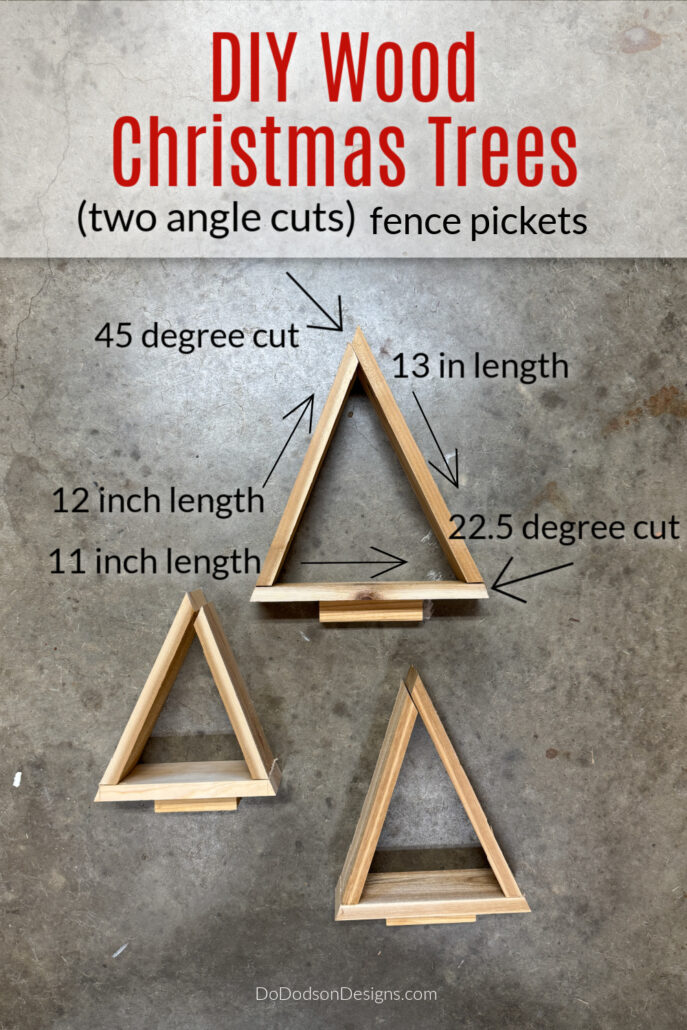
Dimensions For DIY Wood Christmas Trees
I’m a visual learner, like a lot of creatives, so the best way I know to teach is the way I learn: by show. For beginner woodworkers, this can be extremely helpful.
Large (13 in, 12 in, 11 in), Medium (11 in, 10 in, 9 in), Small (9.5 in, 8.5 in, 8.25 in)
The Christmas tree top is cut at a 45-degree angle, with the bottom piece cut at a 22.5-degree angle.
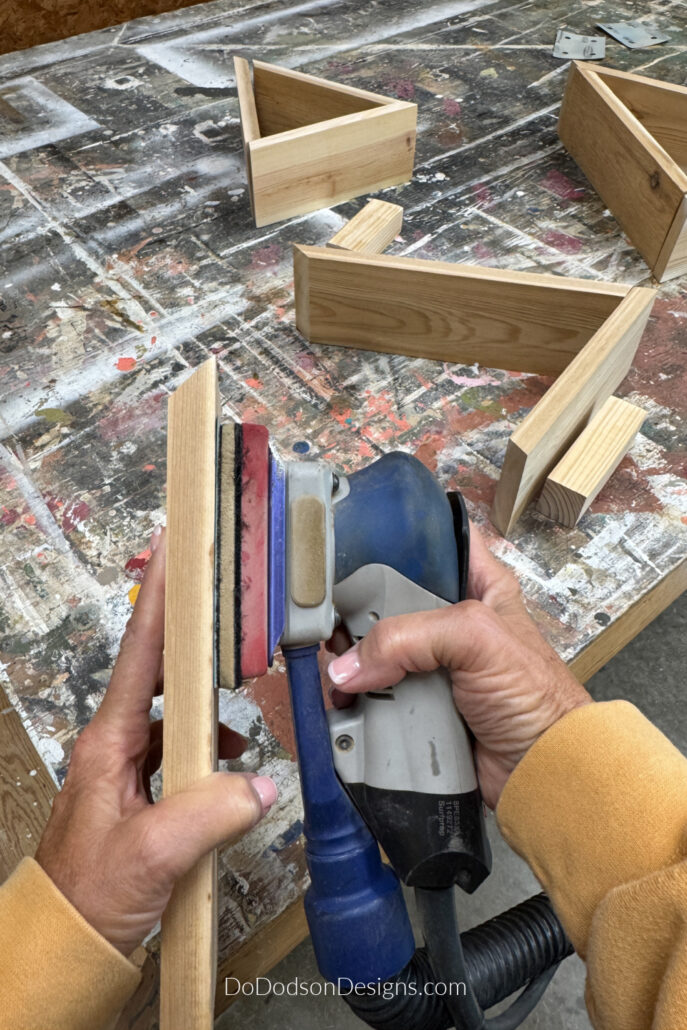
Prep Wood For Paint/Stain
Because I had plans to paint and stain (yes, both) my wood Christmas trees, I made sure the wood’s surface was smooth by sanding first. I started with 180-grit (because the boards I used were rough on one side) and finished with 220-grit.
Wipe away any remaining sawdust with a soft cloth, or you can blow it away—outdoors, of course.
Assembling The Wood Christmas Trees
Using wood glue, add a good amount to each connection piece and hold in place for a few minutes. This should be enough time for the glue to get a bit of a hold.
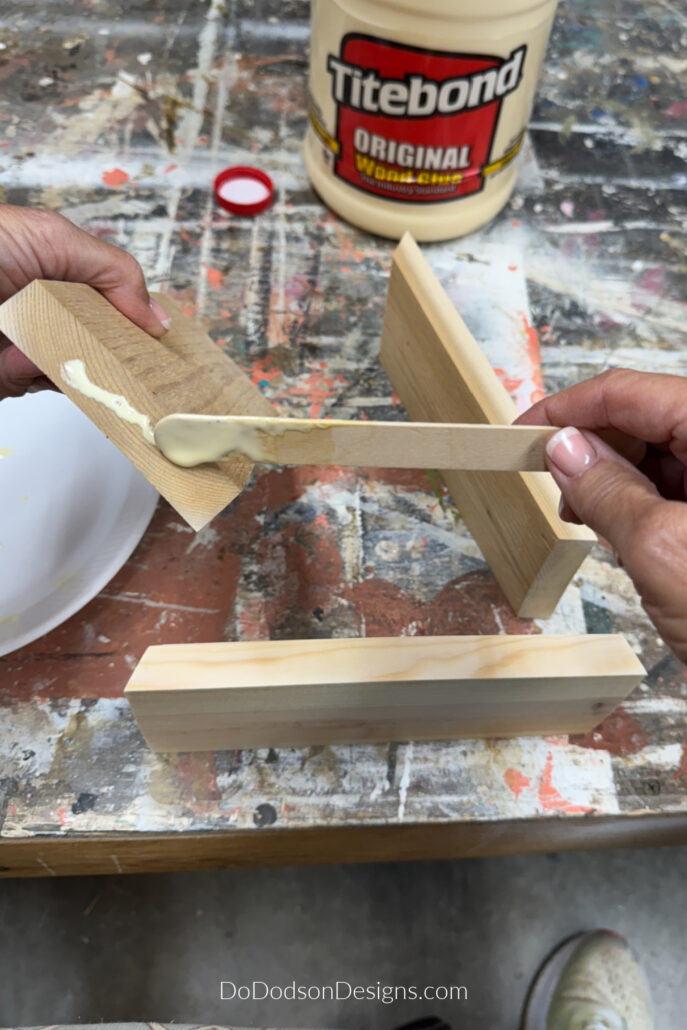
Because I feel wood glue isn’t strong enough on its own, I suggest using a brad nailer (pneumatic or battery-operated) to secure the pieces while the glue is still tacky. Doing this will make for a tight, strong joint.
I used a 1X1 piece of wood to create the base for the trees to sit on. I almost forgot that tidbit.😉 Kinda important.

Paint/Stain Combo Wood Christmas Trees
The fun part of this DIY woodcraft project is that you get to choose. You choose the color and/or style that best represents your home.
For my trees, I chose Dixie Belle’s VooDoo Gel Stain (water-based) in the color Fireside Ash. A beautiful neutral shade that, when used over yellow-toned wood, transforms it into a subtle white-washed wood. It lets the wood grain show right through! I LOVE this look!
It’s simple to use. Brush it on the wood with a paintbrush, then wipe it back (I use paper towels for wood crafts) to reveal that beautiful wood.

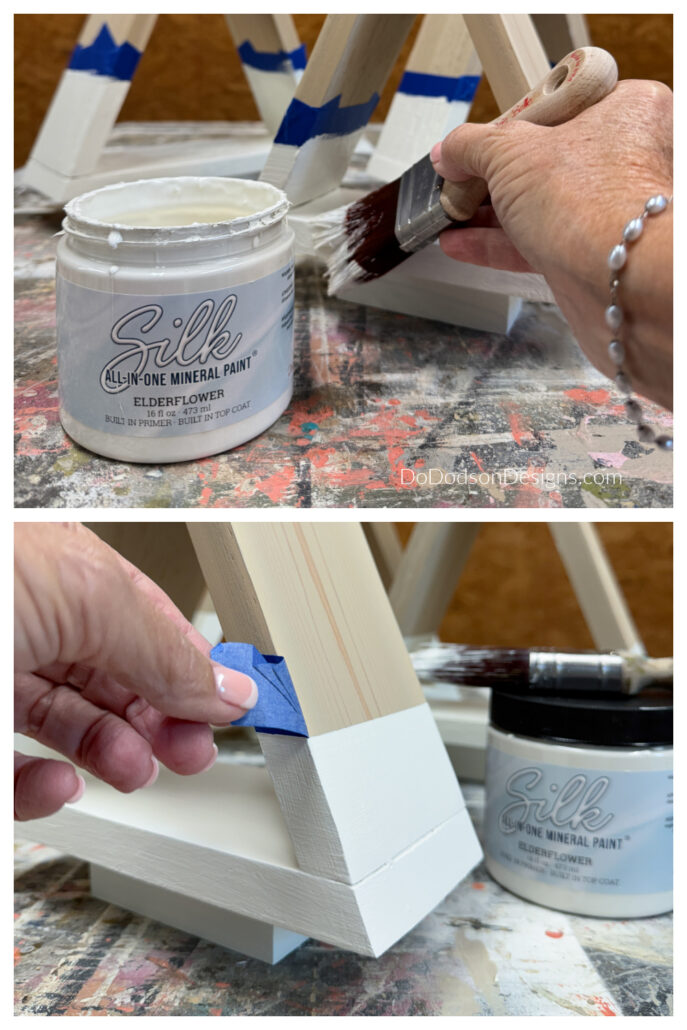
Masking Off For Paint
Once the gel stain is totally dry (leaving it overnight works best!), use painter’s tape to cover the bottom third of the wooden Christmas trees.
Here’s where it’s crucial to have a smooth, wood surface to work on. After applying the painter’s tape, rub it to ensure a good seal with the wood.
You can also apply a clear topcoat at the tape line if you think the paint might bleed under the tape. Doing this will fill in the tiny gaps between the tape and wood. When it dries, it creates a barrier that ensures a clean, crisp paint line once the tape is removed.
Why didn’t I do this? Because I’m a rebel! Just kidding. The wood was smooth enough that I didn’t feel it was necessary, and it wasn’t. It was a judgment call on my part.

I used Elderflower SILK All-In-One Mineral Paint, a complementary color, and applied two coats to the lower third for full coverage, making sure the first coat was completely dry before the second.
If you’ve gotten this far with me, I know you’re a serious woodworking, crafty DIYer extroidinaire. Below are more DIY Christmas wood crafts to inspire you.
Classy Painted Wooden Christmas Trees
The best part of this DIY wood Christmas tree project was pulling off the painter’s tape. OH MY GOSH! Pure satisfaction. The crisp, clean lines that separate the wood from the paint make this Christmas decor super classy! Well, to me, anyway.

Modern Christmas vibes but with a rustic country feel.


I hope you enjoyed this one, and thanks for hanging out while I share this easy, creative way to add some charm to your Christmas decorating!
My brain is on overload with ideas for decorating with these, and my decorating starts TODAY, November 1st! What about you? Do you wait until after Thanksgiving? I think I might have a problem. 🤭
If you dig this project, save it, pin it, and share it with your fave crafting buddy! Let’s spread some holiday cheer! 😃 Don’t forget to say hi in the comment section so that I know you stopped by. I’d love to hear your thoughts, too.
Until the next project… xo, Do